
Best Smart Glasses to Buy in July 2026
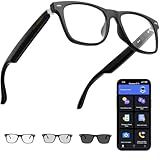
AI Translation Smart Glasses with Chat GPT for Men and Women, Bluetooth Sunglasses with Translator 164 Languages and Color-Change Lens, Music Playback & Hands-Free Calls, UV & Blue Light Protection
- REAL-TIME TRANSLATION FOR 164 LANGUAGES-BREAK LANGUAGE BARRIERS EASILY!
- COMFORT AND STYLE WITH PHOTOCHROMIC LENSES THAT ADAPT TO WEATHER.
- IMMERSIVE AUDIO AND HANDS-FREE CALLING-CONVENIENCE AT YOUR FINGERTIPS!


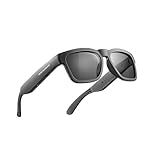
OhO Smart Glasses,Polarized Sunglasses with Bluetooth Speaker,Athletic/Outdoor UV Protection and Voice Control,Unisex (Grey Lens)
- EFFORTLESS VOICE CONTROL FOR MUSIC, CALLS, AND NAVIGATION.
- ENJOY 10 HOURS OF BATTERY LIFE WITH USER-FRIENDLY VOLUME CONTROLS.
- LIGHTWEIGHT, STYLISH DESIGN WITH POLARIZED LENSES FOR OUTDOOR FUN.
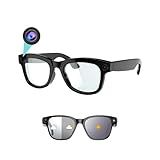
TREEFIA AI Smart Glasses with Camera 2000W AI Real-Time Translation, Bluetooth Audio – Smart Glasses with Camera, Hands-Free Video Recorder for Travel, Sports, Outdoor Use (M01 Pro)
-
1080P HD VIDEO RECORDING: CAPTURE EVERY MOMENT HANDS-FREE IN STUNNING CLARITY.
-
AI TRANSLATION IN 110+ LANGUAGES: COMMUNICATE EFFORTLESSLY GLOBALLY, BREAKING LANGUAGE BARRIERS.
-
BLUETOOTH 5.3 CONNECTIVITY: ENJOY MUSIC AND CALLS WIRELESSLY, PERFECT FOR ACTIVE LIFESTYLES.
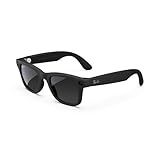
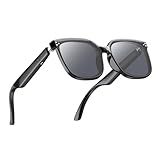
Meta Wayfarer Square Sunglasses, Matte Black/Polarized Gradient Graphite, Regular
- CAPTURE HD PHOTOS AND VIDEOS HANDS-FREE WITH ULTRA-WIDE 12 MP CAMERA.
- ENJOY OPEN-EAR AUDIO FOR CALLS, MUSIC, AND PODCASTS ON THE GO.
- GET REAL-TIME ANSWERS AND SHARE YOUR VIEW SEAMLESSLY WITH OTHERS.
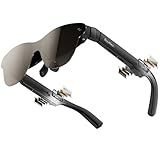
RayNeo Air 3s Pro AR/XR Glasses - 201'' 1200 Nits 120Hz HueView 2.0 Video Display Glasses, Smart Gaming Glasses for iPhone 16,15/Android/Mac/Switch 2/PS5/SteamDeck - Next-Gen Personal Theater
-
EXPERIENCE 1,200 NITS BRIGHTNESS FOR VIVID VISUALS, EVEN IN DARK SCENES!
-
ENJOY A STUNNING 201 VIRTUAL SCREEN FOR ULTIMATE MOVIES AND GAMING!
-
TÜV SÜD CERTIFIED FOR EYE COMFORT-BINGE-WATCH WITHOUT STRAIN!
AI Smart Glasses with Camera, 800W HD Bluetooth Camera Glasses, 1080P Video Recording Sunglasses, Real Time Translation, Voice Assistant, Open-Ear Audio for Travel, Meetings & Vlogging
-
CAPTURE STUNNING MOMENTS WITH 8MP HD CAMERA AND SMOOTH VIDEO STABILIZATION.
-
EFFORTLESSLY TRANSLATE 27 LANGUAGES IN REAL-TIME-NO PHONE NEEDED!
-
ENJOY IMMERSIVE SOUND AND CLEAR CALLS WITH DUAL MICROPHONES AND ENC.
QJF Ai Smart Glasses with Chat GPT, Translation Bluetooth Glasses for Men Women, UV Protection Slidable Color-Change Lens, Open Ear Translator Voice Assistant, for Music Meeting Travel Driving (Blue)
- BREAK LANGUAGE BARRIERS INSTANTLY WITH AI TRANSLATION IN 100+ LANGUAGES!
- SEAMLESS AUDIO/VIDEO CALLS-NO APP DOWNLOAD NEEDED FOR FRIENDS!
- ADJUSTABLE TINT LENSES PROVIDE UV400 PROTECTION AND COMFORT ON THE GO!
Emerhome Gen3 Smart Translation Glasses – Bluetooth Glasses with Dual Temples (Bluetooth+Standard), Real-Time AI Interpreter, Touch Control, Voice Assistant – Lightweight for Travel, Work, Business
- CUSTOMIZABLE STYLE: 4 MODES WITH INTERCHANGEABLE FRAMES AVAILABLE!
- REAL-TIME TRANSLATION: BREAK LANGUAGE BARRIERS EFFORTLESSLY!
- LIGHTWEIGHT COMFORT: DESIGNED FOR ALL-DAY WEAR WITHOUT COMPROMISE!
Hastraith Smart Glasses, 5.3 Bluetooth Sunglasses with Open Ear Speaker, Voice Assistant Compatible, Blue Light Blocking Lens
- EXPERIENCE SEAMLESS CONNECTIVITY WITH BLUETOOTH 5.3 TECHNOLOGY.
- ENJOY HANDS-FREE VOICE CONTROL FOR MUSIC AND SMART ASSISTANCE.
- IMMERSE IN RICH SOUND WITH OPEN SPEAKER DESIGN AND DYNAMIC DRIVERS.
Smart glasses can generally connect to both iPhone and Android devices, although compatibility may vary depending on the brand and model of the glasses. Many smart glasses on the market are designed to be platform-agnostic, meaning they offer Bluetooth connectivity that allows them to pair with both iOS and Android devices. The pairing process often involves using a dedicated app provided by the manufacturer, which can be downloaded from the Apple App Store or Google Play Store. These apps typically facilitate tasks such as software updates, customization of settings, and notifications management. However, the level of integration and available features can differ between iPhone and Android due to the differences in the operating systems. Some smart glasses might offer enhanced functionalities with specific platforms or may have limitations with certain devices. It is always recommended to check the specifications and compatibility listed by the manufacturer to ensure that the smart glasses will work effectively with your particular smartphone.
How to connect smart glasses to Wi-Fi?
Connecting smart glasses to Wi-Fi generally involves going through a few steps that may vary slightly depending on the brand and model of the glasses. Here’s a general guideline you can follow:
- Power On the Glasses: Turn on your smart glasses by pressing the power button until you see the welcome screen or hear a startup sound.
- Access the Settings Menu: Navigate to the settings menu. This could be by using physical buttons, touchpad gestures, or voice commands depending on your model.
- Find the Network or Wi-Fi Settings: In the settings menu, look for “Wi-Fi” or “Network” settings. Select this option to begin scanning for available Wi-Fi networks.
- Scan for Wi-Fi Networks: The glasses should automatically scan and display a list of available Wi-Fi networks. If not, you may have an option to refresh or rescan.
- Select Your Network: Choose your network from the list of available networks. If your network is not visible, you may need to move closer to the router or confirm that the network is broadcasting its SSID.
- Enter the Wi-Fi Password: If prompted, enter the Wi-Fi password. Some smart glasses might have an on-screen keyboard, while others allow you to use a paired smartphone app for easier input.
- Connect: After entering the password, confirm or select “Connect.” Your glasses should then attempt to connect to the network.
- Confirmation: Once connected, you should see a confirmation message or an icon indicating that Wi-Fi is connected.
- Troubleshoot if Necessary: If you encounter issues, check to ensure you entered the password correctly, that you're within range, and that your router is functioning properly. Restarting your glasses and router may also resolve any connection issues.
Remember that specific instructions can vary based on the manufacturer and model. If you’re having trouble, consult the user manual for your device or visit the manufacturer’s support page for detailed guidance.
What is the process for updating smart glasses firmware?
Updating the firmware on smart glasses typically involves several general steps, but the exact process can vary depending on the brand and model. Here’s a general guide to follow:
- Check Compatibility: Ensure your smart glasses are compatible with the latest firmware version. Read the release notes or manufacturer’s website to confirm.
- Power Supply: Fully charge your smart glasses to prevent any interruptions during the update process.
- Download the App: Make sure you have the latest version of the companion app installed on your smartphone or computer. This app is usually required to manage the smart glasses and perform updates.
- Connect Your Device: Connect your smart glasses to your smartphone or computer via Bluetooth or a USB cable, depending on the device’s requirements.
- Check for Updates: Open the companion app and navigate to the settings or support section to check for available firmware updates.
- Download the Firmware: If an update is available, download it through the app. Ensure you have a stable internet connection to avoid interruptions.
- Initiate the Update: Follow the prompts in the app to start the update process. This usually involves selecting the update option and confirming your choice.
- Wait for the Installation: The installation may take several minutes. Do not disconnect your smart glasses or turn off your phone during this time.
- Restart and Verify: Once the update is complete, your smart glasses may automatically restart. Verify the firmware version through the app or device settings to ensure the update was successful.
- Troubleshoot if Necessary: If any issues arise during the update, consult the troubleshooting guide in the user manual or on the manufacturer’s website. You may need to repeat some steps or contact customer support.
Always refer to the specific instructions provided by the manufacturer for the most accurate and safe method to update your smart glasses.
What is augmented reality in the context of smart glasses?
Augmented reality (AR) in the context of smart glasses involves overlaying digital information, such as images, text, or data, onto the wearer's real-world view. This technology enhances the user's perception of their environment by integrating virtual content seamlessly into their field of vision. Here's how AR is applied in smart glasses:
- Display: Smart glasses feature transparent or semi-transparent displays within the lenses, or have projectors that render digital information onto the lenses. This allows users to see digital content without obstructing their view of the real world.
- Interaction: Users can interact with augmented content through touch-sensitive surfaces on the glasses, voice commands, or gesture controls. Some advanced models may also use eye-tracking technology to facilitate interaction.
- Real-time Data Overlay: Smart glasses can provide users with real-time information related to their surroundings. This can include navigation prompts, translations, facial recognition, or contextual data about objects or landmarks.
- Applications: AR smart glasses are used in various fields including healthcare, where they assist surgeons with visual aids during operations; manufacturing, for providing assembly instructions or equipment diagnostics; and retail, offering customers enhanced shopping experiences through virtual try-ons or product information displays.
- Connectivity: These devices often rely on internet connectivity to access cloud-based services and data, which can be updated live to ensure users have the most current information available.
Overall, AR smart glasses aim to enhance productivity, provide immersive experiences, and improve situational awareness by merging the physical and digital worlds in real-time.
How to disconnect smart glasses from a smartphone?
Disconnecting smart glasses from a smartphone can vary depending on the brand and model of your smart glasses, as well as the operating system of your smartphone. However, here are some general steps that you can follow:
For iPhone:
- Open Settings: Go to the "Settings" app on your iPhone.
- Bluetooth Settings: Tap on "Bluetooth" to access your Bluetooth settings.
- Find Your Device: Under "My Devices," find the listing for your smart glasses.
- Disconnect or Forget: To temporarily disconnect, tap the "i" icon next to the device and select "Disconnect." To permanently remove the device so it won’t automatically reconnect in the future, select "Forget This Device" and confirm your choice.
For Android:
- Open Settings: Access the "Settings" app on your Android phone.
- Bluetooth Settings: Find and tap on "Connected devices" or "Connections," then go to "Bluetooth."
- Locate Your Device: You should see a list of paired devices. Find your smart glasses from the list.
- Disconnect or Unpair: To temporarily disconnect, tap on the device and select the option to disconnect. To remove the device completely, tap on the device name and choose "Unpair" or "Forget."
General Tips:
- App Control: Some smart glasses models have dedicated apps, which might also provide an option to disconnect or manage connections. Check if the manufacturer's app offers this feature.
- Power Off: Simply turning off your smart glasses will effectively disconnect them from your smartphone until they are turned back on.
- Factory Reset: If you are returning the glasses or encountering persistent connection issues, consider performing a factory reset on the glasses, which will erase all settings, including the paired device list.
For specific instructions, consult the user manual of your smart glasses or visit the manufacturer’s website for more detailed guidance.
How to reset smart glasses to factory settings?
Resetting smart glasses to factory settings can vary depending on the brand and model you have. However, here are some general steps that can be helpful across various devices:
- Check the User Manual: Start by referring to the user manual or guide that came with your smart glasses. It often contains specific instructions tailored for your model.
- Use the Companion App: Many smart glasses are paired with a companion app on your smartphone or another device. Open the app and navigate to the settings or device management section. Look for an option to reset or restore factory settings.
- Physical Buttons: Some smart glasses have physical buttons for controls. Check if there is a specific button combination you need to press and hold to initiate a reset. Typically, this might involve holding down the power and volume buttons simultaneously for several seconds.
- Settings Menu: If your smart glasses have an onboard settings menu accessible through a display or voice command, navigate through it to locate the reset option.
- Software Update: Ensure that your device’s firmware is up to date. Sometimes restoring to factory settings is a feature only available with the latest software updates.
- Customer Support: If you're unable to find the reset option through the above methods, consider reaching out to the manufacturer's customer support for guidance.
- Online Forums and Support Pages: Some users share troubleshooting tips in forums or online support communities where you might find model-specific instructions.
Always remember that performing a factory reset will erase all data, settings, and apps on the device, reverting it to its original state when first purchased. Ensure you have backed up any important information beforehand.