
Best Solutions for Portable Monitor Issues to Buy in July 2026
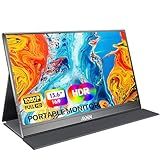
MNN Portable Monitor 15.6inch FHD 1080P USB C HDMI Gaming Ultra-Slim IPS Display w/Smart Cover & Speakers,HDR Plug&Play, External Monitor for Laptop PC Phone Mac (15.6'' 1080P)
-
STUNNING FULL HD DISPLAY: ENJOY LIFELIKE COLORS & DETAIL IN 1920X1080 RESOLUTION.
-
CONVENIENT CONNECTIVITY: DUAL TYPE-C PORTS FOR EASY PLUG & PLAY SETUP.
-
ULTRA SLIM & PORTABLE: LIGHTWEIGHT DESIGN EASILY FITS IN BAGS FOR ON-THE-GO USE.


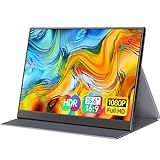
ForHelp 15.6inch Portable Monitor,1080P USB-C HDMI Second External Monitor for Laptop,PC,Mac Phone,PS,Xbox,Swich,IPS Ultra-Thin Zero Frame Gaming Display/Premium Smart Cover
-
SEAMLESS DEVICE COMPATIBILITY: CONNECT EASILY WITH TYPE-C AND HDMI.
-
VIVID FULL HD SCREEN: ENJOY 1920X1080 RESOLUTION FOR STUNNING VISUALS.
-
ULTRA-SLIM & PORTABLE: WEIGHS JUST 1.52LB, PERFECT FOR ON-THE-GO USE.
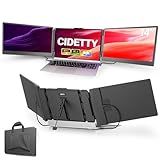
CIDETTY Laptop Screen Extender, 14'' FHD 1080P IPS Ultra-Thin Dual/Triple Monitor Display, HDMI/USB-C Plug-Play Portable Monitor for Laptop, Built-in Speakers(Mac, Win, Android)
- VIBRANT 14 FHD IPS DISPLAY WITH EYE PROTECTION FEATURES.
- UNIVERSAL COMPATIBILITY: WORKS WITH PCS, CONSOLES & MORE!
- ULTRA-SLIM & PORTABLE: PERFECT FOR ON-THE-GO DUAL DISPLAYS.
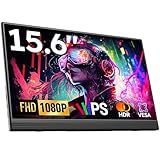
Portable Monitor, 15.6" FHD 1080P Travel Portable Monitor for Laptops, Ultra-Slim External Portable Screen for Laptop with Kickstand, Screen Extender for Laptop PC Mac Phone PS4/5 Xbox Switch
- STUNNING 15.6 FHD 1080P HDR DISPLAY FOR VIBRANT VISUALS!
- PLUG & PLAY: INSTANT SETUP WITH USB-C-NO HASSLE!
- ULTRA-SLIM, LIGHTWEIGHT DESIGN-PERFECT FOR TRAVEL!
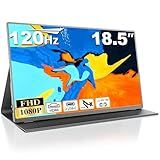
Usparkle 18.5 Inch Large Portable Monitor, 120Hz 1080P FHD IPS Portable Travel Second Screen Display for Laptop/Phone/Xbox PS4/5, 125% sRGB, Dual Speakers, VESA & Smart Cover
-
IMMERSIVE 18.5 FHD DISPLAY: STUNNING VISUALS FOR WORK AND PLAY ANYWHERE.
-
120HZ GAMING READY: SMOOTH, LAG-FREE PERFORMANCE FOR COMPETITIVE GAMERS.
-
UNIVERSAL CONNECTIVITY: QUICK SETUP WITH USB-C AND HDMI FOR ALL DEVICES.
Fixing common issues with a portable monitor can involve several troubleshooting steps. First, ensure that all connections are secure. This includes checking that the HDMI, USB-C, or other relevant cables are properly plugged in and that the ports are free from debris. If the display is not turning on, confirm that the monitor is receiving power. Some portable monitors require external power, so make sure the power source, like a power adapter or the USB connection, is functional. If the monitor is displaying a "No Signal" message, verify that the correct input source is selected in the monitor's menu. For flickering or odd color issues, try using a different cable or port, as these problems can often be due to loose or damaged connections. It's also worth testing the monitor with a different device to rule out a problem with your primary device or its software settings. If the monitor does not respond or has persistent issues, updating or reinstalling the device drivers on your primary device could help. This is particularly relevant if the monitor relies on specific drivers or software to function correctly. Additionally, check the manufacturer’s website for firmware updates for the monitor itself. Issues with touch functionality, if applicable, might be resolved by recalibrating the touch settings or checking compatibility with the device's operating system. If all else fails, consulting the manufacturer's support site, user manual, or customer service for model-specific advice might be necessary.
How do you adjust the brightness on a portable monitor?
Adjusting the brightness on a portable monitor can vary depending on the model and brand, but here are some general steps you can follow:
- Using On-Screen Display (OSD) Menu: Locate the physical buttons on your portable monitor, usually found on the side or bottom edge. Look for a button labeled "Menu" or an icon resembling a menu; press it to access the on-screen display. Navigate through the menu options using the directional buttons (often labeled with arrows) until you find "Brightness" or "Picture Settings." Adjust the brightness level using the appropriate button, often indicated by a plus (+) or minus (-) symbol. Once adjusted, exit the menu by pressing the "Menu" button again or use the "Exit" option in the menu.
- Using Built-in Software: Some portable monitors come with dedicated software or drivers that allow you to adjust settings directly from your connected device (laptop or tablet). Install any drivers or software that might have come with your monitor, if applicable. Open the software and look for a brightness adjustment option.
- Using Automatic Features: Certain advanced portable monitors feature automatic brightness adjustment based on ambient light. Consult your monitor's manual to see if this feature is available and how to activate or deactivate it.
- Refer to the User Manual: If you're having difficulty, consult the user manual provided with your monitor for specific instructions tailored to your model.
- Power or Setting Button: Some monitors have a dedicated “Settings” or "Power" button that can toggle through different brightness presets. Check for such options if available.
Keep in mind that buttons and settings can differ greatly depending on the specific model and manufacturer, so if these steps don't apply, it's best to refer to the manual or manufacturer's website for guidance.
How can you fix a scratched portable monitor screen?
Fixing a scratched portable monitor screen can be a delicate task, and the success largely depends on the severity of the scratch. Here are some methods you might consider trying, but remember to proceed with caution as some actions might void any warranty or further damage the screen:
- Microfiber Cloth and Screen Cleaner: Start by cleaning the screen with a microfiber cloth and a gentle screen cleaner to remove any dirt or debris. This might help in revealing the true extent of the scratch.
- Petroleum Jelly: Apply a small amount of petroleum jelly to the scratch. Gently wipe off the excess with a microfiber cloth, leaving a thin layer in the scratch. This method can fill in minor scratches to make them less noticeable.
- Baking Soda Paste: Mix baking soda with water to form a thick paste. Apply the paste to the scratch using a circular motion with a soft cloth. Gently wipe off the paste with a clean, lightly dampened microfiber cloth.
- Toothpaste: Use a non-gel toothpaste and apply it sparingly to the scratch. Rub it in a circular motion with a soft cloth. Wipe off with a slightly dampened microfiber cloth.
- Polishing Compounds: Use a specialized plastic polish or an LCD screen polishing kit. Follow the product instructions carefully. Use a soft cloth to apply and buff the screen.
- Screen Protector or Repair Kit: Consider applying a screen protector over the screen. It can cover up minor scratches to some extent. Alternatively, use a screen repair kit designed for electronic displays.
- Professional Repair: For deep scratches or if you're not comfortable trying to fix it yourself, consult with a professional repair service. They might be able to polish it out or replace the screen entirely if necessary.
Important Tips:
- Always test any method on a small, inconspicuous area first.
- Do not apply excessive pressure while trying to fix the scratch, as this could damage the display further.
- Review the warranty terms of the monitor before attempting any DIY methods.
If the damage is extensive, it may be worth considering a replacement, especially if the cost of professional repair is close to the price of a new monitor.
How do you fix driver compatibility issues with a portable monitor?
Fixing driver compatibility issues with a portable monitor involves several steps. Here’s a guide to help you resolve these issues:
- Check Connections: Ensure all cables are securely connected. Verify that the correct cable type is used (e.g., USB-C, HDMI).
- Update Operating System: Update your operating system to the latest version, as updates often fix compatibility issues.
- Update or Install Drivers: Identify the Monitor: Find the specific model of your portable monitor. Visit Manufacturer’s Website: Go to the monitor manufacturer's website to download the latest drivers. Install Drivers: Follow instructions to install the updated drivers. Use device manager to check for driver updates: On Windows: Go to Device Manager > Monitors > Right-click your portable monitor > Update driver. On macOS: Use Software Update in System Preferences.
- Check Graphics Card Drivers: Ensure your graphics card drivers are up-to-date. Visit the GPU manufacturer’s website for the latest drivers (e.g., NVIDIA, AMD, Intel).
- USB-C/Thunderbolt Update: If connecting via USB-C, ensure that the USB-C port and drivers are updated. Some manufacturers provide updates for Thunderbolt or USB-C controllers.
- Display Settings Configuration: Adjust display settings in your system settings to ensure the monitor is recognized and configured correctly (resolution, refresh rate).
- Compatibility Mode: If the issue persists, try running the device in compatibility mode: Open the device’s driver properties > Compatibility tab > Run this program in compatibility mode for a previous version of your operating system.
- Check for Conflicting Applications: Some third-party applications could interfere with display drivers. Temporarily disable or uninstall any recent apps to isolate the issue.
- Try a Different Port or Cable: Use a different port or cable to rule out issues with specific hardware connections.
- Reset Monitor Settings: Some monitors have a factory reset option. Consult the manual to reset settings, potentially resolving detection issues.
- Contact Support: If after trying all steps the issue persists, reach out to the monitor manufacturer’s customer support for assistance.
By systematically following these steps, you can usually resolve driver compatibility issues with a portable monitor.