
Best Bluetooth Adapters to Buy in July 2026

TP-Link USB Bluetooth Adapter for PC - Bluetooth 5.4 Dongle Receiver, Plug and Play, Nano Design, EDR & BLE, Supports Windows 11/10/8.1/7 for Desktop, Laptop, Keyboard, Mouse, etc (UB500)
-
LIGHTNING FAST CONNECTIONS: ENJOY 2X FASTER DATA TRANSFER SPEEDS!
-
UNIVERSAL COMPATIBILITY: WORKS WITH A WIDE RANGE OF BLUETOOTH DEVICES.
-
PLUG & PLAY CONVENIENCE: EASY INSTALLATION ON WINDOWS-NO HASSLE!


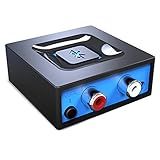
Bluetooth Audio Adapter for Music Streaming Sound System, Esinkin Wireless Audio Adapter Works with Smartphones and Tablets, Bluetooth Receiver for Home Stereo
- SEAMLESS MUSIC STREAMING: CONNECT TO SPEAKERS VIA 3.5MM/RCA CABLES.
- ONE-TOUCH PAIRING: EFFORTLESS SETUP AND AUTO-RECONNECT FEATURE.
- BROAD COMPATIBILITY: WORKS WITH SMARTPHONES, TABLETS, AND STEREO SYSTEMS.
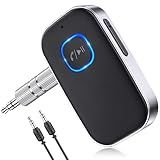
COMSOON Bluetooth Receiver for Car, Noise Cancelling 3.5mm AUX Bluetooth Car Adapter, Wireless Audio Receiver for Home Stereo/Wired Headphones, Hands-Free Call, 16H Battery Life - Black+Silver
-
STREAM MUSIC WIRELESSLY VIA 3.5MM AUX FOR ANY AUDIO SYSTEM!
-
CRYSTAL-CLEAR CALLS WITH INTELLIGENT NOISE REDUCTION TECHNOLOGY.
-
STAY CONNECTED: DUAL PAIRING AND 16 HOURS OF BATTERY LIFE!
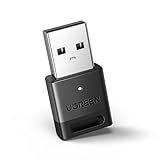
UGREEN USB Bluetooth 5.3 Adapter for PC, Plug & Play for Windows 11/10/8.1, Bluetooth Dongle Receiver for Keyboard/Mouse/Headphone/Speakers/Printer
-
UPGRADE TO BLUETOOTH 5.3 FOR FASTER, MORE RELIABLE CONNECTIONS!
-
CONNECT UP TO 5 DEVICES SIMULTANEOUSLY-NO INTERFERENCE!
-
PLUG AND PLAY DESIGN-NO DRIVERS NEEDED FOR WINDOWS SYSTEMS!
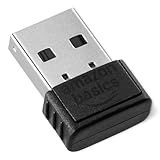
Amazon Basics Bluetooth 5.4 USB Adapter Dongle for PC, USB Receiver for Bluetooth Mouse, Keyboard, Laptop, Windows 11/10/8.1 Compatible
-
INSTANT BLUETOOTH ACCESS: CONVERT ANY PC TO BLUETOOTH WITH USB PLUG!
-
WIDE COMPATIBILITY: SUPPORTS BLUETOOTH 5.4; WORKS WITH WINDOWS 8.1, 10, 11.
-
MULTI-DEVICE CONNECTION: CONNECT UP TO 6 DEVICES SIMULTANEOUSLY WITH EASE!
2026 Upgraded Pro Bluetooth 6.0 Transmitter Receiver|Bluetooth Adapter for TV/Airplane/Gym to Wireless Headphones/All Airpods,Dual Link & Low Latency,Wireless Adapter for Car/Home Stereo
-
LAG-FREE AUDIO: ENJOY CLEAR SOUND FROM ANY DEVICE, ANYWHERE.
-
20+ HOURS PLAYBACK: LONG-LASTING BATTERY FOR ALL-DAY LISTENING.
-
DUAL-LISTENER SYNC: CONNECT TWO DEVICES FOR SHARED AUDIO FUN.
![Nulaxy 54W Bluetooth 5.3 Car Adapter Charger 4-Port Fast Charging [PD36W & QC3.0 18W], Wireless Radio FM Transmitter with Deep Bass Player, 5 Colors LED Backlit, Hands-Free Calling, Support USB Drive](https://cdn.blogweb.me/1/519_DOQ_b5_WL_SL_160_a2f514a8c7.jpg)
Nulaxy 54W Bluetooth 5.3 Car Adapter Charger 4-Port Fast Charging [PD36W & QC3.0 18W], Wireless Radio FM Transmitter with Deep Bass Player, 5 Colors LED Backlit, Hands-Free Calling, Support USB Drive
- FAST 54W CHARGING: POWER MULTIPLE DEVICES EFFICIENTLY, ANYTIME.
- BLUETOOTH 5.3: EXPERIENCE SUPERIOR SOUND AND SEAMLESS CONNECTIVITY.
- SMART VOICE CONTROL: DRIVE HANDS-FREE WITH EASE AND SAFETY.
To enable or disable Bluetooth on a Windows laptop, you can follow these steps:
- Click on the Windows Start button located at the bottom left corner of the screen.
- Type "Device Manager" in the search bar and click on the "Device Manager" application from the search results.
- In the Device Manager window, look for the "Bluetooth" category and click on the arrow next to it to expand the list.
- Right-click on the Bluetooth device listed under the expanded Bluetooth category.
- From the context menu that appears, click on "Disable" to turn off Bluetooth, or "Enable" to turn it on.
- A confirmation dialog box may appear, click "Yes" to continue.
- Close the Device Manager window.
- The Bluetooth on your Windows laptop is now either enabled or disabled, depending on the action you chose.
Please note that the steps may slightly vary depending on the version of Windows you are using.
What is the simplest way to enable Bluetooth on a Windows laptop?
The simplest way to enable Bluetooth on a Windows laptop is by following these steps:
- Open the Start Menu by clicking on the Windows icon in the bottom-left corner of the taskbar.
- Click on the Settings app (Gear icon) from the Start Menu. Alternatively, you can press the Windows key + I on your keyboard to directly open the Settings app.
- In the Settings app, click on the "Devices" category.
- In the left sidebar, select "Bluetooth & other devices".
- On the right side of the window, toggle the Bluetooth switch to turn it on. If it is already on, you can leave it as is.
Once Bluetooth is enabled, you can connect your laptop to Bluetooth devices such as headphones, speakers, smartphones, or any other compatible device.
How to disable Bluetooth temporarily using the network settings on a Windows laptop?
To disable Bluetooth temporarily using the network settings on a Windows laptop, follow these steps:
- Open the "Start" menu by clicking on the "Windows" icon or pressing the "Windows" key on your keyboard.
- Type "Settings" and click on the "Settings" app that appears in the search results.
- In the Settings window, click on the "Devices" option.
- On the left sidebar, click on the "Bluetooth & other devices" section.
- In the right pane, under the "Bluetooth" section, you should see a toggle switch labeled "Bluetooth." Click on the toggle switch to turn off Bluetooth temporarily.
Once you've completed these steps, Bluetooth will be disabled on your Windows laptop. If you want to re-enable it, simply follow the same steps and toggle the switch back on.
How do I enable Bluetooth on a Windows laptop using the control panel?
To enable Bluetooth on a Windows laptop using the control panel, follow these steps:
- Press the Windows key on your keyboard or click on the "Start" button at the bottom left corner of your screen to open the Start menu.
- Type "Control Panel" in the search bar and click on the "Control Panel" desktop app that appears in the search results.
- In the Control Panel, select the "Hardware and Sound" category.
- Under the "Devices and Printers" section, click on "Device Manager" to open the Device Manager window.
- In the Device Manager window, expand the "Bluetooth" or "Bluetooth Radios" category to reveal your Bluetooth devices.
- Right-click on the Bluetooth device you want to enable and select "Enable" from the context menu. If the device is already enabled, it will show the "Disable" option instead.
- By enabling Bluetooth for a Bluetooth adapter, you are effectively turning on Bluetooth connectivity for your laptop. Once enabled, you can then connect other Bluetooth devices to your laptop.
Note: The appearance and organization of the Control Panel and Device Manager may vary slightly based on your version of Windows, but the general steps should remain the same.