
Best Keyboard Vacuums to Buy in July 2026
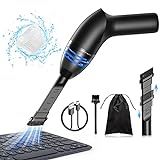
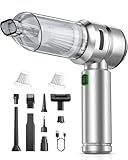
Hayousui 4.3Kpa Keyboard Vacuum Cleaner Mini:Handheld Computer Vacuum Cordless for Car Laptop Sewing Machine Portable Keyboard Vac USB Desk Crumbs Dust Cleaners
- POWERFUL 4.3KPA SUCTION FOR QUICK, EFFICIENT CLEANING ANYWHERE!
- VERSATILE 2-IN-1 NOZZLE TACKLES TIGHT SPACES AND ROUGH SURFACES EASILY!
- REUSABLE HEPA FILTER REMOVES 99.6% DUST FOR A FRESH ENVIRONMENT!


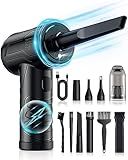
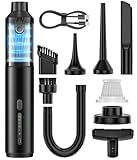
Powerful Compressed Air Duster for Deep Cleaning-Replace Compressed Air Can-No Canned Air Duster-Keyboard Cleaner-PC Cleaning-Rechargeable-3-Speeds-95000RPM Cordless Air Blower-Car Duster 8000mAh
- 3 ADJUSTABLE SPEEDS FOR VERSATILE DEEP CLEANING EFFICIENCY
- POWERFUL 95,000 RPM BLOWER FOR DUST-FREE EQUIPMENT MAINTENANCE
- 2-IN-1 DUST BLOW & VACUUM WITH MULTIPLE NOZZLES FOR CONVENIENCE
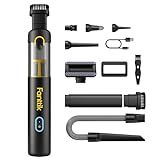
Meudeen Air Duster - Computer Vacuum Cleaner - for Keyboard Cleaning- Cordless Canned Air- Powerful - Energy-Efficient(Air-01)
-
3-IN-1 FUNCTIONALITY: VACUUM, BLOW, AND PUMP AIR IN ONE HANDY DEVICE!
-
VERSATILE ACCESSORIES: 6+ COMBINATIONS FOR CLEANING EVERY NOOK AND CRANNY.
-
POWERFUL & COMPACT: SMALL DESIGN, STRONG 120W SUCTION FOR EFFICIENT CLEANING.
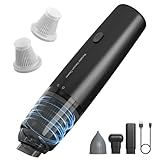
A9life Handheld Vacuum Cordless, Car Vacuum Cleaner Portable with HEPA Filter, 2 Suction Modes, Mini Hand Held Vacuum Rechargeable for Car, Home, Pet Hair, Office, Desk, Keyboards (Black)
-
ULTRA-LIGHTWEIGHT DESIGN: JUST 0.72 LBS FOR EASY, ONE-HANDED CLEANING!
-
POWERFUL SUCTION MODES: ECO/MAX SETTINGS TACKLE ANY MESS IN SECONDS!
-
VERSATILE CLEANING TOOLS: 3 SPECIALIZED ATTACHMENTS FOR EVERY SURFACE!
VNOST Car Vacuum,3 Suction Modes,Portable Mini Cordless Cleaner with 24000pa Suction Power,Type-C Charge,Handheld Vacuum for Home,Car, Office Desk, Keyboards(Dark Silver)
-
24000PA SUCTION POWER: EFFORTLESSLY TACKLES DUST AND DEBRIS WITH EASE.
-
4-IN-1 VERSATILITY: VACUUM, BLOW, INFLATE, AND EXTRACT WITH ONE DEVICE.
-
QUICK CHARGE & LONG RUNTIME: 30-MINS OF USE WITH FAST, CONVENIENT CHARGING.
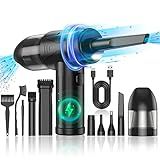
Car Vacuum Portable Cordless Handheld Vacuum Cleaner 4-in-1 Mini Cordless Vacuum with 2 Suction Modes and 16800pa Suction Power Blowing & Inflating 2 Modes Handheld Vacuum for Car, Desk, Keyboards
- VERSATILE 4-IN-1 FUNCTIONALITY: VACUUM, BLOW, INFLATE, AND SUCTION.
- POWERFUL 16.8KPA SUCTION: EASILY TACKLES DUST, SAND, AND DEBRIS.
- ULTRA-LIGHT & PORTABLE DESIGN: WEIGHS ONLY 1 LB FOR EASY HANDLING.
Fanttik Slim V8 APEX Car Vacuum, 4-in-1 Portable Mini Cordless Vacuum with 19000pa Suction Power, Type-C Charge, 2 Suction Modes, Handheld Vacuum for Small Jobs, Car, Office Desk, Keyboards (Black)
-
COMPACT & LIGHTWEIGHT: WEIGHS ONLY 1.1LBS FOR EASY ONE-HANDED USE.
-
4-IN-1 FUNCTIONALITY: INCLUDES ACCESSORIES FOR VACUUMING, BLOWING, INFLATING.
-
POWERFUL SUCTION: 19000PA SUCTION AND 2 MODES FOR QUICK DEBRIS CLEANUP.
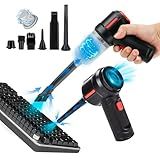
TRANSWARRIOR Electric Air Duster & Vacuum Cleaner 2-in-1, 110000RPM Keyboard Cleaner for PC, No Canned Air - Compressed Air Duster, Blower, Turbo Fan, Battery Powered, Refillable, PC Cleaning Kit
-
ECO-FRIENDLY SOLUTION: REUSABLE AIR DUSTER SAVES MONEY AND THE PLANET.
-
POWERFUL CLEANING: HIGH-PRESSURE AIRFLOW REMOVES DUST FROM ANY DEVICE.
-
VERSATILE & COMPACT: MULTI-USE IN TIGHT SPACES; LIGHTWEIGHT DESIGN FOR PORTABILITY.
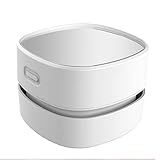
ODISTAR Desktop Vacuum Cleaner, Mini Table dust Sweeper Energy Saving,High Endurance up to 90 mins,Cordless&360º Rotatable Design for Keyboard/Home/School/Office(White AA Battery)
- CORDLESS & BATTERY-POWERED: CLEAN ANYWHERE WITH 90-MIN BATTERY LIFE!
- 360º ROTATABLE DESIGN: REACH EVERY CORNER EASILY FOR THOROUGH CLEANING.
- HIGH SUCTION, LOW NOISE: POWERFUL YET QUIET-PERFECT FOR ANY SETTING!
When looking for a keyboard vacuum, you should consider a few key features to ensure it effectively meets your needs. First, consider the vacuum's suction power as this will determine its ability to pick up dust and debris from between the keys. Next, pay attention to the size and portability of the vacuum; a compact and lightweight design is ideal for cleaning tight spaces and making storage easy. The vacuum's power source is another important factor-whether it's battery-operated, USB-powered, or rechargeable, each offers different levels of convenience. Also, check for a variety of nozzle attachments that can help target difficult-to-reach areas. Additionally, consider whether the vacuum has an easy-to-clean dust bin to simplify maintenance. Lastly, noise level might be a concern for some users, so you may want a model that operates quietly if you're using it in a shared or noise-sensitive environment.
How to decide between a wired and a wireless keyboard vacuum?
Deciding between a wired and a wireless keyboard vacuum involves evaluating several factors related to your specific needs and preferences. Here's a guide to help you make an informed decision:
- Portability and Convenience: Wireless: Offers greater mobility and convenience as there are no cords to manage. Ideal if you prefer a clutter-free setup or need to clean keyboards in different locations frequently. Wired: Typically tethered to a power source, limiting mobility. However, the lack of batteries means you don’t need to worry about charging.
- Power and Performance: Wireless: May have less suction power compared to wired models, although technology is improving. Consider battery life; look for models with good reviews on battery performance. Wired: Generally provides consistent power and might offer stronger suction, as they’re not limited by battery capacity.
- Usage Frequency: Wireless: Better suited for occasional or moderate use, especially if you value convenience over power. Wired: Well-suited for regular or heavy-duty use, assuming the environment allows easy access to a power outlet.
- Battery Life and Charging: Wireless: Check the battery life and how long it takes to recharge. Opt for models with a long-lasting battery if you plan on using it frequently. Wired: No concerns about battery life or recharging; it's ready to use at all times as long as it’s plugged in.
- Cost: Wireless: Can be more expensive due to the added technology for portability. Factor in potential additional costs for battery replacement in the long term. Wired: Typically less expensive initially, though power consumption over time should be considered.
- Environment: Wireless: Suitable for environments where outlets are scarce or hard to reach. Wired: Ideal for areas where you have easy access to power outlets and the vacuum won't need to be moved far.
- Durability and Maintenance: Wireless: Check reviews for durability, as battery degradation might be a concern over time. Ensure that replacement batteries or accessories are available. Wired: Often more straightforward regarding maintenance since there are fewer components that can fail, such as batteries.
Make sure to also read user reviews and expert ratings to gauge the reliability and effectiveness of specific models you're considering. This can provide insight into real-world performance and help guide your decision.
How to troubleshoot common issues with keyboard vacuums?
Troubleshooting common issues with keyboard vacuums involves a few systematic steps. Here's a guide to help you identify and potentially resolve common problems:
- Vacuum Not Turning On: Check Power Source: Ensure the vacuum is adequately charged if it's cordless, or securely connected if it's wired. Inspect Battery: For cordless devices, check if the battery is properly inserted and fully charged. Replace if necessary. Test Outlet: If plugged in, verify the electrical outlet is working by testing it with another device. Check Power Button: Ensure the power button is not stuck and is functioning correctly.
- Weak Suction: Filter Blockage: Clean or replace the air filter. A clogged filter can significantly reduce suction power. Clogged Nozzle or Hose: Inspect and clear any debris from the nozzle, hose, or intake. Full Dust Container: Empty the dust container regularly to maintain optimal suction.
- Strange Noises: Loose Parts: Check for any parts that may have come loose. Tighten screws or fittings as needed. Debris Inside Motor: Look for and remove any trapped debris around the motor area. Worn Components: Inspect for signs of wear on moving parts such as the fan or bearings.
- Overheating: Continuous Use: Allow the vacuum to cool down if it has been used continuously for an extended period. Blocked Airflow: Ensure there are no obstructions in the air vents. Faulty Motor: If the problem persists, the motor might be malfunctioning and may require professional repair or replacement.
- Battery Issues (Cordless Models): Battery Age: Batteries have a limited lifespan. Consider replacing an older battery. Improper Charging: Use the correct charger and follow the manufacturer’s instructions for charging.
- Attachments Not Working Properly: Compatibility: Make sure you are using compatible attachments. Damage or Wear: Inspect for cracks or damages and replace if needed.
- LED/Indicator Lights Malfunctioning: Reset Device: Try resetting the vacuum if it has a reset option or turn it off and on again. Battery Check: Ensure sufficient power for LED functionality.
- Unpleasant Odors: Clean Filters and Dust Traps: Regular cleaning can prevent odors from developing. Inspect for Foreign Objects: A trapped item may be causing the smell.
If none of these steps resolve the issue, refer to the user manual or contact the manufacturer for further assistance. In some cases, especially with electrical or complex mechanical issues, professional servicing may be necessary.
What is a handheld keyboard vacuum?
A handheld keyboard vacuum is a small, portable vacuum cleaner specifically designed for cleaning keyboards and other small or delicate electronic devices. These vacuums are typically compact, lightweight, and easy to maneuver, allowing users to easily reach between keys and other tight spaces where dust, crumbs, and debris tend to accumulate. They often come with various attachments, such as brush nozzles or crevice tools, to enhance cleaning effectiveness and precision. In addition to keyboards, these vacuums can be used on other small electronics and surfaces, making them versatile tools for maintaining a clean workspace.
How to clean the filters in a keyboard vacuum?
Cleaning the filters in a keyboard vacuum is an important maintenance step to ensure its efficiency and longevity. Here's a general guide you can follow:
- Refer to the Manual: Before starting, check the user manual for specific instructions related to your particular model, as procedures can vary slightly.
- Unplug or Power Off: Ensure the vacuum is turned off and unplugged if it's corded, or remove any batteries if it's cordless.
- Remove the Dust Container: Open the vacuum and take out the dust container or dust cup. This usually involves pressing a release button or twisting the container off.
- Access the Filter: Locate the filter. It might be inside the dust container or in a separate compartment. Some models have multiple filters, including pre-filters and HEPA filters.
- Remove the Filter: Carefully take out the filter. Note how it fits or take a picture, so you can easily replace it later.
- Tap Off Loose Dust: Gently tap the filter on the side of a trash can to remove any loose dust and debris.
- Wash the Filter: If the filter is washable, rinse it under lukewarm running water. Don’t use soap unless specified in the manual. Gently squeeze it but avoid wringing to prevent damage.
- Dry the Filter: Let the filter air dry completely before reinstalling it. This can take several hours, so plan accordingly. Do not use heat sources like hair dryers to speed up drying as it may cause damage.
- Clean the Dust Container: While the filter is drying, you can also wash the dust container with water and mild soap if needed. Make sure it’s fully dry before reassembly.
- Reassemble the Vacuum: Once everything is dry, replace the filter and dust container back into the vacuum. Ensure everything is secured properly.
- Power On/Test: Power on the vacuum to ensure it's working correctly and that the cleaning has been successful without any air leaks or unusual sounds.
If your vacuum has a HEPA or non-washable filter, refer to the manual for replacement instructions. These types of filters typically need to be replaced after a certain number of uses or months.
How to evaluate the noise level of a keyboard vacuum?
Evaluating the noise level of a keyboard vacuum involves several steps:
- Check Product Specifications: Most manufacturers provide the noise level of their vacuum cleaners in decibels (dB) in the product specifications. Look for this information to get an initial understanding of the noise output.
- Read Reviews: Customer reviews can provide insights into the real-world noise levels of a keyboard vacuum. Look for comments that mention the noise, and compare across different models.
- Watch Videos: Online video reviews can be helpful in assessing the noise level. Videos where the vacuum is in use will give you a sense of how loud it sounds compared to the environment or voiceover.
- Decibel Meter Apps: If you already own the vacuum or have access to one, you can use a decibel meter app on your smartphone to measure the noise level directly. These apps will give you a decibel reading that can help quantify loudness.
- Consider the Environment: Noise perception can be affected by the environment in which the vacuum is used. Using it in a quiet room might make it seem louder than in a busy office.
- Compare with Other Devices: If possible, compare the noise level of the keyboard vacuum with other common household noises (e.g., hairdryer, regular vacuum cleaner) to get a sense of its loudness relative to everyday sounds.
- Test Run: If you can, conduct a test run of the vacuum in-store or borrow one from a friend to personally assess the noise level.
By considering these factors, you can have a comprehensive understanding of the noise level of a keyboard vacuum.
How to determine the weight suitability of a keyboard vacuum?
Determining the weight suitability of a keyboard vacuum involves considering several factors to ensure it's comfortable and practical for your needs. Here's how you can assess its suitability:
- Purpose and Usage: Consider how often you'll use the vacuum. If it's for occasional cleaning, a slightly heavier model might be acceptable. For frequent use, prioritize a lightweight model.
- Ease of Handling: Test the vacuum's ergonomics if possible. Make sure it's easy to maneuver around the keyboard and doesn't cause strain on your wrist or arm during extended use.
- Portability: If you plan to carry the vacuum around, for example, between different workstations or locations, a lighter model would be more practical.
- User Strength: Personal strength and comfort levels are important. What might be light for one person could be heavy for another. Choose a weight that suits your comfort level.
- Efficiency: Ensure that the vacuum's weight does not compromise its efficiency. A balance between weight and suction power is critical to ensure effective cleaning.
- Specifications: Check the product specifications. A weight range of 1-2 pounds is generally manageable for most users, but personal preference is key.
- Alternative Options: Consider other cleaning methods or tools for comparison to ensure you're choosing the most suitable weight for the desired level of cleaning efficiency.
- Customer Reviews: Look at customer reviews to gather insights into how others feel about the vacuum's weight and handling. Users often comment on how easy or difficult a product is to use.
- Testing: If possible, physically test the vacuum to gauge its weight suitability. Retailers may allow a demo, or you might find one in a library of commonly used office tools.
Assess these factors to choose a keyboard vacuum that is both comfortable to use and effective in cleaning, without causing unnecessary strain or inconvenience.