
Best Mechanical Keyboards to Buy in July 2026
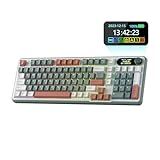
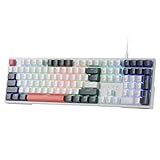
RK ROYAL KLUDGE S98 Mechanical Keyboard w/Smart Display & Knob, Top Mount 96% Wireless Mechanical Keyboard BT/2.4G/USB-C, Hot Swappable, Software Support, Creamy Sounding, 98 Keys
- VERSATILE DISPLAY: CUSTOMIZABLE SCREEN SHOWS GIFS, STATUS, AND MORE!
- EFFORTLESS CONTROL: KNOB DESIGN ADJUSTS SETTINGS WITH A SIMPLE TWIST.
- FLEXIBLE CONNECTIVITY: CHOOSE BT5.0, 2.4G, OR USB-C FOR ULTIMATE FREEDOM!


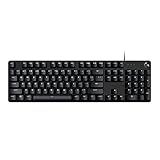
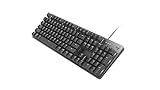
Logitech G413 SE Full-Size Mechanical Gaming Keyboard - Backlit Keyboard with Tactile Mechanical Switches, Anti-Ghosting, Compatible with Windows, macOS - Black Aluminum
- DURABLE PBT KEYCAPS RESIST WEAR FOR LONG-LASTING GAMING PERFORMANCE.
- TACTILE MECHANICAL SWITCHES DELIVER SWIFT AND RELIABLE KEY RESPONSE.
- SLEEK ALUMINUM DESIGN WITH CUSTOMIZABLE WHITE LED BACKLIGHTING.
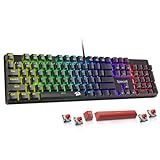
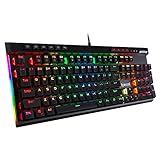
Redragon Mechanical Gaming Keyboard Wired, 11 Programmable Backlit Modes, Hot-Swappable Red Switch, Anti-Ghosting, Double-Shot PBT Keycaps, Light Up Keyboard for PC Mac
- CUSTOM AMBIANCE: 11 BACKLIGHT OPTIONS & ADJUSTABLE BRIGHTNESS FOR MOOD.
- MACRO FLEXIBILITY: REMAP KEYS FOR OPTIMIZED PRODUCTIVITY & GAMING.
- SMOOTH PERFORMANCE: HOT-SWAPPABLE SWITCHES FOR SEAMLESS GAMEPLAY.
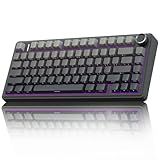
AULA F75 Pro Wireless Mechanical Keyboard,75% Hot Swappable Custom Keyboard with Knob,RGB Backlit,Pre-lubed Reaper Switches,Side Printed PBT Keycaps,2.4GHz/USB-C/BT5.0 Mechanical Gaming Keyboards
-
VERSATILE CONNECTION OPTIONS: CONNECT TO 5 DEVICES VIA BLUETOOTH, USB, OR 2.4GHZ.
-
CUSTOMIZABLE HOT-SWAP DESIGN: EASILY DIY YOUR KEYBOARD WITH SWITCH REPLACEMENTS.
-
VIBRANT RGB LIGHTING: ENJOY 16.8 MILLION COLORS AND 10 MUSIC RHYTHM EFFECTS.

AULA F99 Wireless Mechanical Keyboard,Tri-Mode BT5.0/2.4GHz/USB-C Hot Swappable Custom Keyboard,Pre-lubed Linear Switches,RGB Backlit Computer Gaming Keyboards for PC/Tablet/PS/Xbox
- CONNECT UP TO 5 DEVICES EASILY: SWITCH BETWEEN WORK, GAMING, AND STUDY.
- CUSTOMIZE WITH HOT-SWAPPABLE KEYS: REPLACE SWITCHES WITHOUT SOLDERING HASSLE.
- VIBRANT RGB & MACROS FOR GAMERS: ENHANCE YOUR GAMEPLAY WITH CUSTOMIZABLE EFFECTS.
Redragon K668 RGB Gaming Keyboard, 108 Keys Wired Mechanical Keyboard w/Extra 4 Hotkeys, Sound Absorbing Foams, Upgraded Hot-swappable Socket, Mixed Color Keycaps x 2 Sets, Red Switch
- HOT-SWAPPABLE RED SWITCHES: CUSTOMIZE TYPING WITH EASE AND NOISE-FREE CLICKS!
- FULL SIZE 108 KEYS LAYOUT: ENJOY ANTI-GHOSTING WITH ADDED SHORTCUT KEYS!
- VIBRANT GROOVY RGB: ELEVATE YOUR SETUP WITH DYNAMIC LIGHTING EFFECTS!
Logitech K845 Mechanical Illuminated Keyboard, Strong Adjustable Tilt Legs, Full Size, Aluminum Top Case, 104 Keys, USB Corded, Windows (TTC Brown Switches)
- ADJUSTABLE TILT FOR OPTIMAL TYPING COMFORT IN ANY POSITION.
- CUSTOMIZABLE SWITCH OPTIONS FOR PERSONALIZED SOUND AND FEEDBACK.
- SLEEK ALUMINUM DESIGN COMBINES DURABILITY WITH GAMING MECHANICS.
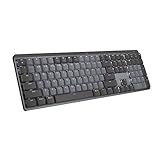
Logitech MX Mechanical Wireless Illuminated Performance Keyboard, Tactile Quiet Switches, Backlit Keys, Bluetooth, USB-C, macOS, Windows, Linux, iOS, Android, Metal, Graphite
- TACTILE QUIET SWITCHES: ENJOY SATISFYING FEEDBACK WITH REDUCED NOISE.
- SMART ILLUMINATION: BACKLIT KEYS AUTO-ADJUST FOR OPTIMAL VISIBILITY.
- MULTI-DEVICE CONTROL: SEAMLESSLY CONNECT TO 3 DEVICES ACROSS OS.
Redragon K580 VATA RGB LED Backlit Mechanical Gaming Keyboard with Macro Keys & Dedicated Media Controls, Hot-Swappable Socket, Onboard Macro Recording (Blue Switches)
EPOMAKER x Aula F75 Gasket Mechanical Keyboard, 75% Wireless Hot Swappable Gaming Keyboard with Five-Layer Padding&Knob, Bluetooth/2.4GHz/USB-C, RGB (Light Blue, LEOBOG Reaper Switch)
- 75% COMPACT DESIGN: PERFECT FOR STREAMLINED WORKSPACES!
- QUIET, RESPONSIVE TYPING WITH INNOVATIVE FIVE-LAYER PADDING!
- THREE CONNECTIVITY OPTIONS & 4000MAH BATTERY FOR ULTIMATE FLEXIBILITY!
Mechanical keyboards are often more expensive than regular membrane keyboards due to several factors. The mechanical switches used in these keyboards, which provide tactile feedback and durability, are costlier to produce compared to the rubber dome switches found in regular keyboards. Additionally, mechanical keyboards often feature higher build quality, customizable keycaps, and advanced features such as programmable keys and backlighting, all of which contribute to their higher price. Enthusiast brands and niche markets for mechanical keyboards also tend to drive up prices due to low-volume production and specialized components. However, prices can vary significantly within the mechanical keyboard market, and budget options are available for consumers who seek the benefits of mechanical switches at a lower cost.
How to program macros on a mechanical keyboard?
Programming macros on a mechanical keyboard can greatly enhance your productivity and gaming experience by automating repetitive tasks. The process varies depending on your keyboard brand and model, but here are some general steps to help you get started:
- Check Keyboard Support: Ensure your mechanical keyboard supports macro programming. Check the user manual or the manufacturer’s website for confirmation.
- Install Software: Download and install the configuration software provided by your keyboard’s manufacturer. Popular brands like Razer, Corsair, Logitech, and SteelSeries offer such software (e.g., Razer Synapse, Corsair iCUE, Logitech G HUB).
- Open the Software: Launch the software after installation. Your keyboard should be automatically detected if it’s properly connected to your computer.
- Create a Profile: Many software solutions allow you to create specific profiles for different applications or games. This can help organize your macros based on context.
- Locate the Macro Section: Within the software, find the 'Macro' or 'Key Assignment' section. The location and naming might differ between software.
- Record the Macro: Select the option to 'Record' or 'Create' a new macro. You typically get the option to record keystrokes, mouse actions, and delays. Perform the actions you wish to record. Pay attention to the recording of delays between actions if necessary.
- Edit the Macro: After recording, you can often edit the sequence. You can adjust delays, add/remove keystrokes, or reorder actions.
- Assign the Macro: Once the macro is created, assign it to a specific key or a dedicated macro key on your keyboard. This can usually be done by selecting the key on an on-screen keyboard in the software and choosing the macro from a list.
- Save and Test: Save your profile or changes. Make sure to test your macro in the intended application to ensure it works as expected.
- Keyboard Hardware Programming (If Supported): Some keyboards, especially those with onboard memory, allow you to program macros directly using specific key combinations. Check your keyboard’s manual for such methods if software isn’t preferred.
- Backup Your Macros: It’s a good idea to back up your profiles and macros periodically, especially if you’ve invested a lot of time into programming them.
- Consult the Manual: Different keyboards might offer unique features related to macros. Always refer to the user manual for additional functionalities or troubleshooting.
If your keyboard doesn't support programming macros through software or onboard memory, you might need to look into third-party software solutions, although they might not be as reliable or feature-rich.
How to maintain a mechanical keyboard?
Maintaining a mechanical keyboard involves regular cleaning and care to ensure its longevity and optimal performance. Here’s a step-by-step guide to help you maintain your mechanical keyboard:
Regular Cleaning
- Dusting: Frequency: Weekly Method: Use a can of compressed air to blow dust out from between the keys. Hold the keyboard at an angle and make sure to focus the air under the keys to dislodge debris.
- Surface Wiping: Frequency: Weekly or as needed Method: Use a microfiber cloth dampened with a bit of isopropyl alcohol to clean the keycaps and the casing of the keyboard. Avoid getting moisture into the switches.
Deep Cleaning
- Removing Keycaps: Frequency: Every 3-6 months Method: Use a keycap puller to gently remove the keycaps. Lift them straight up to avoid bending the stems. Be careful with larger keys like the spacebar, which may have stabilizers underneath.
- Washing Keycaps: Method: Soak the keycaps in warm soapy water for about an hour. Use a brush to remove any stubborn grime. Rinse them well and allow them to dry completely before reinstallation.
- Cleaning the Switches and Board: Method: Use a soft brush or a clean microfiber cloth to remove dust and debris from the exposed switches and the board itself. Be cautious not to damage any of the components.
- Reassembling: Ensure that everything is completely dry before reassembling the keyboard. Reattach the keycaps, aligning them properly with the switches.
Additional Maintenance Tips
- Switch Lubrication: Frequency: Annually or as needed Method: If your switches feel scratchy or sticky, you may need to lubricate them. This requires desoldering the switches and applying a suitable lubricant. This is a more advanced operation that might void warranties; proceed with caution.
- Avoiding Liquids: Keep drinks and other liquids away from your keyboard to prevent spills that can damage the mechanical switches or circuit board.
- Cable Management: Keep the cable organized and avoid bending it excessively to prevent damage. Consider using cable sleeves or cable clips for better management.
- Stabilizer Care: If you notice rattling in larger keys like the spacebar, you may need to lubricate the stabilizers as well. This can improve the feel and sound of the key presses.
- Overall Handling: When moving the keyboard, handle it gently and avoid dropping it, as this can damage switches or the circuit board.
By following these steps and maintaining a regular cleaning schedule, you’ll ensure your mechanical keyboard performs well and lasts for many years.
What are the disadvantages of mechanical keyboards?
Mechanical keyboards have several advantages, but they also come with a few disadvantages that might be worth considering:
- Cost: Mechanical keyboards can be significantly more expensive than their membrane counterparts. The individual switches and higher-quality materials contribute to the increased price.
- Noise: Depending on the type of switches used, mechanical keyboards can be quite noisy. Some people find the clickiness satisfying, while others may find it disruptive, especially in shared or quiet environments.
- Weight and Size: Mechanical keyboards are typically bulkier and heavier than membrane keyboards, which may not be ideal for portability or if desk space is limited.
- Maintenance: Due to their construction, mechanical keyboards may require more maintenance. Dust and debris can get caught between the keys, necessitating regular cleaning to maintain optimal performance.
- Complexity of Repairs: If a key switch fails, repair can be more complex and costly compared to simply replacing a membrane keyboard. It might involve soldering for those not using hot-swappable switches.
- Learning Curve: For those used to membrane keyboards, the transition to a mechanical keyboard can take some getting used to, especially in terms of key feel and actuation force.
- Energy Consumption: Mechanical keyboards may consume more power than membrane keyboards, especially if they include extra features like backlighting or programmable keys, which may be a consideration for wireless models.
- Variety Overload: The wide variety of switches, each with different tactile feelings and sounds, can be overwhelming for those new to mechanical keyboards, making it hard to choose the right one.
These disadvantages may be outweighed by the benefits for some users, but it's important to weigh them against personal preferences and needs.
What is the noise level of mechanical keyboards compared to regular keyboards?
Mechanical keyboards are generally noisier than regular membrane or scissor-switch keyboards, primarily due to their design. Each key on a mechanical keyboard uses a separate mechanical switch, which can produce distinct sounds when pressed. The noise level varies based on the type of switch used:
- Clicky switches (e.g., Cherry MX Blue, Razer Green) are purposely designed to produce a loud clicking sound, which can be satisfying for some users but may be disruptive in shared environments.
- Tactile switches (e.g., Cherry MX Brown) provide tactile feedback but are quieter than clicky switches. They still produce some noise, mainly from the key return action.
- Linear switches (e.g., Cherry MX Red, Black) are generally the quietest of the mechanical switch types, as they do not have a tactile bump or audible click. However, they can still be louder than membrane keyboards due to the sound of the key bottoming out.
In comparison, regular keyboards, such as those with membrane or scissor-switch mechanisms, tend to be quieter because they have fewer moving parts and simpler key mechanisms. They often produce a more muted sound when typing.
Overall, while mechanical keyboards can offer a better typing experience, they are typically louder than regular keyboards. For users concerned about noise, options such as using O-rings (dampening rings) or selecting quieter switch types can help reduce the sound.