
Best Mechanical Keyboard Keycaps to Buy in July 2026
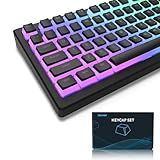
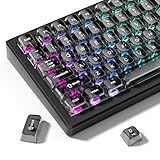
Womier Pudding Keycaps, PBT Shine Through Keycaps 165 Keys Set Custom Key caps Set OEM Profile, Universal Compatiability for 100%, 75%, 65%, 60% Keyboard-Black
-
WIDE COMPATIBILITY: FITS MOST MECHANICAL KEYBOARDS, RAZER, CORSAIR, & MORE!
-
DURABLE PBT MATERIAL: RESISTANT TO WEAR WITH A PREMIUM TEXTURED FINISH.
-
ENHANCED RGB EFFECTS: TRANSLUCENT DESIGN AMPLIFIES BACKLIGHT BRILLIANCE!


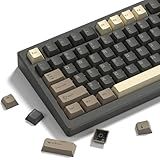
Womier Double Shot PBT Keycaps Set 138 Keys, Cherry Profile Custom Keycaps 60 65 75 100 Percent for 61/64/68/84/87/100/104/108 Retro Gaming Mechanical Keyboard, Brown Gray
- BUILT TO LAST: DURABLE PBT KEYCAPS RESIST WEAR, OIL, AND SCRATCHES.
- TIMELESS COMFORT: CHERRY PROFILE OFFERS A NATURAL TYPING EXPERIENCE.
- VERSATILE FIT: SUITABLE FOR ANY KEYBOARD SIZE-60%, 75%, OR 100%.
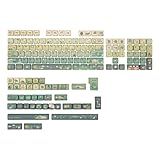
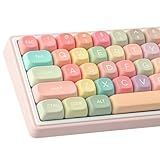
KiiBoom X Cosydiaries Rainy Froggy Day Keycap Set, 144 Keycaps, PBT Custom Keycaps for Mechanical Keyboard, Compatible with ANSI/ISO, 60%, 65%, 75%, TKL, Full-Sized Layout (MOA Profile)
-
ADORABLE FROGGY DESIGN: BRIGHTEN YOUR WORKSPACE WITH PLAYFUL CHARM!
-
ERGONOMIC MOA/CHERRY PROFILE: ENJOY COMFY TYPING WITH REDUCED STRAIN.
-
EXTENSIVE COMPATIBILITY: FITS MULTIPLE LAYOUTS FOR VERSATILE CUSTOMIZATION!
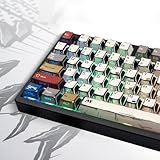
137 PBT Keycaps, Versatile Keycaps for Mechanical Keyboard (Typing, Gaming or Anime Passion) - RGB Backlit, Ergonomic, No Tear & Never Fades, Vibrant (Doubleshot, MX, 100%,75%,65%,60% Fit All, Cherry)
-
VIBRANT, UNIQUE DESIGNS FOR GAMING AND ANIME ENTHUSIASTS.
-
ERGONOMIC PROFILES FOR COMFORTABLE, SATISFYING KEYSTROKES.
-
ULTRA-DURABLE PBT MATERIAL ENSURES NO FADE OR WEAR.
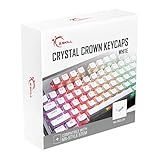
G.SKILL Crystal Crown Keycaps - Keycap Set with Transparent Layer for Mechanical Keyboards, Full 104 Key, Standard ANSI 104 English (US) Layout - White
- ENHANCE RGB SHINE WITH A CLEAR, DUAL-LAYERED DESIGN.
- BOLD, MINIMALISTIC FONT FOR EASY READABILITY ON EACH KEY.
- UNIVERSAL COMPATIBILITY WITH CHERRY MX STEMS FOR SEAMLESS USE.
PBT Keycaps 126 Keys MOA Profile Cute Keycap Dye-Sublimation Rainbow Candy Keycaps Set Custom Keycap for Cherry Gateron MX Swithes Mechanical Keyboards
- DURABLE PBT KEYCAPS RESIST WEAR AND GREASE FOR LONG-LASTING BEAUTY.
- VIBRANT DYE-SUBLIMATION ENSURES CLEAR, BEAUTIFUL FONTS AND PATTERNS.
- MOA PROFILE DESIGN ENHANCES STABILITY AND FEEL FOR A PREMIUM EXPERIENCE.
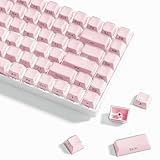
Rainy75 PBT Keycaps, Jelly Keycap Foundation MOA Profile, 132 Keys Cute Custom Keycaps for Cherry Gateron MX Swithes Mechanical Keyboards (Pink)
-
DURABLE PBT MATERIAL: RESISTS WEAR, TEAR, AND DIRT FOR LONGEVITY.
-
VIBRANT JELLY GRADIENT: EYE-CATCHING DESIGN ENHANCES ANY KEYBOARD!
-
132 KEY SET: COMPLETE COMPATIBILITY FOR A CUSTOMIZABLE TYPING EXPERIENCE!
Womier Jelly Keycaps-Crystal Cute Keycaps Pink 60 65 75 100 Percent, Side Printed Elegant Key caps Custom113 Keys, OEM Profile for 61/68/84/87/98/100 Cherry Gateron MX Mechanical, Pink
- VIBRANT RGB TRANSPARENCY ENHANCES YOUR KEYBOARD'S UNIQUE STYLE.
- COMPATIBLE WITH VARIOUS MX SWITCHES FOR EFFORTLESS CUSTOMIZATION.
- OEM PROFILE DESIGNED FOR COMFORT, PERFECT FOR ALL TYPING STYLES.
dagaladoo Grey Clear keycaps,Transparent keycaps 60 75 100 Percent,Ceramic Jelly Key caps Set,Shine Through Key caps.,MDA Profile Keyboard Key Cap for Mx Switches Mechanical Keyboard(115key)
-
DURABLE PC MATERIAL FOR LONG-LASTING GAMING PERFORMANCE
-
STYLISH TRANSPARENT KEYCAPS ENHANCE YOUR KEYBOARD'S AESTHETICS
-
MDA PROFILE OFFERS COMFORT AND REDUCED ACCIDENTAL TOUCHES
Yes, you can customize the keycaps on a mechanical keyboard. Many mechanical keyboards are designed with removable keycaps, allowing you to easily swap them out for different styles, colors, or materials. This customization enables users to personalize the look and feel of their keyboard. There are numerous keycap sets available in the market, offering various designs, from simple and minimalistic to intricate and themed collections. When choosing keycaps, it's important to consider the size and layout of your keyboard to ensure compatibility. Additionally, the keycap profile, which refers to the shape and height of the keycaps, can vary between sets, providing different typing experiences. Customizing keycaps is a popular way for enthusiasts to enhance their keyboards both aesthetically and functionally.
What is keycap stem compatibility?
Keycap stem compatibility refers to the ability of a keycap to fit onto a keyboard switch stem. The stem is the part of the mechanical switch that the keycap attaches to. Different types of mechanical switches have different stem designs, so keycap manufacturers often design keycaps to fit specific types of stems.
The most common stem design in the mechanical keyboard community is the "MX" stem, originally created by Cherry for their Cherry MX switches. This design features a cross-shaped stem, and many keycap manufacturers produce keycaps with an MX-compatible mount to fit these widely-used switches. Other switch types have different designs, such as Topre or ALPS, which require keycaps specifically designed for those stems.
When purchasing or customizing keycaps, it's important to ensure that the keycap set you choose is compatible with the switch stems on your keyboard. This ensures proper fit and prevents damage to either the keycaps or the switches. Always check the specifications of both your keyboard and the keycaps to confirm compatibility.
What is a keycap set?
A keycap set is a collection of keycaps designed to replace or customize the keys on a mechanical keyboard. Keycaps are the removable covers placed on top of keyboard switches, and they often come in various shapes, sizes, materials, and colors. A keycap set typically includes all the necessary keycaps to cover a keyboard, possibly with extra keys to accommodate different layouts or preferences.
Keycap sets are popular among keyboard enthusiasts for personalizing the look and feel of their keyboards. They can be made from different materials such as ABS, PBT, or POM, each offering unique textures and durability. Additionally, keycap sets may feature different legends (the markings on the keys), colors, and designs, allowing users to further customize their keyboards to match their aesthetic preferences.
How to lubricate a mechanical keyboard switch after keycap removal?
Lubricating mechanical keyboard switches can improve their feel and sound. Here’s a step-by-step guide on how to lubricate the switches after you’ve removed the keycaps:
Materials Needed
- Lubricant: Use a high-quality switch lubricant, such as Krytox 205g0 or Tribosys 3203. Make sure it's appropriate for your type of switches.
- Small Brush: A fine, small brush, often a size 0 or 00, is suitable for precise application.
- Switch Opener (optional): Handy for opening the switch housing. While not strictly necessary if you aren't disassembling the switch, it's useful if you want to fully lubricate all parts.
- Tweezers: For handling small parts and springs.
- Work Mat or Tray: To keep your workspace organized.
- Time and Patience: This process requires precision and care.
Step-by-Step Process
Option 1: Lubricating Without Disassembly
- Prepare Your Workspace: Lay down your work mat or tray to catch any small parts. Ensure your environment is free of dust and debris.
- Apply Lubricant: Dip your brush lightly into the lubricant. You want only a small amount on the brush. Gently apply the lubricant to the exposed areas of the switch stem and the top housing surface inside the switch. Be careful not to overapply, as too much lubricant can lead to stickiness or poor performance.
- Test and Adjust: Replace the keycap and press the switch a few times to test its feel. If necessary, you can remove the keycap again and adjust the amount of lubricant.
Option 2: Lubricating with Full Disassembly
- Remove Switches (if necessary): If you're planning to open the switches completely, consider desoldering them from the PCB (for soldered keyboards) or simply remove them if it's a hot-swappable board.
- Disassemble the Switch: Use the switch opener to carefully open the switch housing. This usually involves separating the top housing from the bottom. Remove the stem and spring carefully using tweezers.
- Lubricate the Components: Stem: Apply a thin layer of lubricant to the sliders on the stem with your brush. Spring: Optionally, you can also lubricate the spring. A small application on the ends or bag-lubing (placing the spring in a bag with a small amount of lubricant and shaking) is common. Bottom Housing: Apply a small amount of lubricant inside the bottom housing where the stem sliders make contact.
- Reassemble the Switch: Carefully place the spring and stem back into the bottom housing. Close the switch by snapping the top housing in place.
- Test and Reassemble the Keyboard: Test the feel of the switch by pressing it. Reattach the switch to the keyboard (if desoldered or hot-swappable). Replace the keycaps once you are satisfied.
Tips
- Experiment: Start with a few switches to determine the amount of lubrication that works best for you.
- Avoid PCB Damage: If disassembling, make sure to protect and avoid damaging the PCB while working.
- Clean Surfaces: Make sure all components are clean before applying lubricant to avoid any debris issues.
Remember, the goal is to enhance the switch's performance, so take your time and enjoy the improved tactile experience!
What is the best material for keycaps?
The "best" material for keycaps often depends on personal preference and the specific qualities you're looking for in your keyboard. However, there are a few popular materials each with its own advantages:
- ABS Plastic (Acrylonitrile Butadiene Styrene): Pros: Relatively inexpensive, easily moldable, often used in backlit keycaps due to its ability to be thin without breaking. Cons: Prone to developing a shiny, worn look over time due to finger oils, and can be less durable than other materials.
- PBT Plastic (Polybutylene Terephthalate): Pros: More durable and resistant to shine and wear than ABS, often has a more textured feel, and resists heat better. Cons: Typically more expensive, especially for doubleshot or thick PBT keycaps, and less commonly used in backlit keyboards due to opacity.
- POM Plastic (Polyoxymethylene): Pros: Known for its smooth texture and high durability, makes for long-lasting keycaps. Cons: Can be more expensive and is less commonly found than ABS or PBT.
- Metal: Pros: Extremely durable and offers a distinctive, premium feel and appearance. Cons: Much heavier and more expensive than plastic keycaps, can be uncomfortable for extended typing sessions due to lack of "give" and are not typically suitable for full key sets.
- Wood: Pros: Unique aesthetic and texture, can be customized with different finishes and stains. Cons: Prone to wear over time, can be expensive, and may not suit everyone’s typing preference due to unusual texture.
Ultimately, PBT is often favored for its balance of durability, texture, and resistance to shine, making it a popular choice among keyboard enthusiasts. However, if backlighting or cost is a major factor, ABS might be more appropriate. Exploring different options and possibly trying a keycap sampler from a variety of materials can help you decide what feels best for you.