
Best Keyboard Cleaning Tools to Buy in July 2026
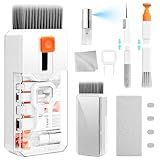
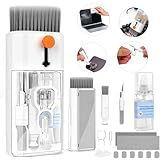
Keyboard Cleaning Kit Laptop Cleaner, 10-in-1 Computer Screen Cleaning Brush Tool, Multi-Function PC Electronic Cleaner Kit Spray for iPad iPhone Pro, Earbuds, Camera Monitor, All-in-one with Patent
- COMPREHENSIVE KIT: 10-IN-1 TOOLS FOR ULTIMATE ELECTRONIC CLEANING.
- USER-FRIENDLY: QUICK, EFFECTIVE CLEANING FOR KEYBOARDS AND SCREENS.
- PORTABLE DESIGN: TAKE IT ANYWHERE; PERFECT FOR ON-THE-GO CLEANING!


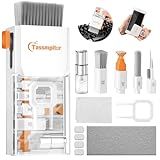
Keyboard Cleaner Laptop Cleaning Kit, All-in-One Keyboard Cleaning Kit, Laptop Cleaner Tool for MacBook iPad iPhone Computer, Portable Electronics Brush Tool for Tablet PC Camera Lens Earbuds Monitor
- DEEP CLEANS ALL DEVICES-KEYBOARDS, LAPTOPS, PHONES, AND MORE!
- RETRACTABLE BRUSH AND CLEANING TOOLS FOR DELICATE SURFACES INCLUDED.
- PREMIUM MICROFIBER CLOTHS FOR STREAK-FREE, SCRATCH-FREE SHINE!
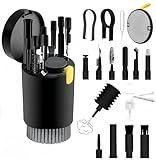
20-in-1 Laptop Phone Screen Earbud Cleaning Kit, Keyboard Cleaner Kit, Keyboard Cleaning Kit with Electronic Cleaning Brush Spray for Airpods Pro, iPad, iPhone Pro, Camera, Computer Cleaning (Black)
- ✨ 20-IN-1 KIT: ALL-IN-ONE SOLUTION FOR ELECTRONICS CLEANING NEEDS!
- 🚀 COMPACT DESIGN: PORTABLE AND EASY TO USE ANYWHERE, ANYTIME!
- 🎁 PERFECT GIFT: IDEAL FOR TECH LOVERS, ENSURING A CLEAN DEVICE!
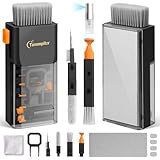
Keyboard Cleaning Kit Keyboard Cleaner, All in One Computer Screen and Laptop Cleaner, Compact Portable Electronic Laptop Cleaning Kit with Soft Brush and Spray for MacBook iPad iPhone Earbud, Black
-
ALL-IN-ONE KIT: COMPLETE CLEANING SOLUTION FOR ALL YOUR ELECTRONICS.
-
DEEP CLEAN EFFICIENCY: RETRACTABLE BRUSH AND KEYCAP PULLER FOR PRECISION.
-
STREAK-FREE FINISH: SPECIALIZED CLOTH ENSURES SPOTLESS SCREENS EVERY TIME.
Keyboard Cleaner Laptop Cleaning Kit - All in One Computer Tech Cleaning Brush, Multi-Function Pc Accessories with Airpod Cleaning Kit, Electronic Laptop Screen Cleaner for MacBook, iPhone, Gaming
-
ALL-IN-ONE KIT: INCLUDES ESSENTIAL TOOLS FOR CLEANING ALL DEVICES EFFICIENTLY.
-
USER-FRIENDLY: SIMPLE INSTRUCTIONS AND EFFECTIVE SPRAY FOR EASY CLEANING.
-
PORTABLE & DURABLE: COMPACT DESIGN WITH REPLACEABLE PARTS FOR LONG-LASTING USE.
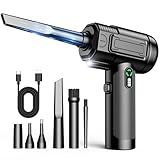
Compressed Air Duster: 100000RPM Electric Air Duster with LED Light Mini Air Blower Rechargeable Cordless Keyboard Cleaning Jet Dry Blower - Car, PC and Home Cleaning Kit Replaces Compressed Air Can
-
POWERFUL 100,000RPM MOTOR FOR QUICK, DEEP CLEANING IN SECONDS!
-
PORTABLE DESIGN WITH SAFETY FEATURES FOR HASSLE-FREE USE ANYWHERE!
-
MULTI-FUNCTIONAL WITH 5 NOZZLES FOR ALL YOUR CLEANING NEEDS!
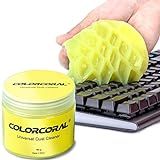
COLORCORAL Cleaning Gel Universal Dust Cleaner for PC Keyboard Car Detailing Office Electronics Laptop Dusting Kit Computer Dust Remover, Computer Gaming Car Accessories, Gift for Men Women 160g
- UNIVERSAL FIT FOR SAFE AND EFFECTIVE CLEANING OF VARIOUS SURFACES.
- NON-STICKY, LEMON-SCENTED GEL ENSURES A PLEASANT USER EXPERIENCE.
- REUSABLE UNTIL DISCOLORED OR STICKY-GREAT FOR ECO-FRIENDLY CLEANING!
To clean a mechanical keyboard, start by unplugging it from your computer or turning off the wireless function if applicable. Remove all the keycaps using a keycap puller to expose the switches and the board underneath. Once the keycaps are off, you can wipe them down with a damp microfiber cloth or wash them in warm soapy water, ensuring they are completely dry before reattaching them. For the keyboard itself, gently use a can of compressed air to blow away dust and debris from around the switches and inside the casing. For any stubborn grime, use a soft brush or a cotton swab dampened with isopropyl alcohol to carefully clean around the switches and other components. Be sure the keyboard is completely dry before reassembling and reconnecting it to your computer. Regular maintenance can help prevent buildup and keep your mechanical keyboard in good working condition.
What is the difference between cleaning a mechanical and a membrane keyboard?
Cleaning a mechanical keyboard and a membrane keyboard involves some similar steps, but there are key differences due to their construction and components. Here’s a comparison of cleaning the two types:
Mechanical Keyboard
- Key Removal: Mechanical keyboards have individual key switches, so you can easily remove and clean the keycaps. Use a keycap puller to prevent damage. This allows for direct access to the underlying switch and surface for thorough cleaning.
- Switch Access: Once the keycaps are removed, you can clean around the mechanical switches. Use compressed air or a small brush to remove dust and debris from around the switches and board surface.
- Deep Cleaning: If needed, you can clean each keycap individually with soapy water. Ensure they are completely dry before reattaching. Some mechanical keyboards allow for disassembly of the switches for deeper cleaning, but this can void warranties and requires technical expertise.
- Sturdiness: Mechanical keyboards are often heavier and more robust, reducing the risk of damage during thorough cleanings.
Membrane Keyboard
- Key Removal: Key removal is not as straightforward because the keys are often not meant to be individually detached. If they can be removed, they may be more fragile than mechanical keycaps.
- Surface Cleaning: Wipe the surface with a damp cloth or use compressed air to remove surface dust and debris. Take care to avoid moisture getting inside, as this can damage the membrane.
- Limited Deep Cleaning: Membrane keyboards are not designed to be disassembled beyond the top layer, which makes deep cleaning more challenging. You can clean the keycaps gently if they are removable, but the delicate inner membrane should not be exposed to water.
- Sensitivity: Membrane components are more sensitive to liquids and pressure. Avoid excessive moisture or force when cleaning.
General Tips
- Unplug Before Cleaning: Always disconnect your keyboard from the computer to prevent any electrical issues.
- Use the Right Tools: Utilize tools like keycap pullers, small brushes, and microfiber cloths for effective and safe cleaning.
- Avoid Excess Moisture: For both types, avoid soaking the keyboard or allowing moisture to seep into the internal components.
- Regular Maintenance: Regular cleaning can prevent build-up and ensure longevity for both types of keyboards.
Cleaning methods will vary based on the keyboard's design and the manufacturer's instructions, so always check the manual if you have specific concerns.
What is the safest way to clean a mechanical keyboard without damaging it?
Cleaning a mechanical keyboard can be done safely by following these steps:
- Unplug the Keyboard: Always disconnect your keyboard from your computer or power source before cleaning to avoid accidental short circuits or other electrical issues.
- Remove Keycaps: Use a keycap puller to gently remove the keycaps from the keyboard. This makes it easier to clean underneath. If you don't have a keycap puller, you can usually use your fingers, but be careful to avoid damaging the keycaps or switches.
- Clean the Keycaps: Soak the keycaps in warm, soapy water for a few hours. After soaking, rinse them thoroughly with clean water and let them air dry completely on a towel. Avoid using hot water to prevent any warping.
- Dust the Keyboard Base: Use a small, soft-bristled brush (like a clean paintbrush) to remove dust and debris from the keyboard base. A compressed air canister can also be used to blow out dust from hard-to-reach areas between the switches.
- Wipe Down the Keyboard Base: Dampen a microfiber cloth with water or isopropyl alcohol and gently wipe the surface of the keyboard base. Avoid soaking the cloth; it should be damp, not wet, to prevent moisture from seeping into the switches or circuitry.
- Reattach Keycaps: Once the keycaps are completely dry, carefully reattach them to the keyboard, ensuring they are aligned correctly with the switches.
- Final Check: Once everything is back in place and dry, reconnect your keyboard to your computer and check to ensure all keys are functioning properly.
By following these steps, you can clean your mechanical keyboard safely and effectively without causing damage. Additionally, regular maintenance like periodically dusting the keyboard can help keep it cleaner for longer.
What is the best method to remove stains from keycaps?
To effectively remove stains from keycaps, follow these steps:
- Remove the Keycaps: Carefully use a keycap puller or a small flat tool to gently pry off the keycaps. Ensure you note their original positions for easy reassembly.
- Prepare a Cleaning Solution: Fill a bowl with warm water and add a few drops of mild dish soap. Mix gently to create a soapy solution.
- Soak the Keycaps: Immerse the keycaps in the soapy water and let them soak for about 30 minutes. This helps to loosen any grime or stains.
- Scrub the Keycaps: Using a soft-bristled toothbrush or a small cleaning brush, gently scrub each keycap to remove any remaining residue. Be careful not to use abrasive materials that could scratch the keycaps.
- Rinse the Keycaps: Thoroughly rinse the keycaps under warm running water to remove any soap residue.
- Dry the Keycaps: Lay the keycaps out on a towel and allow them to air dry completely. Ensure they are completely dry before reattaching them to prevent any moisture from damaging the keyboard.
- Reattach the Keycaps: Once dry, carefully snap each keycap back into its original position on the keyboard.
Additional Tips:
- For stubborn stains, consider using a mixture of baking soda and water to form a gentle paste. Apply it to the stains, let it sit for a few minutes, and then scrub gently.
- Avoid soaking keycaps for too long or using hot water, as this can warp or damage them.
- If the keycaps are particularly valuable or made of a unique material, consult the manufacturer’s care instructions for specific cleaning advice.
By following these steps, you should be able to effectively remove stains from your keycaps and maintain their appearance.
What is the purpose of a keycap puller?
A keycap puller is a tool designed to facilitate the removal of keycaps from a keyboard. It is commonly used by enthusiasts or technicians who want to clean their keyboard, replace keycaps for customization, or perform maintenance or repairs. The tool typically features a handle with wire or plastic loops that can be slid under a keycap, allowing the user to lift and remove it without causing damage to the keycap or the keyboard switches. Using a keycap puller helps prevent scratches or other damage that could occur if keycaps were removed using improper tools or methods.
What is the best way to clean keyboard switches?
Cleaning keyboard switches can be a meticulous task, but it is important for maintaining the functionality and longevity of your keyboard. Here’s a step-by-step guide on how to effectively clean mechanical keyboard switches:
- Gather Materials: A keycap puller Compressed air canister Isopropyl alcohol (preferably 90% or higher) Small brush or a soft toothbrush Cotton swabs Microfiber cloth
- Preparation: Turn off your computer and disconnect the keyboard. Make sure your work area is clean and well-lit.
- Remove Keycaps: Use the keycap puller to gently remove the keycaps. Be careful not to bend or damage them. Note the arrangement of the keycaps, or take a picture for reference, to ensure they are replaced correctly.
- Clean Keycaps: Soak the keycaps in warm soapy water for about 30 minutes. Rinse and dry them thoroughly with a microfiber cloth or let them air dry.
- Clear Dust and Debris: Use a can of compressed air to blow away dust and debris from the keyboard base. Tilt the keyboard at different angles to ensure thorough cleaning.
- Clean the Switches: Dampen a cotton swab with isopropyl alcohol and gently clean around the switch mechanism. Use a small brush to reach any stubborn dirt around the switch. Be careful to avoid getting too much liquid inside the switches. A slight dampness is okay, but avoid saturating the area.
- Reassembly: Once everything is completely dry, reattach the keycaps. Press each key to ensure it is working smoothly.
- Final Check: Connect the keyboard back to your computer and test each key to ensure they are functioning properly.
Additional Tips:
- For regular maintenance, frequently use compressed air to prevent dust build-up.
- Consider using a keyboard cover or regular cleaning cycles to minimize dirt and debris.
- If you have a specific type of mechanical switch (e.g., Cherry MX, Razer), look for any particular cleaning instructions recommended by the manufacturer.
Following these steps will help ensure your keyboard switches remain clean, responsive, and in good working condition.
How to clean a mechanical keyboard using household items?
Cleaning a mechanical keyboard with household items is relatively straightforward. Here’s a step-by-step guide to help you:
Materials Needed:
- A can of compressed air or a hairdryer set to cool
- Microfiber cloth or lint-free cloth
- Cotton swabs
- Isopropyl alcohol (70% or higher)
- A small brush or a clean toothbrush
- Keycap puller (optional, if you have one)
Steps:
- Unplug the Keyboard: Always ensure your keyboard is disconnected from your computer to avoid any potential damage or electrical hazards.
- Remove Keycaps (Optional): If your keyboard has removable keycaps and you have a keycap puller, consider removing them for a more thorough clean. Make sure to take note of their layout for reassembly.
- Dust Removal: Compressed Air: Use a can of compressed air or a hairdryer on a cool setting to blow out any dust and debris from between the keys. Blow at an angle to avoid pushing debris further into the keyboard. Brush: Use a small brush or toothbrush to gently dislodge stubborn debris.
- Cleaning the Keycaps: If you removed the keycaps, soak them in a bowl of warm water mixed with a small amount of dish soap. Let them soak for 10-15 minutes. Use a cloth or brush to scrub each keycap individually if needed. Rinse the keycaps thoroughly with clean water and let them dry completely on a towel.
- Cleaning the Keyboard Surface: Dampen a microfiber cloth with isopropyl alcohol (make sure it’s not dripping wet) and gently wipe the surface of the keyboard to remove oils, grime, and bacteria. Use cotton swabs dipped in isopropyl alcohol to clean around the switches and hard-to-reach areas.
- Reattach Keycaps: Once everything is fully dry, reattach the keycaps back onto the keyboard. Refer to the layout you noted earlier if needed.
- Final Touches: Give the keyboard a final blow with compressed air or the cool setting on a hairdryer to ensure no moisture remains.
Tips:
- Avoid eating over your keyboard to minimize the accumulation of crumbs and debris.
- Regularly dust your keyboard to prevent build-up.
- If certain keycaps are frequently getting dirty, consider using desk mats or hand positioning adjustments to reduce contact.
By following these steps, you should be able to keep your mechanical keyboard clean and in good working condition using common household items.