
Best Tools and Accessories to Buy for Fixing Printer Paper Jams in July 2026
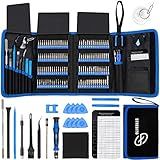
STREBITO Electronics Precision Screwdriver Sets 142-Piece with 120 Bits Magnetic Repair Tool Kit for iPhone, MacBook, Computer, Laptop, PC, Tablet, PS4, Xbox, Nintendo, Game Console
-
ALL-IN-ONE TOOLKIT: 120 BITS & 22 ACCESSORIES FOR EVERY REPAIR NEED!
-
ERGONOMIC DESIGN: COMFORTABLE GRIP & FLEXIBLE EXTENSION FOR EASY ACCESS.
-
MAGNETIC ORGANIZATION: KEEP SCREWS ORGANIZED & TOOLS EFFECTIVE WITH MAGNETS!


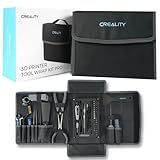
Creality 3D Printer Tool Kit, 74Pcs 3D Printing Tool Wrap Kit Assembly/Removal/Filament Cutting Set 3D Printer Accessories for All FDM Printers Cleaning Finishing Printing
- ALL-IN-ONE TOOLKIT: ESSENTIAL FOR 3D PRINTING BEGINNERS AND PROS ALIKE.
- PRECISION HANDLING TOOLS: REFINE EDGES AND SURFACES WITH EXPERT TOOLS.
- VERSATILE NOZZLE CLEANERS: QUICK CLEANING FOR EFFICIENT 3D PRINTING RESULTS.
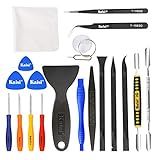
Kaisi Professional Electronics Opening Pry Tool Repair Kit with Metal Spudger Non-Abrasive Nylon Spudgers and Anti-Static Tweezers for Cellphone iPhone Laptops Tablets and More, 20 Piece
- COMPLETE REPAIR KIT: 20 TOOLS FOR ALL YOUR DEVICE DISASSEMBLY NEEDS.
- DURABLE STAINLESS STEEL SPUDGER TOOLS FOR LONG-LASTING PERFORMANCE.
- INCLUDES CLEANING CLOTHS FOR A POLISHED, PROFESSIONAL FINISH.
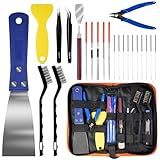
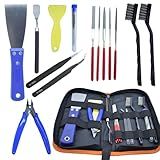
3D Printer Tool Kit 24PCS Cleaning and Maintenance Set with Nozzle Needles Cutters Files Brushes Putty Knife and Tweezers for Model Building and Print Removal
- COMPLETE 24-PIECE SET: EVERYTHING YOU NEED FOR 3D PRINTING SUCCESS!
- PRECISION CLEANING TOOLS: IMPROVE PRINT QUALITY WITH NOZZLE CLEANING NEEDLES.
- PORTABLE STORAGE BAG: EASILY CARRY YOUR TOOLKIT WHEREVER CREATIVITY TAKES YOU.
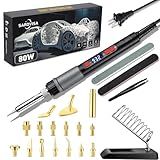
21-in-1 3D Printer Smoothing Tool Kit, 80W LCD Digital Adjustable Temperature Soldering Welding Iron Kit with Insert Brass Heatset Nuts & Soldering Tips, Fast Heating 3D Printing Modify Finishing Tool
-
VERSATILE 21-IN-1 KIT FOR ALL 3D PRINTING NEEDS-PERFECT FOR EVERYONE!
-
FAST HEATING & PRECISE CONTROL ENSURE QUICK, EFFICIENT SOLDERING!
-
USER-FRIENDLY DESIGN WITH SAFETY FEATURES FOR ENHANCED USABILITY!
JUNYAOHSU 3D Printer Tool Kit, 24pcs 3D Printer Nozzle Cleaning Tool Removal Tool Kit, Wire Brush, Wire Flush Cutter, Scraper Knife, Diamond Files, Tweezer, Putty Knife for 3D Printer, Model Building
- ALL-IN-ONE KIT: COMPLETE TOOLSET FOR EVERY 3D PRINTING NEED.
- NOZZLE CLEANING PRECISION: 10 NEEDLES FOR HASSLE-FREE FILAMENT CLEARANCE.
- PORTABLE DESIGN: EASY-TO-CARRY BAG FOR CREATIVE INSPIRATION ON-THE-GO.
Fixing a paper jam in an all-in-one printer typically involves a series of straightforward steps. First, turn off the printer and unplug it to ensure safety. Carefully open the main access panel and, if necessary, remove the paper tray to access the jammed paper. Gently pull out any jammed paper, ensuring you pull in the direction the paper would normally feed to avoid tearing and leaving remnants inside the printer. Also, check the printer's rollers, as small bits of paper can sometimes get caught there. If applicable, open the rear access panel and remove any stuck paper. After clearing all the jams, reassemble any parts you removed, plug the printer back in, and turn it on to see if the issue is resolved. Additionally, ensure that the paper loaded in the tray is within the printer’s specification and that the tray is not overfilled, which can help prevent future jams. If the problem persists, it may be helpful to refer to the printer's manual or contact customer support for further assistance.
How to safely store paper to reduce the risk of jams?
To reduce the risk of paper jams in printers or copiers, it's important to store paper properly. Here are some tips to help you do that:
- Temperature and Humidity Control: Store paper in a location with consistent temperature and humidity. Ideal conditions are around 20-24°C (68-75°F) and 45-55% relative humidity. Avoid areas prone to moisture, heat, or direct sunlight.
- Proper Storage Containers: Use airtight containers or re-sealable plastic bags to protect paper from dust and moisture. Keep paper in its original packaging until needed to provide an extra layer of protection.
- Organized Shelving: Store paper flat on sturdy shelves to prevent bending or curling. Avoid stacking paper too high, which can cause it to warp under its own weight.
- Avoid Floor Storage: Do not store paper directly on the floor to protect it from dirt, dust, and potential water damage.
- Rotate Stock: Use older paper first to prevent it from getting stale or damaged over time. Implement a first-in, first-out (FIFO) system for efficient use.
- Handle with Care: Handle paper with clean, dry hands to avoid transferring oils or moisture. Fan through the stack lightly before loading into the printer to reduce static cling and separation issues.
By following these guidelines, you can help ensure your paper remains in good condition and minimize the chances of jams when printing or copying.
How do you access the rear panel of a printer to remove a jam?
Accessing the rear panel of a printer to remove a paper jam can vary depending on the model of the printer you are using. However, the following general steps should help you with most common printers:
- Turn Off the Printer: Always begin by turning off the printer and unplugging it from the power source to prevent any risk of electric shock or damage to the printer.
- Locate the Rear Access Panel: Most printers have a rear access panel or a door at the back. Check the back of the printer for any latches, buttons, or tabs that allow you to open or remove this panel.
- Open or Remove the Panel: If there are latches, press them to release the panel. If there are tabs, gently press or pull them to unlock the panel. Some panels may require you to open them by rotating or pulling them downwards.
- Remove Jammed Paper: Once the panel is open, carefully inspect the internal components for any jammed paper. Gently pull out the paper in the direction of the paper path to avoid tearing it. Make sure there are no small bits of paper left inside, as these can cause further jams.
- Check for Obstructions: While the rear panel is open, check for any additional obstructions or foreign objects that might be causing or contributing to the jam.
- Close the Rear Panel: Once the jam is cleared, securely close or reattach the rear access panel. Make sure it clicks into place to ensure proper alignment and function.
- Reconnect and Test: Plug the printer back in, turn it on, and run a test print to ensure that it is functioning properly.
Refer to your printer’s manual for specific instructions for your model, as some printers might have slightly different mechanisms for accessing the rear panel.
How to lubricate the printer gears safely?
Lubricating the gears of a printer can help to maintain its operation smoothly, especially if you notice noise or if it's been used extensively. However, it's important to do this carefully to avoid damage. Here's a general guide you can follow:
- Power Off and Unplug: Ensure that your printer is turned off and unplug it from the power source. This is a crucial safety step to prevent electric shock or damage to the printer.
- Consult the Manual: Check the manufacturer's manual or website for specific instructions or recommendations regarding lubrication. Some manufacturers might discourage user maintenance beyond cleaning or suggest using certain types of lubricants.
- Access the Gears: Open the printer casing according to the manufacturer's instructions. This might involve removing paper trays or covers. Be gentle to avoid snapping any components.
- Clean Before Lubricating: Use a dry, lint-free cloth or a small brush to clean any dust or debris from the gears. You can also use compressed air for hard-to-reach areas.
- Select the Right Lubricant: Use a lubricant specifically recommended for printers, usually a silicone-based or dry PTFE spray lubricant. Avoid oil-based products as they can attract dust and cause buildup over time.
- Application: Apply a small amount of lubricant to the gears. You can use a cotton swab or a small brush for precision. Avoid over-lubricating as this can cause other issues such as attracting dust or dripping into unwanted areas.
- Manual Rotation: Manually rotate the gears to distribute the lubricant evenly. Do this gently to avoid damaging any components.
- Reassemble the Printer: Once lubricated, carefully reassemble any parts you removed and ensure everything is securely in place.
- Test the Printer: Plug the printer back in, turn it on, and run a test print to make sure everything is working smoothly and the noise has reduced.
- Regular Maintenance: Incorporate cleaning and lubricating as part of your regular printer maintenance routine, but not too frequently. Excessive lubrication can cause issues.
If you are uncertain or uncomfortable with lubricating your printer yourself, it might be best to consult a professional or contact the manufacturer for service options.