
Best Portable Monitor Accessories to Buy in July 2026
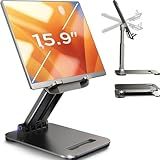
LISEN Tablet Stand for iPad Stand Holder Desk, Foldable Home Office Desk Accessories Travel for iPad Holder Dorm College Essentials Portable Monitor Fits Tabs Kindle iPhone 4-15.9" Black
-
ULTIMATE STABILITY: HEAVIER BASE AND ANTI-SLIP DESIGN PREVENT SLIPS.
-
TRAVEL READY: FOLDS TO POCKET SIZE; IDEAL FOR REMOTE WORK AND TRIPS.
-
DURABLE DESIGN: ONE-PIECE CONSTRUCTION ELIMINATES SLIPPAGE ISSUES.


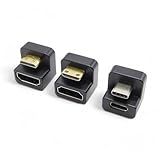
KADO Portable Monitor 180 Degree Adapter Set - Mini HDMI to HDMI 4K 60Hz U Shaped USB-C to USB-C USB 3.1 Gen 2 10Gbps 60W PD Charging Extender Converter for Laptop and Tablet (Major Combo)
- VERSATILE 3-IN-1 ADAPTER SET FOR ALL DISPLAY NEEDS!
- FAST USB-C TRANSFERS: UP TO 10 GBPS FOR EFFICIENCY!
- ENJOY STUNNING 4K VIDEO & AUDIO WITH HDMI SUPPORT!
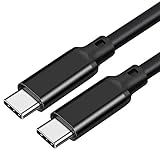
240W USB 3.2 Gen 2X2 Display Monitor Link Data Transfer Video Cable for Lepow Z1 15.6 In, InnoView, ASUS ZenScreen, KYY, Cocopar, Arzopa, AOC, ViewSonic Portable Monitor HDR Outputt Charger Power Cord
-
20GBPS SUPERSPEED TRANSFERS: SYNC DATA AT TWICE THE SPEED OF USB 3.1!
-
4K VIDEO & AUDIO OUTPUT: ENJOY SEAMLESS STREAMING, NO BLUR OR DISTORTION!
-
RAPID 240W CHARGING: CHARGE DEVICES QUICKLY WITH ROBUST PD AND QC COMPATIBILITY!
Kado Portable Monitor Stand Aluminum Alloy, Tablet Holder Phone Clamp for Display Phone, Wall Mount 3M Cubical Mount for Portable Monitor, Kitchen Cabinet Tablet Holder for iPad Surface Pro
-
DURABLE ALUMINUM DESIGN: SLEEK, ROBUST SUPPORT FOR LONG-LASTING USE.
-
TRANSFORMABLE VERSATILITY: USE IT ANYWHERE-KITCHEN, GYM, OR OFFICE!
-
UNIVERSAL COMPATIBILITY: FITS TABLETS, PHONES, AND MONITORS OF ALL SIZES.
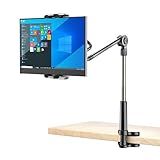
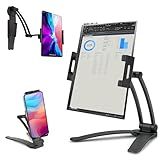
LenTok Foldable Desk Tablet Mount for iPad Portable Monitor 4.7-15.6'', Long Gooseneck Tablet Arm Holder, Table Tripod with Clamp Compatible with Surface Pro, All iPad Pro 12.9
-
BROAD COMPATIBILITY: WORKS WITH IPAD PRO, SURFACE, & 15.6 MONITORS.
-
DURABLE DESIGN: STURDY ALUMINUM ALLOY ARM; ADJUSTABLE HEIGHT FOR COMFORT.
-
EFFORTLESS ADJUSTMENTS: QUICK, ONE-CLICK ANGLE ADJUSTMENTS; IDEAL FOR RELAXING.
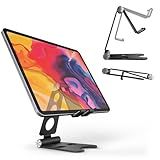
Kado Aluminum Alloy Tablet Stand for Portable Monitor, Foldable iPad Stand Holder Adjustable, Computer Office Desk Accessories for Kindle, Switch, iPad Pro/Air/Mini, iPhone Pro/Max/Plus
- DURABLE ALUMINUM BUILD ENSURES LONG-LASTING STABILITY FOR DEVICES.
- MULTIPLE ADJUSTABLE ANGLES ENHANCE COMFORT AND REDUCE EYE STRAIN.
- COMPACT, FOLDABLE DESIGN MAKES IT PERFECT FOR TRAVEL AND PORTABILITY.
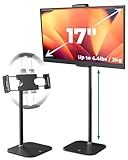
COOPER TabStand Height Adjustable iPad Stand for Desk, Heavy-Duty 7-17" Tablet Holder & Portable Monitor Stand | 4.4lb Holding Strength | iPad Holder for Pro, Air, Mini, Kindle (Night Black)
- 360° ROTATION ENSURES OPTIMAL VIEWING, EVEN FOR HEAVY DISPLAYS.
- HEIGHT ADJUSTABLE FROM 13-20, ACCOMMODATING VARIOUS DEVICE SIZES.
- BUILT TO LAST: HEAVY-DUTY DESIGN WITH 3-YEAR WARRANTY INCLUDED.
Improving the display quality of a portable monitor involves several approaches focusing on the settings, connection, and physical condition of the monitor. Start by calibrating the monitor's brightness, contrast, and color settings using the on-screen display menu to ensure optimal picture quality. Adjusting these settings can often enhance the display to better suit your viewing environment and personal preferences. Additionally, ensure that you are using a high-quality connection type, such as HDMI or DisplayPort, as these can provide clearer and more stable video signals compared to older technologies like VGA. If the monitor supports it, enable features like High Dynamic Range (HDR) for richer colors and better contrast. Keep the monitor's screen clean and free from dust or fingerprints to maintain clarity. Updating the monitor's firmware, if available, can also help improve performance and compatibility with newer devices. Lastly, if the display still doesn't look as sharp as desired, consider the monitor's native resolution settings and make sure your source device is outputting at a compatible resolution for the best visual fidelity.
How to perform a factory reset on a portable monitor?
Performing a factory reset on a portable monitor often depends on the specific make and model of the monitor. However, there are general steps you can follow for most portable monitors. It's important to refer to the user manual for your specific model for precise instructions, but here's a general guide:
- Power On the Monitor: Ensure your portable monitor is connected to a power source and turned on.
- Access the Menu: Look for a button labeled "Menu" on the side or back of the monitor. This might also be accessible via touch controls if your monitor supports it. Press the "Menu" button to enter the on-screen display (OSD) menu.
- Navigate the Menu: Use the directional buttons, which might be located near the Menu button, to navigate through the OSD. Look for a section labeled "Settings," "System," "Setup," or anything similar.
- Select Factory Reset: Within the settings menu, look for an option that says "Factory Reset," "Reset to Default," "Restore Defaults," or something similar. Select this option.
- Confirm Reset: You might be prompted to confirm your selection. Use the navigation buttons to select "Yes" or "OK" to confirm.
- Reboot if Necessary: After performing the reset, some monitors might restart automatically, while others might need you to turn them off and back on again.
- Check and Reconfigure: Once the reset is complete, your monitor will revert to its original factory settings. You may need to reconfigure certain settings like language, brightness, and contrast to suit your preferences.
If these steps don't apply to your monitor, consulting the user manual or manufacturer's website for guidance is a good idea. Additionally, if your portable monitor has unique software or app support, you might need to use these to perform a reset.
How to extend battery life while using a portable monitor?
Extending the battery life while using a portable monitor involves a combination of managing both the monitor's power consumption and optimizing the power settings on your connected device. Here are some strategies:
- Optimize Brightness Settings: Lower the brightness of the portable monitor to the minimum level that is comfortable for viewing. High brightness settings typically consume more power.
- Use Power-Saving Modes: Check if the portable monitor has power-saving modes or eco-modes that reduce power consumption.
- Manage Connected Device Settings: Adjust settings on the connected device (e.g., laptop or smartphone) to consume less power. This includes lowering the brightness, closing unnecessary applications, and disabling features like Bluetooth and Wi-Fi when not in use.
- Choose Efficient Connectivity: If the portable monitor supports multiple types of connectivity (e.g., HDMI, USB-C), use the one that is most efficient for your device in terms of power consumption.
- Turn Off When Not in Use: Turn off the monitor when you are not using it, even for short periods, to save battery life.
- Use External Power Sources: If possible, use an external power source like a power bank to power the portable monitor. This will reduce the drain on your device’s battery.
- Limit Resource-Intensive Activities: Avoid running high-power or resource-intensive applications that require a lot of graphics processing, as they can increase power draw.
- Use Energy-Efficient Equipment: If you're selecting a portable monitor, choose one with energy-efficient LED backlighting and consider its energy consumption rating.
- Regularly Update Software: Ensure that the firmware or software for the portable monitor and your connecting device is up to date, as updates can optimize power management features.
- Turn Off Unused Features:
- Disable any features or functionalities on the monitor that you don’t need, like audio output if it's not necessary.
Implementing these strategies can help you maximize battery life while using a portable monitor, thereby extending the time you have before needing to recharge your devices.
How to troubleshoot connectivity issues with a portable monitor?
Troubleshooting connectivity issues with a portable monitor can involve several steps to identify and resolve the problem. Here’s a guide to help you diagnose and fix these issues:
- Check the Connections: Ensure that all cables (USB-C, HDMI, etc.) are securely plugged into both the monitor and the device (laptop, desktop, etc.). If using adapters, confirm they are compatible and properly connected.
- Try Different Cables and Ports: Swap out the cable with another one to see if the issue is with the cable. Try connecting the monitor to a different port on your device if available.
- Verify Power Supply: Make sure the portable monitor is receiving power, especially if it requires an external power source. Check for any power indicator lights on the monitor.
- Adjust Display Settings: On your device, go to the display settings and ensure that the portable monitor is detected and configured correctly (extend, duplicate, or as a second screen). Adjust the screen resolution to ensure it matches the specifications of the portable monitor.
- Update Drivers: Check for updates for your device’s graphics drivers, as outdated drivers can cause connectivity problems. Also, check for any firmware updates for the portable monitor, if applicable.
- Test with Another Device: Connect the portable monitor to a different laptop or device to determine if the problem lies with the monitor or the original device.
- Cycle Power Sources: Disconnect the monitor and power it off completely, then reconnect and power it back on. Perform a power cycle on your computer as well.
- Check Device Compatibility: Make sure your device supports the connection type and power requirements of the portable monitor. Refer to the monitor’s manual or specifications for any compatibility constraints.
- Inspect for Physical Damage: Check for any visible signs of damage on the monitor, cables, ports, and connectors.
- Perform a Hardware Reset: For some monitors, a small reset button or a specific combination of button presses can reset the device’s hardware settings.
- Consult Documentation: Review the user manual and manufacturer support site for troubleshooting tips specific to your model.
- Consider Technical Support: If none of the above steps work, contact the manufacturer’s customer support for further assistance.
Through these steps, you should be able to identify and address most connectivity issues with a portable monitor.
How to connect a portable monitor to a laptop for optimal performance?
Connecting a portable monitor to a laptop can enhance your productivity or gaming experience. To ensure optimal performance, follow these steps:
- Check Compatibility: Ensure that the portable monitor is compatible with your laptop. Check the ports available on both devices such as HDMI, USB-C, Mini DisplayPort, or others.
- Select the Right Cable: Use a high-quality cable that matches the best available connection option on your laptop. For USB-C, make sure your laptop supports video output through this port. An HDMI connection is also commonly used and reliable.
- Update Drivers: Update your laptop's graphics drivers to the latest version. This can improve compatibility and performance with external displays.
- Adjust Display Settings: Once connected, open your laptop's display settings (usually found in System Preferences for macOS or Settings > System > Display for Windows). Choose the display mode: Extend, Duplicate, or Second Screen Only, depending on your needs. Set the resolution and refresh rate to match the portable monitor’s native settings for optimal performance.
- Power Settings: Some portable monitors require external power. Ensure that the monitor is adequately powered, either through a power adapter or a powered USB port.
- Positioning and Ergonomics: Place your portable monitor at eye level to minimize strain. Ensure it's stable and secure to prevent accidental toppling.
- Color Calibration: If necessary, calibrate the color settings on the portable monitor so that it matches your laptop’s screen or your preferences.
- Graphics Settings: If you’re using the portable monitor for gaming, access the graphics settings in your operating system or through your GPU’s control panel to dedicate more resources or optimize settings for the secondary monitor.
- Test Performance: Check for performance issues like lag or stuttering. If they occur, ensure no unnecessary background applications are running that may affect performance.
- Troubleshooting: If you encounter connectivity issues, restart both the monitor and laptop, and ensure all cables are securely connected. Double-check compatibility and settings.
By following these steps, you should be able to achieve optimal performance with your portable monitor and enhance your multi-tasking capabilities or visual experience.
How to reduce glare on a portable monitor?
Reducing glare on a portable monitor can improve visibility and reduce eye strain. Here are some strategies you might consider:
- Location and Positioning: Reorient the Monitor: Adjust the monitor's position to angle it away from direct light sources like windows or bright overhead lights. Lighting Adjustments: Use blinds or curtains to control natural light, or rearrange the room lighting to minimize reflections on the screen.
- Use a Monitor Hood: Purchase a Monitor Hood: These are designed to shade the screen and reduce glare from surrounding lights. DIY Hood: You can make one using cardboard or similar materials if a commercial hood isn’t available.
- Anti-Glare Screen Protector: Apply an anti-glare or matte screen protector. These are relatively inexpensive and can significantly reduce reflections on the screen.
- Adjust Display Settings: Brightness and Contrast: Adjust the monitor's brightness and contrast settings to optimize visibility in different lighting conditions. Ambient Light Sensors: If your monitor has this feature, enable it to automatically adjust brightness based on surrounding light.
- Work Environment: Color Schemes: Use software options to enable dark mode or high-contrast themes, which can be easier on the eyes in bright environments. Monitor Calibration: Ensure your monitor is properly calibrated to enhance screen performance and reduce strain.
- Use Polarized Sunglasses: If other options are not possible, wearing polarized sunglasses might help reduce glare while working.
By implementing these methods, you should be able to minimize glare and enhance your viewing experience on your portable monitor.
What is the role of pixel density in display clarity?
Pixel density, often measured in pixels per inch (PPI), plays a crucial role in determining the clarity and sharpness of a display. Here’s how it impacts display quality:
- Detail and Sharpness: Higher pixel density means more pixels are packed into each inch of the display, allowing for finer detail and sharper images. This is particularly important for reading text, viewing images, or watching videos, as higher pixel density can make content appear clearer and more lifelike.
- Smoothness of Edges: Displays with high pixel density exhibit smoother edges and curves because the increased number of pixels can more accurately represent curved lines and subtle details. This reduces the jagged edges that can appear in lower-density displays.
- Viewing Distance: The benefits of higher pixel density are most noticeable at closer viewing distances. For example, on smartphones or tablets, where the user is typically close to the screen, high PPI is crucial. On larger screens like TVs, high pixel density is less critical if viewed from a standard distance.
- Color and Contrast: A higher pixel density can improve the perception of color and contrast. Since more pixels can display more subtle variations in color and tone, the overall image quality can appear more vibrant and realistic.
- Reduction of Screen Door Effect: In displays with low pixel density, individual pixels may become visible, especially at close range, creating a "screen door" effect where the grid structure of the display is noticeable. Higher pixel density minimizes this effect, enhancing visual immersion.
In summary, a higher pixel density generally leads to a clearer, crisper display, which is especially important for devices frequently used at close range. However, the optimal pixel density also depends on the intended use, display size, and viewing distance.