
Best Keyboard Cleaning Tools to Buy in July 2026
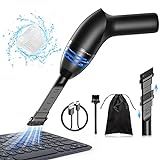
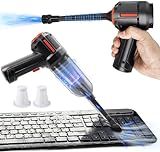
Hayousui 4.3Kpa Keyboard Vacuum Cleaner Mini:Handheld Computer Vacuum Cordless for Car Laptop Sewing Machine Portable Keyboard Vac USB Desk Crumbs Dust Cleaners
-
POWERFUL 4.3KPA SUCTION EASILY TACKLES DUST, CRUMBS, AND PET HAIR.
-
VERSATILE 2-IN-1 NOZZLE CLEANS TIGHT CREVICES AND ROUGH SURFACES.
-
USB RECHARGEABLE WITH 15-20 MINS OF RUNTIME FOR ON-THE-GO CLEANING.


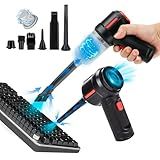
Car Vacuum Portable Cordless Handheld Vacuum Cleaner 4-in-1 Mini Cordless Vacuum with 2 Suction Modes and 16800pa Suction Power Blowing & Inflating 2 Modes Handheld Vacuum for Car, Desk, Keyboards
- VERSATILE 4-IN-1 DESIGN: VACUUM, BLOW, INFLATE, AND SUCTION WITH EASE!
- POWERFUL 16.8 KPA SUCTION: EASILY TACKLES FINE SAND, DUST, AND DEBRIS.
- ULTRA-LIGHT AND PORTABLE: WEIGHS JUST 1 LB FOR EFFORTLESS CLEANING ANYWHERE!
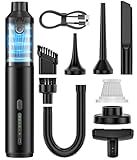
A9life Handheld Vacuum Cordless, Car Vacuum Cleaner Portable with HEPA Filter, 2 Suction Modes, Mini Hand Held Vacuum Rechargeable for Car, Home, Pet Hair, Office, Desk, Keyboards (Black)
-
CORDLESS & ULTRA-LIGHT: JUST 0.72 LBS FOR EFFORTLESS ONE-HANDED CLEANING!
-
POWERFUL SUCTION: TWO MODES HANDLE ANY MESS IN SECONDS!
-
MULTI-SURFACE TOOLS: TACKLE EVERY CLEANING CHALLENGE WITH EASE!
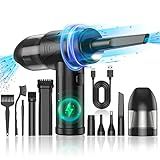
KMM Handheld Car Vacuum Cleaner, 9000Pa Vacuum Cleaner and Air Duster, 120W High Power Hand Held Vacuum with LED Light and Multi-Nozzles for Car, Home, Office, Pet
- FAST CHARGING IN 3 HOURS; ECO-FRIENDLY, REPLACES AIR CANISTERS.
- 2-IN-1 DESIGN: POWERFUL VACUUM AND AIR DUSTER FOR VERSATILE CLEANING.
- LIGHTWEIGHT, COMPACT, WITH LED LIGHT FOR EASY USE IN ANY SITUATION.
PeroBuno Computer Vacuum Cleaner - Air Duster - for Keyboard Cleaning - Cordless Canned Air - Powerful - Energy - Efficient - Compressed
- LEAK-FREE AIR DUSTER: MAX EFFICIENCY IN DUST REMOVAL WITHOUT AIR LEAKS.
- CORDLESS CONVENIENCE: PORTABLE DESIGN FOR EASY CLEANING ANYWHERE, ANYTIME.
- ECO-FRIENDLY & COST-EFFECTIVE: REUSABLE, SAVING MONEY ON DISPOSABLE CANS.
Meudeen Air Duster - Computer Vacuum Cleaner - for Keyboard Cleaning- Cordless Canned Air- Powerful - Energy-Efficient(Air-01)
-
3-IN-1 FUNCTIONALITY: VACUUM, DUST, AND BLOW WITH ONE VERSATILE DEVICE!
-
VERSATILE ACCESSORIES: 6+ ATTACHMENTS FOR EVERY CLEANING CHALLENGE YOU FACE.
-
POWERFUL & COMPACT: STRONG SUCTION IN A LIGHTWEIGHT DESIGN FOR EASY HANDLING.
TRANSWARRIOR Electric Air Duster & Vacuum Cleaner 2-in-1, 110000RPM Keyboard Cleaner for PC, No Canned Air - Compressed Air Duster, Blower, Turbo Fan, Battery Powered, Refillable, PC Cleaning Kit
-
ECO-FRIENDLY AND REUSABLE: SAVE MONEY AND REDUCE WASTE TODAY!
-
POWERFUL AIRFLOW: DEEP CLEANS DUST FROM ALL YOUR DEVICES EFFORTLESSLY.
-
VERSATILE DESIGN: PERFECT FOR HOME, OFFICE, AND CAR CLEANING NEEDS.
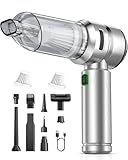
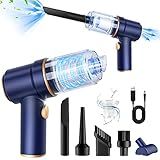
VNOST Car Vacuum,3 Suction Modes,Portable Mini Cordless Cleaner with 24000pa Suction Power,Type-C Charge,Handheld Vacuum for Home,Car, Office Desk, Keyboards(Dark Silver)
- 24000PA SUCTION POWER: EFFORTLESSLY TACKLE DUST WITH ADJUSTABLE MODES.
- 4-IN-1 VERSATILITY: VACUUM, INFLATE, AND EXTRACT WITH NINE ATTACHMENTS.
- QUICK CHARGE BATTERY: 30 MINS RUN-TIME WITH FAST TYPE-C CHARGING.
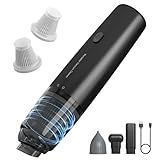
Powerful Compressed Air Duster for Deep Cleaning-Replace Compressed Air Can-No Canned Air Duster-Keyboard Cleaner-PC Cleaning-Rechargeable-3-Speeds-95000RPM Cordless Air Blower-Car Duster 8000mAh
- THREE ADJUSTABLE SPEEDS: CUSTOMIZE AIRFLOW FOR EFFECTIVE CLEANING.
- 2-IN-1 FUNCTIONALITY: DUST AND VACUUM WITH VERSATILE NOZZLES INCLUDED.
- ECO-FRIENDLY RECHARGEABLE: SAVE MONEY AND THE ENVIRONMENT EFFORTLESSLY.
Cleaning your keyboard with a vacuum can help maintain its functionality and appearance by removing dust, crumbs, and debris that accumulate with regular use. The frequency with which you should do this depends on several factors, such as your environment and usage habits. Generally, for an average user, vacuuming your keyboard once a month should be sufficient to keep it clean. However, if you frequently eat at your desk, have pets, or work in a dusty environment, you might need to clean it more frequently, perhaps every couple of weeks, to prevent buildup that could affect its performance. Make sure to use a vacuum with a soft brush attachment to avoid damaging the keys and be gentle during the process.
What is the best practice for cleaning laptop keyboards?
Cleaning a laptop keyboard requires a gentle approach to avoid damaging the keys or electronic components. Here are some best practices you can follow:
- Power Down: Turn off your laptop and disconnect it from any power sources. Remove the battery if possible.
- Initial Cleaning: Shake Out Debris: Turn the laptop upside down and gently shake it to dislodge any loose debris. Compressed Air: Use a can of compressed air to blow out dust and particles from between the keys. Hold the can at an angle and make short bursts to avoid moisture.
- Surface Cleaning: Microfiber Cloth: Dampen a microfiber cloth with a small amount of isopropyl alcohol (70% or higher) or water. The cloth should be slightly damp, not wet. Wipe the Keys: Gently wipe the surface of the keys and the surrounding areas. Avoid getting liquid under the keys.
- Targeted Cleaning: Cotton Swabs: For more stubborn dirt, you can use cotton swabs lightly dampened with isopropyl alcohol. Carefully clean around the edges of each key.
- Deep Cleaning (if necessary and if you're comfortable): Removing Keys: Some keyboards allow you to remove the keys for a more thorough cleaning. Check your laptop's manual to see if this is recommended or possible. Note that this can be risky and might void your warranty or cause damage if not done properly.
- Drying: Allow the laptop to dry completely before turning it on. Ensure there's no moisture left between the keys.
- Avoid: Avoid using excessive force or sharp objects that can damage the keys. Do not spray cleaning solutions directly onto the keyboard.
Regular maintenance and gentle cleaning are key to prolonging the lifespan and functionality of your laptop keyboard.
What is an alternative to using a vacuum for keyboard cleaning?
An alternative to using a vacuum for cleaning a keyboard is using compressed air. Compressed air cans are specifically designed to blow dust and debris out from between the keys without causing any damage. Another option is using a small, soft-bristled brush to gently sweep away the dust and dirt. Keyboard cleaning gels or putties are also popular; they can be pressed into the keyboard to lift out particles without leaving residue. For deeper cleaning, you could remove the keycaps (if your keyboard design allows) and clean them separately.
How to clean a mechanical keyboard?
Cleaning a mechanical keyboard involves several steps to ensure that you remove dust, dirt, and any spills effectively without damaging the components. Here’s a step-by-step guide to help you clean your mechanical keyboard:
Materials Needed:
- Keycap puller
- Soft brush or compressed air
- Microfiber cloth or soft lint-free cloth
- Isopropyl alcohol (preferably 70% or higher) diluted with a bit of water
- Cotton swabs
- Mild soap (optional)
- Small bowl for soaking
Steps:
- Unplug the Keyboard: Always unplug your keyboard from the computer or disconnect it from your device if it's wireless.
- Remove the Keycaps: Use a keycap puller to remove the keycaps gently. Place the puller over a keycap, apply gentle pressure, and pull up. Work carefully to avoid damaging or losing any keycaps.
- Clean the Keycaps: Soak the keycaps in a bowl of warm water and a small amount of mild soap. Let them soak for about 15-30 minutes. After soaking, use a soft cloth or brush to scrub any remaining dirt. Rinse thoroughly and allow them to dry completely, ideally overnight on a towel.
- Clear Dust and Debris: Use a soft brush or compressed air to remove dust, crumbs, and debris from the keyboard base. If using compressed air, spray at an angle to help dislodge particles.
- Clean the Keyboard Deck: Dampen a microfiber cloth with a mixture of water and isopropyl alcohol (use it sparingly to avoid excess moisture). Wipe down the keyboard deck thoroughly, paying attention to any sticky areas.
- Clean Around and In Between Switches: Use cotton swabs dipped very lightly in isopropyl alcohol to clean around the switches. Do not pour alcohol directly onto the keyboard.
- Reattach the Keycaps: Once keycaps are thoroughly dry, carefully reattach them to their respective switches. Press gently until each keycap clicks into place.
- Final Check: Perform a final check to ensure all keys are securely attached and test the keyboard to confirm all keys are working properly.
Additional Tips:
- Regular Maintenance: Dust your keyboard regularly with a soft brush or compressed air to minimize buildup.
- Avoid Harsh Chemicals: Do not use bleach or strong detergents, as they can damage the plastic.
- Liquid Spills: If you spill liquid, immediately unplug the keyboard, remove keycaps, and let the keyboard dry out completely. Clean and dry thoroughly before reusing.
By following these steps, you can maintain your mechanical keyboard in good working condition and prolong its lifespan.
What is the safest way to clean a keyboard?
Cleaning a keyboard safely involves a few careful steps to ensure that you don't damage it. Here’s a step-by-step guide:
- Turn Off/Disconnect the Keyboard: If it's a wired keyboard, unplug it from the computer. If it's a wireless keyboard, turn it off and remove the batteries if applicable.
- Remove Loose Debris: Tilt the keyboard upside down and gently shake it to dislodge any loose debris (like crumbs or dust).
- Use Compressed Air: Use a can of compressed air to blow out any debris between the keys. Hold the can upright to prevent any propellant from spraying out, and use short bursts of air.
- Remove Keycaps (if possible): For mechanical keyboards, you can remove the keycaps using a keycap puller. This allows for a deeper clean. Make sure to take a photo of your keyboard's layout before removing the keycaps so you can easily put them back in place.
- Clean the Surface: Use a slightly damp microfiber cloth to wipe down the surface of the keyboard. Avoid using paper towels or rough fabrics that might scratch the surface.
- Disinfect the Keys: Apply a small amount of isopropyl alcohol (at least 70%) to a cotton swab or cloth and gently wipe each key. This will disinfect and remove oils and dirt. Do not pour or spray alcohol directly onto the keyboard.
- Keycaps Cleaning: If you've removed the keycaps, you can soak them in warm, soapy water. Rinse them and let them dry completely before reattaching.
- Reassemble the Keyboard: Once everything is thoroughly dry, place the keycaps back onto the keyboard.
- Inspect and Replace: Check for any remaining dirt or residue. If necessary, repeat cleaning any persistent areas.
- Preventive Maintenance: Regularly dust and wipe down your keyboard to prevent buildup of dirt. Consider using a keyboard cover or washing your hands before use to keep it cleaner.
These steps should help you effectively and safely clean your keyboard. Always follow the specific care instructions from the keyboard manufacturer, as different materials may require different methods.
How to use a vacuum for cleaning electronics?
Using a vacuum to clean electronics can be tricky because of the risk of static electricity, which can damage sensitive components. However, if done carefully, it can be effective in removing dust and debris. Here are some tips for using a vacuum to clean your electronics:
- Choose the Right Vacuum: Use a vacuum specifically designed for electronics, often called an electronics vacuum or mini vacuum cleaner. These usually come with anti-static properties. If you don't have an electronics vacuum, use a handheld vacuum with a low power setting.
- Use Appropriate Attachments: Use brush or soft nozzle attachments to avoid scratching the surfaces or damaging components. Avoid using metal attachments unless they're specifically designed to be anti-static.
- Prevent Static Build-Up: Consider using an anti-static wrist strap or mat to ground yourself while cleaning, reducing the risk of static discharge. Spray surfaces with anti-static spray if you have one.
- Preparation: Turn off and unplug the electronic device before cleaning. Remove any detachable components, like keyboards or casings, if possible and safe to do so.
- Cleaning Process: Start by vacuuming from a small distance to avoid sucking in loose parts and adjust as needed. Gently run the soft brush attachment over surfaces to loosen dust, then vacuum them up. Be careful around fans and vents-hold the fan in place to prevent it from spinning too fast, which can generate electricity. Avoid using high suction power directly on small or delicate components.
- Consider Alternatives: In some cases, using a can of compressed air to blow dust out before vacuuming might be more effective. Use microfiber cloths or specially-designed electronics cleaning wipes for surfaces.
- Frequency: Regularly clean your electronics to prevent heavy accumulation of dust, which makes cleaning easier and quicker.
By taking these precautions, you can safely use a vacuum to help clean your electronics without risking damage from static electricity.