
Best Keyboard Vacuum Maintenance Tools to Buy in July 2026
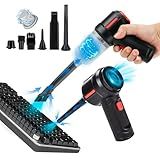
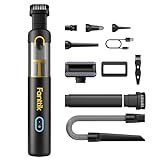
Meudeen Air Duster - Computer Vacuum Cleaner - for Keyboard Cleaning- Cordless Canned Air- Powerful - Energy-Efficient(Air-01)
- 3-IN-1 TOOL: VACUUM, AIR DUSTER, AND BLOWER IN ONE COMPACT DEVICE!
- VERSATILE ACCESSORIES: 6+ ATTACHMENTS FOR CLEANING ANY HARD-TO-REACH AREA!
- LONG BATTERY LIFE: FAST CHARGING, RELIABLE LITHIUM BATTERY FOR EXTENDED USE!


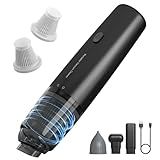
A9life Handheld Vacuum Cordless, Car Vacuum Cleaner Portable with HEPA Filter, 2 Suction Modes, Mini Hand Held Vacuum Rechargeable for Car, Home, Pet Hair, Office, Desk, Keyboards (Black)
-
ULTRA-LIGHTWEIGHT DESIGN ENABLES EFFORTLESS ONE-HANDED CLEANING ANYWHERE.
-
POWERFUL SUCTION WITH ADJUSTABLE MODES TACKLES ANY MESS IN SECONDS.
-
VERSATILE TOOLS FOR EVERY SURFACE MAKE CLEANING FAST AND EFFICIENT.
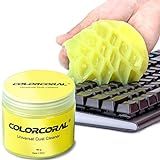
COLORCORAL Cleaning Gel Universal Dust Cleaner for PC Keyboard Car Detailing Office Electronics Laptop Dusting Kit Computer Dust Remover, Computer Gaming Car Accessories, Gift for Men Women 160g
- UNIVERSAL FIT FOR VERSATILE CLEANING OF ALL DEVICES
- SAFE, NON-STICKY GEL WITH REFRESHING LEMON SCENT
- REUSABLE AND EFFECTIVE FOR LONG-LASTING CLEANLINESS
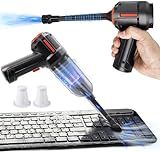
Car Vacuum Portable Cordless Handheld Vacuum Cleaner 4-in-1 Mini Cordless Vacuum with 2 Suction Modes and 16800pa Suction Power Blowing & Inflating 2 Modes Handheld Vacuum for Car, Desk, Keyboards
-
VERSATILE 4-IN-1 FUNCTIONALITY: VACUUM, BLOW, INFLATE, AND SUCTION!
-
POWERFUL 16.8KPA SUCTION: STRONG ENOUGH TO TACKLE FINE DUST AND DEBRIS.
-
ULTRA-LIGHT & PORTABLE: WEIGHS ONLY 1 LB FOR EASY, HASSLE-FREE CLEANING.
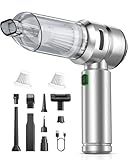
Fanttik Slim V8 APEX Car Vacuum, 4-in-1 Portable Mini Cordless Vacuum with 19000pa Suction Power, Type-C Charge, 2 Suction Modes, Handheld Vacuum for Small Jobs, Car, Office Desk, Keyboards (Black)
-
COMPACT & LIGHTWEIGHT: JUST 1.1LBS, PERFECT FOR EFFORTLESS ONE-HANDED USE!
-
VERSATILE 4-IN-1 DESIGN: VACUUM, BLOW, INFLATE, AND PUMP WITH EASE!
-
POWERFUL 19000PA SUCTION: CLEANS DUST & DEBRIS EFFORTLESSLY IN EVERY CORNER!
PeroBuno Computer Vacuum Cleaner - Air Duster - for Keyboard Cleaning - Cordless Canned Air - Powerful - Energy - Efficient - Compressed
-
NO MORE AIR LEAKS: EXPERIENCE HIGHER EFFICIENCY WITH NO LEAKS!
-
CORDLESS CONVENIENCE: CLEAN ANY SURFACE EFFORTLESSLY WITHOUT CORDS!
-
COST-EFFECTIVE & REUSABLE: SAY GOODBYE TO DISPOSABLES; SAVE MONEY NOW!
VNOST Car Vacuum,3 Suction Modes,Portable Mini Cordless Cleaner with 24000pa Suction Power,Type-C Charge,Handheld Vacuum for Home,Car, Office Desk, Keyboards(Dark Silver)
-
24000PA SUCTION POWER: EFFORTLESSLY TACKLES DUST AND DEBRIS IN SECONDS!
-
VERSATILE 4-IN-1 FUNCTIONALITY: VACUUM, BLOW, INFLATE, AND EXTRACT WITH EASE.
-
QUICK RECHARGE & LONG RUN TIME: 30 MINS OF USE; FAST TYPE-C CHARGING INCLUDED!

Buysk 32mm Vacuum Attachments Accessories, Vacuum Cleaning Set Brush Nozzle Crevice Tool with 35mm to 32mm Hose Adapter 5pcs
-
DURABLE PP MATERIAL ENSURES LONG-LASTING PERFORMANCE AND PORTABILITY.
-
COMPATIBLE WITH 31MM & 34MM VACUUM PIPES-CHECK SIZE BEFORE BUYING!
-
VERSATILE ATTACHMENTS FOR CLEANING CARS, FURNITURE, AND HIGH PLACES.
YUNYILAN Desktop Vacuum Cleaner USB Recharging, Portable Mini Vacuum Cleaner for Cleaning Eraser Crumbs, Dust, Crumbs, Computer Keyboard and Car (Pink)
-
POWERFUL SUCTION: EFFORTLESSLY TACKLE DUST, CRUMBS, AND PET HAIR.
-
USB RECHARGEABLE: SAVE MONEY WITH HASSLE-FREE CHARGING-NO BATTERIES NEEDED!
-
PORTABLE DESIGN: LIGHTWEIGHT AND COMPACT FOR EASY CLEANING ANYWHERE, ANYTIME.

HOTO Handheld Car Vacuum Cleaner Cordless, 4-in-1 Portable Mini Vacuum with 20000Pa Strong Suction, Electric Compressed Air Duster Blower for Car, Desk, Computer, Keyboard, Home, Office Cleaning
-
POWERFUL 20,000 PA SUCTION FOR DEEP CLEANING DUST AND DEBRIS.
-
4-IN-1 DESIGN: VACUUM, BLOW, INFLATE, AND SEAL WITH EASE!
-
COMPACT AND LIGHTWEIGHT AT 0.78 LBS – PERFECT FOR ON-THE-GO CLEANING.
To maintain your keyboard vacuum for long-lasting use, start by regularly cleaning its filters to ensure optimal suction power; this may involve rinsing or replacing them as recommended by the manufacturer. Always empty the dust container after each use to prevent clogs and maintain performance. Store your vacuum in a dry, cool place to avoid damage from moisture or extreme temperatures. Keep an eye on the power cord and attachments, ensuring they are free of tangles or damage; replace them if necessary. Periodically check the moving parts for any debris or lint build-up, and gently clean them to avoid wear and tear. Lastly, refer to the user manual for any specific maintenance advice tailored to your particular model to guarantee its longevity.
How to troubleshoot a keyboard vacuum that won't turn on?
If your keyboard vacuum won't turn on, here are some troubleshooting steps you can follow to identify and potentially resolve the issue:
- Check the Power Source: Ensure that the vacuum is plugged into a working electrical outlet. You can test the outlet with another device to confirm it has power. If your vacuum is battery-operated, ensure the battery is fully charged and properly inserted.
- Inspect the Power Cord or Battery: Look for any visible signs of damage to the power cord, plug, or battery. Frayed or damaged cords can prevent the device from receiving power. If the vacuum uses an AC adapter, check that the adapter is functioning properly.
- Examine the On/Off Switch: Verify that the power switch is functioning and in the correct position. Sometimes switches can get stuck or become non-responsive.
- Look for Blockages: Check the vacuum’s intake and other openings for any blockages that might prevent it from functioning. Sometimes, debris can get stuck and cause the motor not to turn on.
- Check for Overheating: Many small vacuums have automatic shut-off features that activate if the device overheats. If it feels hot, allow it to cool down for a period before trying to turn it on again.
- Inspect Internal Components: If you are comfortable with it, you might open the vacuum to check for any visible internal issues like disconnected wires. Make sure the device is unplugged and the battery removed before attempting this step.
- Consult the User Manual: Refer to the user manual for any specific troubleshooting tips or reset instructions provided by the manufacturer.
- Reset the Vacuum: Some vacuums include a reset button or require a specific sequence of actions to reset. Follow any instructions available in your manual.
- Contact Customer Support: If the problem persists, contact the manufacturer’s customer service for additional support. They may offer repair services or additional troubleshooting steps.
- Warranty and Repair: If your device is under warranty, consider taking advantage of any repair or replacement services provided by the manufacturer.
By systematically checking each part of the vacuum and its power supply, you should be able to pinpoint the problem or determine if professional repair is needed.
What is a HEPA filter in a keyboard vacuum?
A HEPA filter, or High-Efficiency Particulate Air filter, is a type of air filter that is designed to remove at least 99.97% of airborne particles that are 0.3 micrometers in diameter. In the context of a keyboard vacuum, a HEPA filter is used to trap dust, allergens, and other tiny debris that can accumulate on and around a keyboard.
By incorporating a HEPA filter, a keyboard vacuum can effectively capture small particles that are often missed by standard filters, improving air quality around the cleaning area and preventing the recirculation of dust and other allergens into the environment. This is particularly beneficial for individuals with allergies or asthma, as it helps reduce exposure to potential irritants.
How to disassemble a keyboard vacuum for cleaning?
Disassembling a keyboard vacuum for cleaning involves several steps to ensure you do it safely and effectively. While specific models may vary, here are some general guidelines to follow:
- Unplug or Remove Batteries: Make sure the vacuum is unplugged or the batteries are removed to ensure safety while disassembling.
- Consult the Manual: If available, refer to the user manual for specific disassembly instructions related to your model. This will provide the most accurate guidance.
- Locate the Screws: Most keyboard vacuums have screws that hold the casing together. These can typically be found on the bottom or sides. You will need a suitable screwdriver, usually a small Phillips-head or flat-head.
- Remove the Screws Carefully: Carefully unscrew and remove all the screws. Keep them in a safe place so that you don’t lose them.
- Open the Casing: Gently pull apart the casing. Be cautious, as it may have clips that need to be carefully undone by hand or with a plastic prying tool.
- Identify Internal Components: Once open, you’ll see the internal components such as the motor, fan, and dust collection compartment. The fan and dust container are often the main parts that require cleaning.
- Clean the Components: Dust Container: If detachable, remove it and either empty it or wash if it’s water-safe. Filter: Many models have a filter. If the filter is washable, rinse it under water and ensure it is completely dry before reassembly. If not, gently tap out the dust or use compressed air. Fan and Motor Area: Use a soft brush or compressed air to remove any dust or debris.
- Reassemble the Vacuum: Once cleaned, carefully reassemble all the parts in reverse order. Make sure everything is properly aligned before tightening screws.
- Test the Vacuum: Plug it back in or reinsert the batteries and test it to ensure it is working properly.
Always be cautious and gentle when handling the components to avoid damage. If you encounter any difficulties, refer back to the manual or seek online resources specific to your model.
What is the recommended cleaning frequency for a keyboard vacuum?
The recommended cleaning frequency for a keyboard vacuum depends on how frequently you use it and the environment in which it is used. However, a general guideline is as follows:
- Frequent Usage in High-Dust Environments: If you use the vacuum frequently or in a dusty environment, consider cleaning it every 1-2 weeks. This ensures optimal performance and longevity by preventing the buildup of dust and debris within the vacuum unit.
- Moderate Usage: For moderate usage, cleaning the vacuum once a month should suffice. This involves emptying the dust container, checking and cleaning or replacing the filter (if applicable), and ensuring that the nozzle or brush attachment is clear of obstructions.
- Light Usage or Clean Environments: If the vacuum is used infrequently or in relatively clean environments, you can clean it every 2-3 months. Regular checks to ensure that it’s functioning properly are still advisable.
Remember, specific cleaning instructions may vary depending on the brand and model of your keyboard vacuum, so it’s always a good idea to consult the user manual for manufacturer-recommended maintenance schedules and procedures.
How to replace the filter in a keyboard vacuum?
Replacing the filter in a keyboard vacuum is typically a straightforward process, though the exact steps can vary slightly depending on the brand and model of your vacuum. Here’s a general guide to help you replace the filter:
- Turn Off and Unplug: Ensure that the vacuum is turned off and unplugged from any power source to avoid any accidents or damage.
- Locate the Filter Compartment: Most keyboard vacuums have a designated compartment for the filter. This is usually accessible from the back or the bottom. Consult your vacuum’s manual if you’re unsure where the filter is located.
- Open the Compartment: Depending on the model, you might need to unscrew the compartment cover or simply slide it open. If screws are involved, you may need a screwdriver.
- Remove the Old Filter: Carefully take out the old filter. It might be secured with clips or just placed in a slot. Be gentle to avoid damaging other components or scattering dust.
- Dispose of the Old Filter: If the filter is disposable, throw it away in compliance with your local waste disposal regulations. Be cautious as the filter may contain a significant amount of dust and debris.
- Insert the New Filter: Place the new filter in the same position as the old one. Ensure it fits snugly and securely within any clips or slots provided.
- Secure the Compartment: Close the filter compartment by sliding the cover back in place or reattaching any screws. Make sure it is sealed properly to avoid loss of suction or performance issues.
- Test the Vacuum: Plug the vacuum back in and turn it on to ensure it’s working correctly with the new filter. Listen for any unusual noises and check if the suction is effective.
- Regular Maintenance: Check the filter regularly for dust buildup and replace it as recommended by the manufacturer to maintain optimal vacuum performance.
If you have the manual for your keyboard vacuum, it’s a good idea to refer to it for any model-specific instructions or tips.