
Best Keyboard Vacuum Attachments to Buy in July 2026
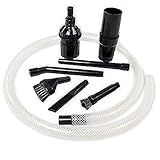
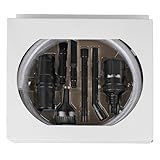
Schneider Industries Micro Vacuum Attachment 7 Piece Kit


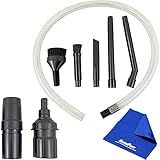
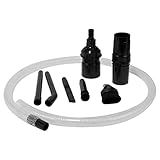
MaximalPower Mini/Micro Vacuum Cleaner Attachment Tool Kit 8 Pcs Set
-
TRANSFORM VACUUMS: CONVERT ANY HOUSEHOLD VACUUM INTO A MINI CLEANING MACHINE!
-
EASY INSTALLATION: SIMPLE ADAPTER SLIDES ONTO MOST VACUUM HOSES EFFORTLESSLY!
-
REACH EVERY NOOK: CLEAN TIGHT SPACES-KEYBOARDS, VENTS, AND CAR INTERIORS!
Schneider Industries Micro Vacuum Attachment 7 Piece Kit
- COMPACT DESIGN FOR EASY USE IN TIGHT SPACES AND QUICK CLEAN-UPS.
- VERSATILE ATTACHMENTS FOR VARIOUS SURFACES AND HARD-TO-REACH AREAS.
- CORDLESS CONVENIENCE FOR ULTIMATE MOBILITY AND PORTABILITY.
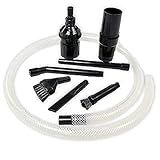
ZANVACUE Vacuum Cleaner Attachment Crevice Cleaning Tool Brush Kit Micro Cleaning Kit for Keyboard Compatible with Universal Vacuum Cleaner Attachment
- VERSATILE TOOL KIT FOR ALL VACUUM BRANDS, CONVENIENT FIT!
- EASILY CLEAN NARROW SPACES: IDEAL FOR CREVICES & TIGHT CORNERS!
- COMPLETE SET WITH 7 ATTACHMENTS FOR EVERY CLEANING NEED!
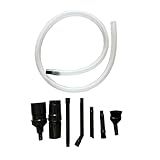
7PCS Micro Vacuum Attachments,Dryer Lint Vacuum Attachment Universal Vacuum Cleaner Attachment Tool Kit,Mini Cleaning Brush Vacuum Attachment Keyboard Crevice Cleaning Tool Brush Kit
-
UNIVERSAL FIT FOR MAJOR BRANDS: COMPATIBLE WITH TOP VACUUM MODELS.
-
VERSATILE CLEANING SOLUTIONS: 1000+ USES FOR HOMES AND WORKSHOPS.
-
DURABLE & LONG-LASTING: SUPERIOR QUALITY, RESILIENT MATERIALS ENSURE LONGEVITY.
Micro Vacuum Attachment 9 Piece Kit Keyboard Crevice Tool Brush Kit for Universal Vacuum Cleaner Attachments
-
UNMATCHED PRECISION: CLEAN NARROW CREVICES EFFORTLESSLY-NO LIQUIDS NEEDED!
-
VERSATILE TOOLSET: NINE SPECIALIZED ATTACHMENTS FOR EVERY TIGHT SPACE.
-
INTELLIGENT DESIGN: SAFELY VACUUM DEBRIS WITHOUT LOSING IMPORTANT PARTS!
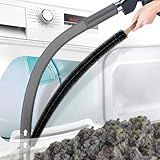
PetOde 2 Pieces Dryer Vent Cleaner Kit Compatible with Most Vacuum Cleaner, Dryer Lint Brush and Vacuum Hose Attachment, Quickly Lint Remover, Deep Gray
-
UNIVERSAL FIT: CONNECTS TO MOST VACUUMS, NO MORE INCOMPATIBILITY WORRIES!
-
VERSATILE USE: CLEANS DRYER VENTS, FRIDGE COILS, & TIGHT SPACES EASILY.
-
SAFETY FIRST: REGULAR LINT CLEANING REDUCES FIRE HAZARDS IN YOUR HOME!
Keyboard vacuums typically come with several attachments designed to handle various cleaning tasks. A common attachment is the crevice tool, which is narrow and elongated, allowing it to reach into tight spots between and underneath keys. There might also be a small brush attachment, useful for dislodging dust and debris that are stuck between keys or in hard-to-reach corners. Additionally, some keyboard vacuums come with flexible hoses that allow for greater maneuverability, as well as different sized nozzles to adapt to the size and shape of the area being cleaned. These attachments together make it easier to effectively clean a keyboard, ensuring that dust and debris don't accumulate and affect performance.
How to prevent damage to keys with vacuum attachments?
Preventing damage to keys when using vacuum attachments involves a few careful practices to ensure that the keys are protected while still effectively cleaning around them. Here’s how you can do it:
- Use a Soft Brush Attachment: If your vacuum has a soft brush attachment, use it to clean around and over the keys. The bristles are gentle and less likely to cause damage than other types of attachments.
- Control the Suction Power: Many vacuums have adjustable suction settings. Use a lower suction setting to minimize the risk of pulling keys off or causing any damage.
- Use a Thin Cloth Barrier: Place a thin cloth or pantyhose over the nozzle of the vacuum attachment. This allows dust and debris to be sucked up while providing a barrier to protect the keys.
- Proceed Gently: When vacuuming around keys, move the attachment gently and avoid pressing down on the keys to prevent any potential damage.
- Handheld Vacuums: Consider using a handheld vacuum designed specifically for delicate surfaces. These often have reduced power and more control for sensitive tasks.
- Manual Cleaning: For particularly delicate keys, consider using a can of compressed air or a small brush to manually remove debris without any risk of vacuum-related damage.
- Inspect Regularly: Before and after vacuuming, inspect the keys to ensure they are secure and have not been loosened during the process.
- Keep a Safe Distance: Maintain a safe distance between the vacuum nozzle and the keys. Direct contact should be avoided to prevent any potential suction damage.
By following these careful practices, you should be able to prevent damage to keys while still keeping them clean.
How to clean a keyboard with a vacuum?
Cleaning a keyboard with a vacuum can be a quick way to remove dust and debris. Here are some steps to ensure you do it safely and effectively:
- Unplug or Turn Off: Before you start, make sure to unplug your keyboard from your computer or turn off the wireless connection if it’s a wireless keyboard. For laptops, ensure they are shut down.
- Shake Out Loose Debris: Hold the keyboard upside down and gently shake it to remove any loose debris. You can also tap it lightly on the back to dislodge more stubborn particles.
- Use a Soft Brush Attachment: If your vacuum has a soft brush attachment, use it. This will help to avoid scratching the keys or damaging the keyboard. If you don't have a soft brush attachment, proceed with caution.
- Adjust Vacuum Settings: Set your vacuum to a low setting if possible. High suction can be too strong and might remove keys or damage the keyboard.
- Vacuum the Keyboard: Carefully run the vacuum with the brush attachment over the keyboard. Move systematically from one area to another to ensure you cover all parts of the keyboard. Pay special attention around the keys where debris can settle.
- Check for Remaining Dirt: After vacuuming, inspect the keyboard for any remaining particles. You might need to use a can of compressed air for hard-to-reach areas. Hold the can upright and spray short bursts to avoid moisture build-up.
- Wipe Exterior if Necessary: If your keyboard is still dirty, gently wipe the keys with a microfiber cloth dampened with a bit of isopropyl alcohol. Make sure the cloth is only slightly damp, not wet.
- Let it Dry: Allow the keyboard to fully air dry if you used any liquids before plugging it back in.
- Reconnect and Test: Once the keyboard is dry, reconnect it to your computer or turn on your wireless connection and test it to ensure all keys are functioning correctly.
Remember that regular maintenance can help prevent debris from building up in your keyboard.
What attachments are standard with keyboard vacuums?
Standard attachments for keyboard vacuums often include a variety of tools designed to effectively clean dust and debris from tight spaces and delicate electronics. Common attachments include:
- Crevice Tool: A narrow attachment that helps clean tight spaces between keys and other small gaps.
- Brush Nozzle: This attachment is equipped with soft bristles to gently remove dust from the surface of keyboards and other electronic devices without causing damage.
- Flat Nozzle: A wide, flat attachment for covering larger areas quickly, useful for surfaces around the keyboard.
- Extension Hose: Provides added reach and flexibility to maneuver around the keyboard and other tight spots.
- Precision Nozzle: A smaller, more focused nozzle for targeting specific areas with greater suction power.
These attachments cater to various cleaning needs, ensuring that a keyboard vacuum can effectively clean not only keyboards but also other office equipment and electronics.
What is a keyboard vacuum?
A keyboard vacuum is a small, handheld device designed specifically for cleaning the spaces between and around the keys of a computer keyboard. These vacuums are typically compact, lightweight, and powered either by USB connectivity or batteries, making them convenient for quick cleanups. They often come with different attachments, such as narrow nozzles and brush heads, to effectively remove dust, crumbs, and other debris that can accumulate over time. Using a keyboard vacuum can help maintain the functionality and hygiene of the keyboard by preventing debris from interfering with key mechanisms and reducing the buildup of germs.