Best All-In-One Photo Printers to Buy in July 2026

Liene M100 4x6'' Photo Printer Bundle (180 pcs +5 Ink Cartridges), Wi-Fi Picture Printer for iPhone, Android, Smartphone, Computer, Dye-Sublimation, Portable for Home Use
-
VIBRANT PHOTOS: THERMAL DYE TECH ENSURES STUNNING, LONG-LASTING PRINTS.
-
USER-FRIENDLY APP: NAVIGATE PRINTING WITH EASE-NO JAMS OR HASSLES!
-
CONVENIENT BUNDLE: GET 180 PHOTO SHEETS & 5 INK CARTRIDGES INCLUDED!


Kodak Mini 2 Retro 4PASS Portable Photo Printer, 2.1x3.4 inches, 38 Sheets Bundle, White
-
INSTANT PRINTING ANYWHERE: USE BLUETOOTH TO PRINT FROM ANDROID/IOS DEVICES.
-
COMPACT & PORTABLE: WEIGHS ONLY 0.4 LBS FOR EASY TRAVEL AND ACTIVITIES.
-
SUPERIOR, LONG-LASTING QUALITY: 4PASS TECHNOLOGY FOR VIBRANT, DURABLE PHOTOS.
KODAK Dock Plus 4PASS Instant Photo Printer, 4x6 inches, 50 Sheets Bundle
-
PRINT INSTANTLY AT HOME; DOCK, CHARGE, AND SHARE MEMORIES EFFORTLESSLY.
-
WIRELESS AND EASY CONNECTIONS WITH IPHONES, IPADS, AND ANDROID DEVICES.
-
SUPERIOR, LASTING PHOTO QUALITY WITH FINGERPRINT-PROOF, WATER-RESISTANT PRINTS.
HPRT 4x6 Photo Printer with 108 Sheet Photo Paper& 2 Ribbon, Desktop Instant Picture Printer for iPhone, Smartphone, Thermal Dye Sublimation, WI-Fi Connnecting, Home Use, Beige
- 📸 HIGH PRINTING EFFICIENCY: ENJOY FAST, PORTABLE PHOTO PRINTING ANYTIME!
- 🌈 STUNNING QUALITY: THERMAL DYE TECH ENSURES VIVID, DURABLE IMAGES!
- 🖨️ EASY TO USE: LIGHTWEIGHT DESIGN AND PLUG-AND-PLAY FOR DAILY PRINTING!
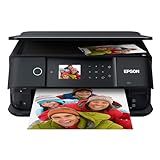
Epson Expression Premium XP-6100 Wireless Color Photo Printer with Scanner and Copier, Black, Medium
-
STUNNING 5-COLOR PHOTO QUALITY FOR EYE-CATCHING PRINTS AND DOCUMENTS!
-
FAST 4X6 PHOTOS IN JUST 15 SECONDS FOR QUICK SHARING!
-
ULTIMATE WIRELESS PRINTING FROM ANY DEVICE; EASY AND CONVENIENT!
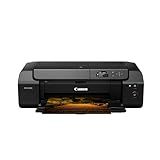
Canon PIXMA PRO-200S Professional 13" Wireless Inkjet Photo Printer with 3.0" Color LCD Monitor, 8-Color Dye-Based Ink, Black
- VIBRANT PRINTS WITH 8 COLOR DYE-BASED INK SYSTEM FOR STUNNING VISUALS.
- COMPACT DESIGN SAVES SPACE IN YOUR HOME OR STUDIO EFFORTLESSLY.
- HIGH-SPEED BORDERLESS PRINTS FROM 3.5” X 3.5” TO 13” X 19” IN MINUTES.
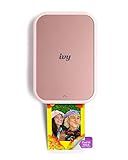
Canon Ivy 2 Mini Photo Printer, Print from Compatible iOS & Android Devices, Sticky-Back Prints, Blush Pink
- PRINT AND CUSTOMIZE PHOTOS DIRECTLY FROM YOUR SMARTPHONE EASILY!
- NO INK NEEDED-USES INNOVATIVE ZINK TECHNOLOGY FOR VIBRANT PRINTS.
- PEEL & STICK FEATURE ALLOWS YOU TO PLACE PHOTOS ON ANY SURFACE!
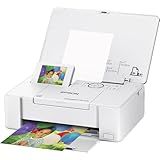
Epson PictureMate PM-400 Wireless Compact Color Photo Printer, white
- EXCLUSIVELY DESIGNED FOR EPSON CARTRIDGES FOR RELIABLE PERFORMANCE.
- PRINT STUNNING BORDERLESS 4X6 PHOTOS IN JUST 36 SECONDS!
- ULTRA-COMPACT, WIRELESS DESIGN FOR SEAMLESS MOBILE PRINTING ANYWHERE.
Canon Selphy CP1500 Wireless Compact Photo Printer (Black)
-
SLEEK DESIGN WITH EASY WI-FI & SMARTPHONE CONNECTIVITY FOR CONVENIENCE.
-
PORTABLE PRINTING ANYWHERE WITH OPTIONAL BATTERY PACK FOR FREEDOM.
-
INSTANTLY DRY, WATER-RESISTANT PHOTOS THAT LAST UP TO 100 YEARS!
If you're looking for the best all-in-one printer for photo printing, you'll want a device that combines excellent print quality, versatility, and user-friendly features. Key attributes to look for include high-resolution printing capabilities, vibrant color reproduction, and support for a range of paper sizes and types. Additionally, features such as wireless connectivity, an intuitive touchscreen interface, and efficient ink usage can enhance your overall experience. Popular brands like Canon and Epson often receive high praise for their photo-centric models, offering specialized ink technologies and advanced printing features that cater to photographers and creative professionals. Depending on your specific needs, it's also beneficial to consider the printer's scanning and copying functionalities, as well as its overall size and design, to ensure it fits well within your workspace.
How to scan photos using an all-in-one printer?
Scanning photos using an all-in-one printer is a straightforward process. Here’s a step-by-step guide to help you:
- Prepare the Printer: Ensure that your all-in-one printer is properly connected to your computer and powered on. Install any necessary drivers or software if you haven’t already.
- Place the Photo: Lift the scanner lid, and place the photo face down on the scanner glass. Align it with the indicated guide, usually found along the edge of the glass.
- Close the Lid: Gently close the scanner lid to avoid moving the photo. This helps in capturing a clear scan.
- Access Scanning Software: On your computer, open the scanning software. This could be the software provided by the printer manufacturer or a built-in application like Windows Fax and Scan, or Image Capture on macOS.
- Select Scan Settings: Choose the type of scan you need. For photos, select a color photo option. Set the resolution. A higher DPI (dots per inch) like 300 or 600 is recommended for photos to ensure good quality. Choose the file format for saving the photo, such as JPEG or PNG.
- Preview and Adjust: Use the preview option to see how the scanned image will appear. This allows you to position the photo correctly and adjust settings if necessary.
- Scan the Photo: Once satisfied with the preview, click the "Scan" button. The scanning process will start, and the image will be saved to the location you specified.
- Save and Edit: After scanning, you will have the option to save the image. Choose a folder on your computer and name the file appropriately. You can also edit the photo using image editing software if needed.
- Check Your Scan: View the scanned image to ensure it has the desired quality and resolution. If not, you may need to adjust the settings and scan again.
By following these steps, your photos should be scanned efficiently and with good quality. If you encounter any problems, refer to your printer's manual for troubleshooting tips.
How to choose the best printer for photo printing?
Choosing the best printer for photo printing involves considering several factors to ensure high-quality prints that match your needs. Here are some key aspects to consider:
- Printer Type: Inkjet vs. Dye-Sublimation: Inkjet printers are versatile and can produce high-quality photo prints, often with more vibrant colors and detail. Dye-sublimation printers excel at producing smooth gradients and are often preferred for printing photos.
- Print Resolution: Look for a printer with a high print resolution, typically measured in dots per inch (DPI). A higher DPI will provide more detail and clarity in your prints.
- Color Accuracy: Opt for a printer with a wide color gamut and good color accuracy. Printers that use more ink cartridges (e.g., those with 6 or more cartridges) can often produce more accurate and vibrant colors.
- Media Size and Compatibility: Determine the maximum paper size the printer can handle. Standard photo sizes are 4x6 inches and 8x10 inches, but you may need larger formats. Consider if you plan to print on different media types like glossy, matte, or specialty photo paper.
- Ink System: Check the type of ink system used. Some printers use pigment-based inks that offer better longevity and water resistance, while dye-based inks can offer brighter colors.
- Print Longevity: Consider the longevity of the prints. Some inks and paper combinations are rated to last longer without fading.
- Speed: While not always critical for photo quality, faster printers can improve workflow efficiency if you need to print a large number of photos.
- Software and Features: Look for printers with good software support for photo editing and direct photo printing from devices. Features like wireless printing, direct printing from sd cards, or USB drives can offer convenience.
- Brand and Reviews: Consider well-reviewed brands known for their photo printing capabilities, such as Canon, Epson, and HP. Check professional reviews and user feedback to understand the pros and cons of a specific model.
- Budget: Be mindful of both the upfront cost and the ongoing cost of ink and paper. Sometimes cheaper printers have more expensive consumables.
- Additional Features: Some printers come with added functionality like scanners or fax machines (all-in-one printers). Decide if these features are important to your needs.
When making your decision, align these considerations with your specific use case, whether it's professional photography, hobbyist prints, or occasional family photos, and choose a printer that best matches your requirements.
How to set up an all-in-one printer for photo printing?
Setting up an all-in-one printer for photo printing involves several steps to ensure you achieve high-quality prints. Here's a general guide to help you through the process:
1. Unbox and Assemble
- Unbox the Printer: Remove all packaging materials, tapes, and protective coverings.
- Install Components: Insert any required components such as the ink cartridges and paper trays as per the user manual.
2. Install Ink Cartridges
- Open the Printer: Carefully access the ink cartridge compartment by lifting the scanner bed or front cover.
- Insert Ink Cartridges: Follow the instructions to insert each cartridge securely, matching the colors appropriately.
- Run Alignment: If prompted, run an alignment process to ensure the cartridges are installed correctly.
3. Load Photo Paper
- Choose the Right Paper: Use high-quality photo paper specifically designed for your printer model.
- Set Paper Guides: Adjust the paper guides in the tray to fit the size of the photo paper.
4. Connect the Printer
- Wireless or Wired Connection: Use either a USB cable or your home Wi-Fi to connect the printer to your computer or network.
- Install Drivers and Software: Install the latest drivers and software from the manufacturer’s website. This will often include photo-editing tools and printing utilities.
5. Printer Settings
- Access Printer Preferences: Go to the printer properties via your operating system.
- Select Paper Type and Quality: Choose the correct paper type and select the highest print quality setting.
- Color Management: If applicable, adjust the color management settings for more accurate color reproduction.
6. Prepare Photos
- Edit Photos: Use editing software to adjust the brightness, contrast, and other settings. Crop the image to the desired size if needed.
- Resolution: Ensure the resolution is suitable for printing. Typically, 300 DPI is ideal for photo prints.
7. Print Photos
- Open Photo in Software: Use photo-editing or photo-viewing software to open the image you wish to print.
- Choose Correct Settings: In the print dialog, select the printer, adjust paper size, and other preferences.
- Send to Print: Click the print button to start the process.
8. Finishing
- Allow Printing to Complete: Let the printer finish without interruption.
- Let Prints Dry: Allow the prints to dry completely to prevent smudging.
- Avoid Touching the Surface: Handle the prints by the edges.
9. Maintenance
- Regular Cleaning: Perform regular cleaning and maintenance as per the manual.
- Keep Drivers Updated: Ensure all software and drivers remain updated for best performance.
By following this guide, you should be set up to print high-quality photos with your all-in-one printer. Always refer to your printer’s specific manual as setups can vary slightly between models.
What is a print head, and why is it important?
A print head is a crucial component of a printer, responsible for transferring ink or toner onto paper or other print media to create text and images. It functions as the tool that actually delivers the ink or toner, often moving back and forth across the paper to form the desired output. The print head contains tiny nozzles that spray or apply minute droplets of ink, or it applies toner in laser printers.
The importance of the print head lies in its direct impact on print quality and efficiency. Key reasons why it is important include:
- Print Quality: The precision and functionality of the print head largely determine the sharpness, color accuracy, and overall quality of the prints. High-quality print heads produce prints with finer details and smoother color gradients.
- Speed: The effectiveness of the print head affects how quickly a printer can output pages. Efficient print heads can cover more area faster, allowing for higher printing speeds without compromising quality.
- Durability and Maintenance: The durability of the print head influences the maintenance requirements and lifespan of the printer. High-quality print heads are less likely to clog or malfunction, reducing downtime and the need for repairs or replacements.
- Compatibility: Print heads are often designed to work with specific types or brands of inks and printers. Using the correct print head ensures compatibility and optimal performance of the printer.
- Cost-Effectiveness: A well-functioning print head can reduce ink or toner waste and lower printing costs by minimizing printing errors and the need for repeat prints.
Ensuring the print head is clean and functioning correctly is crucial for maintaining optimal printer performance and achieving the best possible print results.