
Best Mechanical Keyboards to Buy for Improved Typing in July 2026
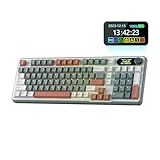
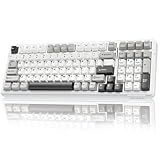
RK ROYAL KLUDGE S98 Mechanical Keyboard w/Smart Display & Knob, Top Mount 96% Wireless Mechanical Keyboard BT/2.4G/USB-C, Hot Swappable, Software Support, Creamy Sounding, 98 Keys
-
CUSTOMIZABLE DISPLAY: GIFS, DATE, AND BATTERY INFO IN ONE COMPACT VIEW.
-
EFFORTLESS CONTROL: ADJUST SETTINGS WITH A SIMPLE TWIST OR CLICK.
-
VERSATILE CONNECTIVITY: BT 5.0, 2.4G, AND USB-C OPTIONS FOR ALL SETUPS.


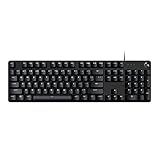
Logitech G413 SE Full-Size Mechanical Gaming Keyboard - Backlit Keyboard with Tactile Mechanical Switches, Anti-Ghosting, Compatible with Windows, macOS - Black Aluminum
- ELEVATE GAMEPLAY WITH DURABLE PBT KEYCAPS AND TACTILE SWITCHES.
- ENJOY ANTI-GHOSTING TECH FOR RELIABLE KEY INPUT DURING INTENSE SESSIONS.
- SLEEK DESIGN AND CUSTOMIZABLE LIGHTING ENHANCE ANY GAMING SETUP.
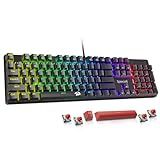
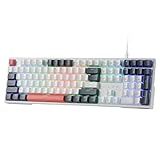
Redragon Mechanical Gaming Keyboard Wired, 11 Programmable Backlit Modes, Hot-Swappable Red Switch, Anti-Ghosting, Double-Shot PBT Keycaps, Light Up Keyboard for PC Mac
-
VIBRANT BACKLIGHTING: 11 DYNAMIC PRESETS TO MATCH ANY MOOD OR SETTING.
-
MACRO CUSTOMIZATION: STREAMLINE YOUR GAMEPLAY WITH REMAPPABLE KEYS.
-
SMOOTH TYPING: HOT-SWAPPABLE RED SWITCHES FOR FAST, EFFORTLESS GAMING.
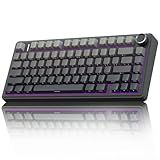
AULA F75 Pro Wireless Mechanical Keyboard,75% Hot Swappable Custom Keyboard with Knob,RGB Backlit,Pre-lubed Reaper Switches,Side Printed PBT Keycaps,2.4GHz/USB-C/BT5.0 Mechanical Gaming Keyboards
- TRI-MODE CONNECTIVITY: CONNECT UP TO 5 DEVICES EFFORTLESSLY!
- HOT-SWAP CUSTOMIZATION: EASILY SWITCH SWITCHES FOR A UNIQUE TYPING FEEL!
- VIBRANT RGB LIGHTING: 16.8 MILLION COLORS TO ENHANCE YOUR GAMING ATMOSPHERE!
AULA F99 Wireless Mechanical Keyboard,Tri-Mode BT5.0/2.4GHz/USB-C Hot Swappable Custom Keyboard,Pre-lubed Linear Switches,RGB Backlit Computer Gaming Keyboards for PC/Tablet/PS/Xbox
-
CONNECT 5 DEVICES: SWITCH SEAMLESSLY BETWEEN 3 MODES FOR ULTIMATE CONVENIENCE.
-
HOT-SWAPPABLE DESIGN: EASILY CUSTOMIZE KEY SWITCHES WITHOUT SOLDERING HASSLE.
-
16 RGB EFFECTS: ENHANCE YOUR SETUP WITH VIBRANT LIGHTING AND MACRO FEATURES.
Redragon K668 RGB Gaming Keyboard, 108 Keys Wired Mechanical Keyboard w/Extra 4 Hotkeys, Sound Absorbing Foams, Upgraded Hot-swappable Socket, Mixed Color Keycaps x 2 Sets, Red Switch
- HOT-SWAPPABLE SWITCHES: CUSTOMIZE YOUR TYPING EXPERIENCE EFFORTLESSLY.
- 108 KEYS WITH ANTI-GHOSTING: MAXIMIZE KEY PRESSES WITHOUT LAG-PERFECT FOR GAMERS.
- VIBRANT RGB LIGHTING: CREATE A DYNAMIC SETUP WITH ADJUSTABLE LIGHTING MODES.
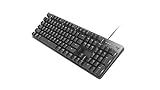
Logitech K845 Mechanical Illuminated Keyboard, Strong Adjustable Tilt Legs, Full Size, Aluminum Top Case, 104 Keys, USB Corded, Windows (TTC Brown Switches)
- ADJUSTABLE TILT FOR OPTIMAL TYPING COMFORT AT 4-8 DEGREES.
- CHOOSE RED, BLUE, OR BROWN SWITCHES FOR TAILORED FEEDBACK.
- DURABLE ALUMINUM DESIGN OFFERS PREMIUM GAMING MECHANICS COMPACTLY.
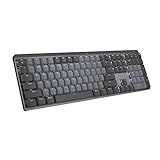
Logitech MX Mechanical Wireless Illuminated Performance Keyboard, Tactile Quiet Switches, Backlit Keys, Bluetooth, USB-C, macOS, Windows, Linux, iOS, Android, Metal, Graphite
- TACTILE QUIET SWITCHES ENSURE FOCUSED TYPING WITHOUT DISTURBING OTHERS.
- LOW-PROFILE DESIGN ENHANCES COMFORT AND PRECISION FOR ALL-DAY USE.
- EFFORTLESS MULTI-DEVICE PAIRING FOR SEAMLESS WORKFLOW ACROSS SYSTEMS.
Mechanical keyboards are often praised for their potential to improve typing speed and accuracy. This is largely attributed to their tactile feedback, which provides a physical sensation when a key is pressed, allowing typists to register keystrokes more intuitively without needing to visually confirm the action. The individual mechanical switches found in these keyboards offer a more precise actuation point and faster response times compared to membrane or rubber dome keyboards. Additionally, users can choose from various types of switches, such as linear, tactile, or clicky, to suit their preferences and typing style. The durability and stability of mechanical keyboards can further enhance typing accuracy by reducing errors caused by unstable or inconsistent key presses. However, the improvement in typing speed and accuracy also depends on personal preference and familiarization with the keyboard, as some users may not experience significant benefits or might need an adjustment period to realize improvements.
What is the difference between mechanical and membrane keyboards?
Mechanical and membrane keyboards differ primarily in the way they register key presses, which affects their feel, durability, and performance.
- Switch Mechanism: Mechanical Keyboards: These keyboards use individual mechanical switches for each key. Each key has its own switch mechanism that typically consists of a housing, a spring, and a stem. The design and operation of these switches provide tactile feedback, and often a distinct audible click, which many users prefer for typing and gaming. Membrane Keyboards: These keyboards use a flexible membrane layer that presses down to make contact with a circuit when a key is pressed. This layer is often rubber or silicone and is less complex than the switches in a mechanical keyboard.
- Tactile Feedback: Mechanical Keyboards: Offer a range of tactile feedback options depending on the type of mechanical switch used (e.g., linear, tactile, or clicky switches like Cherry MX, Razer, or Romer-G). This can result in a more satisfying typing experience, with clear feedback on each key press. Membrane Keyboards: Usually provide less tactile feedback and a softer, mushier feel when typing. The keypress is often less distinct, which can be a preference for quieter typing or for those who do not enjoy the resistance of mechanical keys.
- Durability and Lifespan: Mechanical Keyboards: Generally more durable, with a longer lifespan. They are typically rated for tens of millions of key presses per key, making them suitable for heavy typists and gamers. Membrane Keyboards: Tend to wear out faster, with a shorter lifespan due to the simpler and more fragile construction. They might be rated for fewer key presses compared to mechanical switches.
- Customization: Mechanical Keyboards: Often offer greater customization options, such as the ability to change keycaps, select different switch types, and program macro keys. Some models support modifications or custom builds. Membrane Keyboards: Generally offer fewer customization options due to their fixed key switch design.
- Price: Mechanical Keyboards: Usually more expensive due to the complex switch technology, build quality, and additional features they might offer. Membrane Keyboards: Typically more affordable, making them a popular choice for budget-conscious users.
- Sound: Mechanical Keyboards: Often produce more noise, especially with clicky switches, though quieter options are available. Membrane Keyboards: Typically quieter, which might be preferred in shared workspaces or environments where noise is a concern.
Each type has its own advantages and disadvantages, and the choice between a mechanical or membrane keyboard often comes down to personal preference and specific use cases, such as whether the keyboard is needed for gaming, typing, or professional work.
How to adjust typing posture for better accuracy?
Improving typing posture can significantly enhance accuracy and speed, as well as prevent strain and injury. Here are some tips to help you adjust your typing posture:
- Chair Height and Position: Make sure your chair is at a height where your feet rest flat on the floor, and your knees are at about a 90-degree angle. Sit back in your chair with your back straight. Your lower back should be supported by your chair's backrest.
- Desk and Keyboard Position: Your keyboard should be at or slightly below elbow height. You may need to adjust your chair or use a keyboard tray to achieve this. Position your keyboard so that it is directly in front of you, and you can reach it without stretching.
- Arm and Hand Placement: Keep your elbows close to your body and your forearms parallel to the ground. Your wrists should be in a neutral position (straight), allowing your hands to hover comfortably over the keyboard without drooping or bending upwards.
- Monitor Placement: Place your monitor at eye level and about an arm's length away to avoid neck strain. Ensure that the top of the screen is at eye level, so you are looking slightly down at your work.
- Lighting: Good lighting can help prevent eye strain. Make sure your workspace is well-lit, but avoid glare on your screen. Adjust the brightness and contrast of your monitor to a comfortable level.
- Breaks and Exercises: Take regular breaks to rest your eyes and hands. Follow the 20-20-20 rule: every 20 minutes, take a 20-second break and look at something 20 feet away. Stretch your hands, wrists, and fingers periodically to prevent tension and strain.
- Typing Technique: Learn touch typing, which involves using all your fingers and knowing key positions by feel. This can reduce the need to look down and up, improving speed and accuracy. Keep your fingers lightly on the home row keys (ASDF for the left hand and JKL; for the right hand) when not in use.
By following these guidelines, you can create a comfortable and ergonomic setup that supports better typing posture, leading to enhanced accuracy and reduced risk of strain or injury.
How to build your own mechanical keyboard?
Building your own mechanical keyboard can be a rewarding project that allows for customization in terms of aesthetics, typing feel, and functionality. Here's a step-by-step guide to help you through the process:
1. Research and Planning
- Understand Your Needs: Decide on the size and layout of the keyboard (e.g., full-size, TKL, 65%, 60%).
- Budgeting: Determine how much you're willing to spend. Costs can vary widely based on components and customizations.
2. Select Components
- Keyboard Case: This is the outer shell of your keyboard. Available in materials like aluminum, plastic, or acrylic.
- PCB (Printed Circuit Board): Choose a compatible PCB. Consider whether you want hot-swappable switches.
- Plate: A mounting plate for stability and acoustic properties. Common materials include aluminum, brass, steel, or polycarbonate.
- Switches: Key mechanical component. Choose from tactile, clicky, or linear switches based on your preference.
- Keycaps: Choose a set that fits your layout. Consider materials like ABS or PBT and different profiles like SA, DSA, or Cherry.
- Stabilizers: Required for larger keys (e.g., spacebar, enter, shift). Consider clip-in or screw-in stabilizers.
- Cables and Connectors: USB Type-C is common for modern builds, but ensure compatibility with your PCB.
3. Tools and Supplies
- Screwdriver Set: For assembling the case and securing components.
- Soldering Kit: If using a PCB that requires soldering switches.
- Keycap Puller and Switch Puller: For installing and removing keycaps and switches.
- Lubricant and Brushes: For lubing switches and stabilizers to improve feel and acoustics.
- Desoldering Pump/Wick: For any mistakes during soldering (if needed).
4. Assembly Process
- Preparation: Organize your workspace and lay out all components and tools.
- Plate and Switches: Install switches into the plate, ensuring they're fully seated.
- Solder the Switches: If using a solderable PCB, carefully solder each switch's pins to the PCB. If using a hot-swappable PCB, this step is not necessary.
- Install Stabilizers: Lube and install stabilizers on the PCB for consistent larger key performance.
- Mount PCB and Plate into the Case: Secure these components inside your chosen case. Follow any included instructions for case assembly.
- Attach Keycaps: Place keycaps onto their corresponding switches according to your layout.
5. Testing and Finishing Touches
- Test Functionality: Before final assembly, connect the keyboard to a computer to verify all keys are working using key testing software.
- Audio and Feel Adjustment: Adjust the acoustic properties and feel by adding foam or experimenting with different switch lubing techniques if needed.
- Final Assembly: Once everything is verified, finish assembling the keyboard and secure all components.
6. Programming (if applicable)
- Configuring the PCB: Use software like QMK or VIA to customize layouts, macros, and lighting if your PCB supports it.
Tips for Success
- Community Resources: Leverage online forums, guides, and videos. Communities like Reddit’s /r/mechanicalkeyboards can be invaluable.
- Patience and Practice: Especially with soldering, practice makes perfect. Take your time with each step.
Building a mechanical keyboard can be a fun and personalized project. By selecting each component, you tailor the keyboard to your exact needs and tastes, resulting in a truly custom typing experience.
What is anti-ghosting technology?
Anti-ghosting technology is a feature commonly found in keyboards, particularly those designed for gaming. It addresses a problem known as "ghosting," which occurs when multiple keys are pressed simultaneously, and some keystrokes are not recognized by the keyboard. This can lead to unintended actions or a lack of response in gaming or typing scenarios.
Ghosting happens due to hardware limitations in many standard keyboards, which are typically designed to handle only a few simultaneous key presses at a time. This is because most keyboards use a grid-like matrix to detect key presses, and pressing multiple keys can create an "overlap" in the circuit that causes the keyboard to miss or incorrectly register certain combinations of key presses.
Anti-ghosting technology is implemented to ensure that each key press is accurately registered, even when multiple keys are pressed at once. This is achieved through various methods, such as using a more complex matrix design, adding diodes to each key to prevent incorrect electrical pathways, or implementing software solutions to detect and correctly interpret simultaneous key presses.
In gaming keyboards, where fast and complex input is crucial, anti-ghosting often goes alongside features like "n-key rollover," which allows any number of keys to be pressed at once and all of them to be accurately registered. Anti-ghosting can significantly enhance the user experience by providing more reliable and responsive input, especially in scenarios that require quick and complex keystrokes.
How to lubricate mechanical keyboard switches?
Lubricating mechanical keyboard switches can enhance the feel and performance of your keyboard by reducing friction and noise. Here’s a step-by-step guide on how to lubricate your switches:
Materials Needed:
- Lubricant: Use a switch lube like Krytox 205g0 or Tribosys 3204. Avoid WD-40 or any oil-based lubricants.
- Switch Opener: For opening switches easily (optional, but recommended).
- Keycap Puller: For removing keycaps.
- Switch Puller: For removing switches from a hot-swappable board or after desoldering.
- Brush: A small, fine brush for applying lubricant.
- Work Surface: Set up a clean and organized workspace.
- Tweezer: For handling small parts.
Steps:
- Remove Keycaps: Use the keycap puller to gently remove all the keycaps from your keyboard.
- Remove Switches (for hot-swappable keyboards or desolder necessary): If your keyboard is hot-swappable, use a switch puller to remove the switches. If not, you'll need to desolder the switches first.
- Open the Switches: Use the switch opener to carefully open each switch. If you don’t have a switch opener, you can use a flat tool to unclip the housing. Separate the switch into its main components: top housing, stem, spring, and bottom housing.
- Apply Lubricant to the Bottom Housing: Use the brush to apply a small amount of lubricant to the railings where the stem slides. Avoid over-lubricating, as too much can affect switch performance.
- Lubricate the Spring: Lightly coat the spring with lubricant. You can also bag-lube multiple springs at once by shaking them in a small bag with a tiny amount of lubricant.
- Lubricate the Stem: Apply a thin layer of lubricant to the sides of the stem (the parts that contact the rails) and the cylindrical part. Avoid the stem legs if you want to retain the tactile bump (for tactile switches).
- Assemble the Switch: Reassemble the switch components: place the spring in the bottom housing, position the stem, and snap the top housing back on.
- Reinstall the Switches: If they were desoldered, solder them back in place. If they're hot-swappable, push them back into the PCB sockets.
- Reattach Keycaps: Use the keycap puller to put all keycaps back onto the switches.
Tips:
- Test Before Reassembly: Test each switch feel before reassembling the keyboard to ensure satisfaction.
- Work in Batches: Lubricate switches in groups to avoid losing small parts.
- Switch Preference: Different switches may require slightly different techniques, so adjust as necessary.
Always follow a careful, precise method when lubricating switches to prevent any damage. Consider practicing on an old or spare switch before working on your keyboard if this is your first time.
What are programmable keys on a mechanical keyboard?
Programmable keys on a mechanical keyboard are keys that can be customized to perform specific functions or execute sequences of actions based on user preferences. This customization is typically achieved through software provided by the keyboard manufacturer or third-party applications. Here are some common features and uses of programmable keys:
- Macro Recording: Users can record a sequence of keystrokes or mouse actions and assign it to a single key. Pressing this key will replay the recorded macro, which can be useful for repetitive tasks in gaming or productivity applications.
- Key Remapping: Programmable keys allow users to change the default function of a key. For example, you might remap a less-used key to perform a frequently-used action or combination of actions.
- Custom Shortcuts: Users can create shortcuts for launching applications, opening specific files or folders, or executing system commands.
- Multiple Profiles: Many programmable keyboards support multiple user profiles, allowing users to switch between different key configurations quickly. This is helpful for users who need different setups for different applications or games.
- Gaming Enhancements: For gamers, programmable keys can be used to enhance gameplay by simplifying complex commands, combinations, or in-game actions to a single keystroke, providing a competitive edge.
- Lighting Effects: Some programmable keys are associated with customizable RGB lighting, allowing users to set specific colors, patterns, or effects for individual keys or groups of keys.
To utilize programmable keys, users typically need to install specific software drivers that provide an interface for configuring and customizing the keys. This software can offer a variety of options for personalizing how each key behaves based on the user's needs.