
Best Keyboard Vacuums to Buy in July 2026
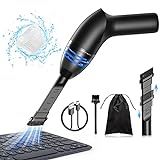
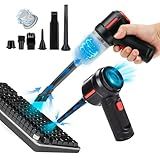
Hayousui 4.3Kpa Keyboard Vacuum Cleaner Mini:Handheld Computer Vacuum Cordless for Car Laptop Sewing Machine Portable Keyboard Vac USB Desk Crumbs Dust Cleaners
-
POWERFUL SUCTION & PORTABLE DESIGN FOR EASY CLEANUP ANYWHERE!
-
VERSATILE NOZZLES FOR QUICK CLEANING IN TIGHT SPACES & SURFACES!
-
WASHABLE HEPA FILTER ENSURES FRESHNESS & LONG-LASTING USE!


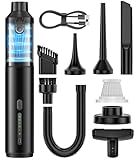
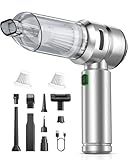
Car Vacuum Portable Cordless Handheld Vacuum Cleaner 4-in-1 Mini Cordless Vacuum with 2 Suction Modes and 16800pa Suction Power Blowing & Inflating 2 Modes Handheld Vacuum for Car, Desk, Keyboards
-
4-IN-1 FUNCTIONALITY: VACUUM, BLOW, INFLATE, AND SUCTION IN ONE DEVICE.
-
STRONG SUCTION POWER: 16.8KPA SUCTION TACKLES DUST AND DEBRIS EFFORTLESSLY.
-
ULTRA-LIGHT DESIGN: WEIGHS ONLY 1 LB FOR EASY, CORD-FREE CLEANING ANYWHERE.
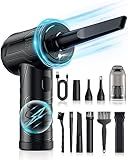
Powerful Compressed Air Duster for Deep Cleaning-Replace Compressed Air Can-No Canned Air Duster-Keyboard Cleaner-PC Cleaning-Rechargeable-3-Speeds-95000RPM Cordless Air Blower-Car Duster 8000mAh
-
THREE ADJUSTABLE SPEEDS FOR TAILORED CLEANING ON ANY SURFACE.
-
POWERFUL 95,000 RPM MOTOR EFFICIENTLY REMOVES DUST AND DEBRIS.
-
VERSATILE 2-IN-1 DESIGN: BLOW DUST AWAY OR VACUUM WITH EASE.
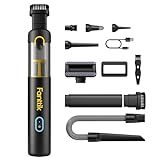
Fanttik Slim V8 APEX Car Vacuum, 4-in-1 Portable Mini Cordless Vacuum with 19000pa Suction Power, Type-C Charge, 2 Suction Modes, Handheld Vacuum for Small Jobs, Car, Office Desk, Keyboards (Black)
-
ULTRA-LIGHT & CORDLESS DESIGN: EASY HANDLING FOR QUICK CLEAN-UPS ANYWHERE.
-
19000PA POWERFUL SUCTION: EASILY TACKLES DUST, PET HAIR, AND SMALL DEBRIS.
-
FAST TYPE-C CHARGING: FULLY CHARGES IN 2.5 HOURS FOR ON-THE-GO CONVENIENCE.
Meudeen Air Duster - Computer Vacuum Cleaner - for Keyboard Cleaning- Cordless Canned Air- Powerful - Energy-Efficient(Air-01)
-
3-IN-1 FUNCTIONALITY: VACUUM, BLOW DUST, & INFLATE STORAGE BAGS!
-
VERSATILE ACCESSORIES: PERFECT FOR KEYBOARDS, CARS, & HARD-TO-REACH AREAS!
-
LONG BATTERY LIFE: FAST CHARGING & RELIABLE TECH FOR EXTENDED USE!
VNOST Car Vacuum,3 Suction Modes,Portable Mini Cordless Cleaner with 24000pa Suction Power,Type-C Charge,Handheld Vacuum for Home,Car, Office Desk, Keyboards(Dark Silver)
-
POWERFUL 24000PA SUCTION: EFFORTLESSLY TACKLES DUST IN CARS AND HOMES.
-
VERSATILE 4-IN-1 FUNCTIONALITY: CLEANS, INFLATES, AND EXTRACTS WITH EASE.
-
QUICK CHARGING & LASTING USE: 30 MINS RUN TIME WITH FAST TYPE-C RECHARGE.
A keyboard vacuum is a small, portable device designed to help remove dust, debris, and crumbs from between the keys of a keyboard. Dust and debris can accumulate over time, affecting the keyboard's performance and potentially causing key malfunctions. A keyboard vacuum works by using suction to lift and remove these particles that are lodged in the hard-to-reach crevices of a keyboard. Its compact size and typically small nozzle make it effective at targeting these areas, ensuring a more thorough cleaning compared to simply shaking or brushing off the keyboard. This cleaning process not only helps maintain the keyboard's aesthetic appearance but also extends its lifespan and performance by preventing mechanical issues like sticky or unresponsive keys. Additionally, regular use of a keyboard vacuum can contribute to a healthier work environment by minimizing the dust and allergens that accumulate and circulate, especially in homes or offices where keyboards are frequently used.
How to clean keyboard keys without removing them?
Cleaning keyboard keys without removing them is a straightforward process and can be done using a few simple tools and cleaning agents. Here’s a step-by-step guide:
- Turn Off the Device: Ensure the keyboard is turned off or disconnected if it is a USB or wireless keyboard. If you’re cleaning a laptop keyboard, shut down the laptop.
- Shake Out Debris: Gently turn the keyboard upside down and give it a gentle shake to dislodge any loose debris.
- Brush the Surface: Use a soft brush, like a paintbrush or a keyboard brush, to remove dust and crumbs from between the keys. Gently brush around the keys at different angles.
- Use Compressed Air: Use a can of compressed air to blow out dust and debris from under and between the keys. Hold the can upright and spray in short bursts to prevent moisture buildup.
- Wipe with a Microfiber Cloth: Dampen a microfiber cloth with a mild cleaning solution (water mixed with a small amount of isopropyl alcohol) and gently wipe the tops of the keys. Ensure the cloth is only slightly damp, not wet, to avoid moisture seeping into the keyboard.
- Cotton Swabs for Tight Spaces: Use cotton swabs dipped in the same cleaning solution to clean around the edges of each key. Ensure the swabs are not too wet.
- Disinfect: If you wish to disinfect the keys, use a disinfectant wipe or a cloth dampened with isopropyl alcohol to gently wipe the keys. Avoid excessive liquid.
- Dry: Allow the keyboard to air dry completely before turning it back on or reconnecting it.
By following these steps, you can maintain a clean keyboard without removing the keys. Regular maintenance helps prevent buildup and keeps your keyboard functioning well.
What are the benefits of a clean keyboard?
Keeping your keyboard clean offers several benefits, both for the functionality of the device and for hygiene. Here are some advantages of maintaining a clean keyboard:
- Improved Performance: Dust, crumbs, and debris can interfere with the keys’ mechanics, leading to sticky or non-responsive keys. Regular cleaning ensures the keyboard functions smoothly.
- Extended Lifespan: By preventing buildup of dirt and grime, you reduce wear and tear on the keys and internal components, potentially extending the keyboard's life.
- Enhanced Aesthetics: A clean keyboard looks better and can enhance the overall appearance of your workspace, making it more pleasant to use and work in.
- Hygiene: Keyboards can harbor bacteria and viruses, especially if they are shared among multiple users. Regular cleaning reduces the risk of spreading germs and contributes to a healthier workspace.
- Prevention of Allergens: Dust and other allergens can accumulate on a keyboard, potentially triggering allergies. Regular cleaning can help in reducing these triggers.
- Better User Experience: A clean keyboard feels more pleasant to use, creating a more enjoyable and comfortable typing experience.
- Professional Image: In professional settings, a clean keyboard conveys attention to detail and care in maintaining equipment, which can reflect positively in a business environment.
Integrating regular cleaning into your routine can help you enjoy these benefits with minimal effort.
What is the cost difference between manual cleaning and using a keyboard vacuum?
The cost difference between manual cleaning and using a keyboard vacuum can vary based on several factors, including the specific tools or products you use for manual cleaning, the type and quality of the keyboard vacuum, and the frequency of cleaning. Here's a general comparison:
Manual Cleaning
Costs Involved:
- Compressed Air Canister: Typically used for blowing dust and debris out of keyboards. They usually cost between $5 to $10 per can.
- Cleaning Gel or Putty: This can be used to pick up dust and debris from between the keys. Costs range from $5 to $10.
- Microfiber Cloths: Often used in conjunction with isopropyl alcohol for deeper cleaning. A pack might cost under $10.
- Isopropyl Alcohol: Typically priced at about $3 to $5 for a small bottle.
Pros:
- Lower initial cost if you already have some of these items at home.
- Flexible and can be used for other cleaning tasks.
Cons:
- More labor-intensive and time-consuming.
- May not be as effective in reaching deep crevices compared to a vacuum.
Keyboard Vacuum
Costs Involved:
- Initial Purchase: The cost of a keyboard vacuum can range from $15 to $50, depending on the brand and features.
- Electricity/Batteries: Minimal cost, but rechargeable models might incur electricity costs over time, while others may need replacement batteries.
Pros:
- Quick and efficient for regular cleanups.
- Can reach tight spaces that are difficult with manual cleaning.
Cons:
- Higher upfront cost compared to some manual cleaning methods.
- May not be as effective in removing sticky residues or stains.
Cost Difference
- Initial Investment: A keyboard vacuum generally requires a higher initial investment compared to manual cleaning tools.
- Long-Term Use: If you frequently clean multiple keyboards or prefer the convenience, the time saved with an electric vacuum might justify its cost.
- Use Case: If you occasionally clean your keyboard or don't mind manual work, manual cleaning might be more cost-effective.
Ultimately, the decision depends on personal preference, the value of convenience, and how often you anticipate needing to clean keyboards.
What are the common features of keyboard vacuums?
Keyboard vacuums are small, handy devices designed to clean debris, dust, and dirt from computer keyboards and other small electronic devices. Here are some common features you might find in keyboard vacuums:
- Compact Size: Designed to be easily maneuverable and convenient, these vacuums are typically compact and lightweight for easy handling and storage.
- USB or Battery Powered: Many keyboard vacuums are powered via USB connections, allowing them to draw power directly from a computer or a suitable USB adapter. Some models may also run on batteries, offering greater portability.
- Interchangeable Nozzles: Often come with multiple nozzle attachments, such as brushes and narrow tips, for versatile cleaning of different surfaces and tight spaces.
- HEPA or Fine Particle Filters: Some models incorporate filters designed to trap fine particles, preventing dust from being released back into the air.
- Reusable and Washable Filters: Many models feature reusable and washable filters, which can be easily cleaned to maintain optimal performance and reduce waste.
- Low Noise Operation: Designed to operate quietly, making them suitable for use in office environments without causing significant disruption.
- Light Suction Power: Powerful enough to remove dust and small debris from keyboards without damaging delicate components.
- Cordless Operation: Cordless models offer greater freedom of movement, reducing the hassle of managing cords.
- Easy Maintenance: Usually feature simple and tool-free mechanisms for detaching and emptying the dust container.
- LED Indicator: Some models are equipped with LED indicators for power status and battery charge level.
These features make keyboard vacuums not only effective at cleaning keyboards but also useful for other small electronics and intricate items, like camera lenses or sewing machines.
How to prevent dust buildup in keyboards?
Preventing dust buildup in keyboards requires some regular maintenance and a few preventative measures. Here are some tips to help keep your keyboard clean:
- Use a Keyboard Cover: This is a protective silicone or plastic skin designed to fit over the keys. It prevents dust and other debris from getting into the keyboard while still allowing you to type easily.
- Regular Cleaning: Make it a habit to clean your keyboard regularly. Use compressed air to blow out dust and debris from between the keys. You can also use a small, soft brush or a keyboard vacuum designed for electronics to remove particles.
- Proper Storage: When not in use, cover your keyboard with a dust cover or store it in a drawer. This is especially useful if you're not using your computer for extended periods.
- Keep Your Workspace Clean: Dust and debris can accumulate on your desk and eventually make their way into your keyboard. Wipe down your desk regularly with a damp cloth and ensure the surrounding area is clean.
- Avoid Eating Over Your Keyboard: Crumbs and spills can contribute to dirt and dust buildup. Try to avoid eating or drinking over your keyboard to minimize the risk of debris.
- Wash Your Hands: Before using your keyboard, make sure your hands are clean, as oils and dirt from your fingers can contribute to grime accumulating on the keys.
- Adjust Room Environment: Consider using an air purifier to reduce dust in the room where your keyboard is used, especially if your workspace tends to be particularly dusty.
By following these steps, you can significantly reduce dust buildup and prolong the life and functionality of your keyboard.