Best Helm Management Tools to Buy in June 2026
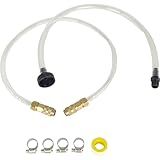
Seastar Hydraulic Steering Bleed Kit,Bleed & Fill Tube,Fits Seastar Hydraulic Cylinders and all Outboard, Sterndrive & Inboard Seastar Hydraulic Helms,Tool Kit for Boats or Automotive
-
LEAK-FREE PERFORMANCE WITH THREADED BRASS FITTINGS FOR DURABILITY.
-
EFFORTLESS BLEED AND FILL WITH EASY QUICK CONNECT FITTINGS.
-
RUST AND CORROSION-RESISTANT DESIGN FOR LASTING, MARINE-READY QUALITY.


Marine Tech Tools Fill Tube, Seastar Hydraulic Steering Bleed Kit, Fits all Outboard, Sterndrive & Inboard Seastar Hydraulic Helms, Seastar Hydraulic Steering Fluid Bleeder Kit
-
EASY FILL SYSTEM: CONNECTS SECURELY FOR A CLEANER, FASTER FLUID CHANGE.
-
TIME & COST EFFICIENT: DIY TOOL SAVES TIME AND MONEY ON MAINTENANCE.
-
BUILT TO LAST: DURABLE DESIGN CRAFTED IN CHARLESTON, SC FOR BOATERS' NEEDS.
Marine Tech Tools Seastar Hydraulic Steering Filler Kit with Swivel, Outboard Power Steering Bleed Kit for Boat, Fits Seastar Hydraulic Steering & All Outboard, Sterndrive & Inboard
- EASILY CHANGE FLUID FOR CLEANER, FASTER MAINTENANCE
- QUICK DISCONNECT FITTING FOR HASSLE-FREE USE
- TIME & COST SAVINGS FOR EVERY DIY BOATER

BOSU Helm - Push Up Bar, Utility Trainer
- COMPATIBLE WITH BOSU AND STABILITY BALLS FOR VERSATILE WORKOUTS.
- 3 GRIP OPTIONS MINIMIZE WRIST STRAIN AND TARGET MULTIPLE MUSCLE GROUPS.
- LIGHTWEIGHT DESIGN SUPPORTS OVER 700 LBS; PERFECT FOR EASY TRANSPORT.
EZROAD Boat Bleed Filler Kit Compatible with Seastar Inboard Outboard Hydraulic Steering System Oil Filler Hose Bridge Brass Tube Bleeder Bleeding Connect Marine Sterndrive Cylinder Helms Fitting Tool
-
UNIVERSAL COMPATIBILITY: WORKS SEAMLESSLY WITH SEASTAR & BAYSTAR SYSTEMS.
-
LEAK-FREE DESIGN: BRASS FITTINGS ENSURE NO LEAKS DURING REFILLING.
-
DURABLE MATERIALS: RUST-RESISTANT STAINLESS STEEL FOR MARINE RELIABILITY.

Marine Tech Tools Shift Shaft Wrench, Fits Mercury, Suzuki, and Yamaha 100HP+ Outboards, Precision Outboard Shift Shaft Tool for Mercury & Yamaha Engines
- UNIVERSAL FIT FOR MAJOR BRANDS – COMPATIBLE WITH MERCURY, SUZUKI, YAMAHA.
- EFFORTLESS GEAR SHIFTING – DOUBLE-HEADED DESIGN FOR SEAMLESS OPERATION.
- DURABLE & RELIABLE – CORROSION-RESISTANT STEEL WITH A LIFETIME WARRANTY.
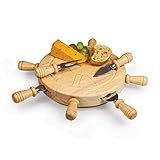
PICNIC TIME Mariner Cheese Board and Knife Set, Novelty Charcuterie Board Set with Stainless Steel Tools Housed in Helm Case Under the Lid, Swivel-Open Serving Platter, and Charcuterie Set, (Parawood)
- UNIQUE SHIP'S WHEEL DESIGN ELEVATES GATHERINGS AND COCKTAIL PARTIES.
- EASY ACCESS TO TOOLS WITH A REVOLVING CHEESE BOARD FOR SEAMLESS SERVING.
- DURABLE MATERIALS ENSURE QUALITY, BACKED BY A LIFETIME GUARANTEE.
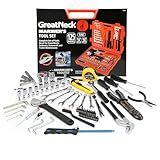
Great Neck MS125 125 Piece Marine Tool Set, Gifts for Men, Dad Gifts, High Visibility, Water-Resistant Boat Tool Box Case, Anti-Rust Chrome-Plated Boat Supplies And Accessories
- DURABLE & RUST-RESISTANT TOOLS FOR LONG-LASTING USE
- WATER-RESISTANT CASE KEEPS TOOLS SAFE & EASILY ACCESSIBLE
- COMPREHENSIVE KIT FOR ALL YOUR MARINE REPAIR NEEDS
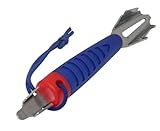
DeckMate 6-in-1 Boat Tool, Includes 2 Deck Keys, Shackle Key, Zipper Pull, Screwdriver, and Hex Tool
- SIX ESSENTIAL TOOLS: DECK KEYS, SCREWDRIVERS & MORE IN ONE TOOL!
- CONVENIENT ZIPPER/TOGGLE PULLER & BUILT-IN BOTTLE OPENER INCLUDED.
- BUY WITH CONFIDENCE: LIFETIME WARRANTY ENSURES LONG-LASTING USE!
To delete Helm releases older than 1 month, you can use the Helm command-line tool to filter releases based on their release date and then delete them manually. First, use the following command to list all Helm releases:
helm list
Next, you can use the --date flag to filter the releases based on their release date. For example, to only show releases older than 1 month, you can use a command like this:
helm list --date '<1m'
Once you have identified the releases you want to delete, you can use the following command to delete them:
helm uninstall RELEASE_NAME
Replace RELEASE_NAME with the name of the release you want to delete. Repeat this process for each release older than 1 month that you want to delete.
What is the best practice for managing helm releases in production?
The best practice for managing helm releases in production is to follow these key guidelines:
- Use version control: Store your helm charts and values files in a version control system like Git. This way, you can track changes over time and easily roll back to previous versions if needed.
- Use namespaces: Deploy each helm release into its own namespace to isolate resources and prevent conflicts between different releases.
- Use CI/CD pipelines: Automate the deployment process using CI/CD pipelines to ensure consistency and reduce errors.
- Use secrets management: Store sensitive information such as passwords and API keys in a secure manner using a secrets management tool like Kubernetes secrets or a dedicated secrets manager.
- Monitor releases: Use monitoring tools to track the health and performance of your helm releases in production. Set up alerts for any issues that may arise.
- Test releases: Before deploying new helm releases to production, test them in a staging environment to ensure they work as expected and do not cause any disruptions.
- Keep releases up to date: Regularly update your helm releases to apply security patches and feature updates. Use tools like Helmfile or Flux to automate the release update process.
How to avoid accidental deletion of helm releases?
- Use Helm's rollback feature: Helm allows you to rollback to a previous release version if an accidental deletion occurs. You can use the helm rollback command to revert back to a previous release.
- Enable release deletion confirmation: You can configure Helm to prompt for confirmation before deleting a release using the --force flag. This can help prevent accidental deletions by requiring an extra step before the release is removed.
- Use GitOps with Helm: By managing your Helm releases through GitOps processes, you can version control your releases and easily revert back to previous states in case of accidental deletions.
- Implement RBAC for Helm: By setting up Role-Based Access Control (RBAC) for Helm, you can restrict who has permissions to delete Helm releases. This can help prevent accidental deletions by limiting the users who have the authority to delete releases.
- Backup Helm releases: Regularly backup your Helm releases to ensure that you have a copy of your releases in case of accidental deletions. This can be done by exporting Helm release configurations or using a tool like Velero for backing up Kubernetes resources.
How to handle dependencies between helm releases while deleting them?
Handling dependencies between Helm releases while deleting them can be done by following these steps:
- Identify the dependencies: Before deleting a Helm release, make sure to identify any dependencies it has on other releases. This can be done by checking the values.yaml file of the release or by looking at the resources created by the release in the Kubernetes cluster.
- Delete dependent releases first: If your release has dependencies on other Helm releases, it is recommended to delete the dependent releases first before deleting the main release. This will ensure that any resources or configurations created by the dependent releases are no longer needed by the main release.
- Use Helm hooks: You can use pre-delete and post-delete Helm hooks to manage dependencies between releases. Pre-delete hooks can be used to clean up any resources or configurations created by dependent releases before deleting the main release. Post-delete hooks can be used to handle any cleanup tasks after the main release has been deleted.
- Use Helm charts with dependencies: If your releases have complex dependencies, consider using Helm charts that support dependencies. Helm charts allow you to define dependencies between different releases, making it easier to manage dependencies when deleting releases.
- Manual cleanup: If the above steps are not possible, you may need to manually clean up any leftover resources or configurations created by dependent releases after deleting the main release. This can be done using kubectl commands to delete the resources directly from the Kubernetes cluster.
By following these steps, you can effectively handle dependencies between Helm releases while deleting them and ensure that all resources and configurations are properly cleaned up.
How to troubleshoot issues during helm release deletion?
- Check the status of the release: Use the helm list command to verify the status of the release you are trying to delete. Make sure that the release is not in a failed state or stuck in a pending state.
- Check for any resource dependencies: If there are any resource dependencies that are preventing the release from being deleted, you can use the helm status command to check for any related resources that may need to be deleted manually before the release can be deleted.
- Check for any errors or warnings: Look for any error or warning messages that may indicate why the release deletion is failing. You can use the helm get command to retrieve detailed information about the release, including any error messages that may be helpful in troubleshooting the issue.
- Check the Helm Tiller logs: If you are using Tiller for managing releases, you can check the logs for any error messages that may provide insight into why the release deletion is failing.
- Force delete the release: If all else fails, you can try force deleting the release using the helm delete --purge command. This will delete the release and all of its associated resources without waiting for confirmation.
- Reach out for support: If you are still unable to resolve the issue, consider reaching out to the Helm community for support. You can ask for help on forums, GitHub issues, or other community resources to get assistance with troubleshooting the problem.
How to manage helm releases in Kubernetes?
There are multiple ways to manage helm releases in Kubernetes, but here are some common best practices:
- Install Helm: First, you need to install Helm on your local machine or on your Kubernetes cluster.
- Create a Helm chart: Next, you need to create a Helm chart for your application. A Helm chart is a collection of templates and configurations that describe your application and how it should be set up in Kubernetes.
- Install a release: Use the helm install command to install a release using your Helm chart. You can customize the release by providing values files or command-line arguments.
- Upgrade a release: If you need to make changes to an existing release, you can use the helm upgrade command. This allows you to update the configuration or the version of the application.
- Rollback a release: If a release fails or causes issues, you can use the helm rollback command to revert to a previous version of the release.
- List releases: You can use the helm ls command to list all the releases that have been installed in your Kubernetes cluster.
- Delete a release: When a release is no longer needed, you can use the helm delete command to uninstall and delete the release from your cluster.
By following these steps, you can effectively manage helm releases in Kubernetes and easily deploy and manage your applications.
What is the risk of not deleting old helm releases?
Not deleting old Helm releases can lead to several risks, including:
- Security vulnerabilities: Old releases may contain outdated dependencies or configurations that can leave vulnerabilities in the environment exposed to attacks.
- Resource wastage: Unused Helm releases may consume valuable resources, such as memory and CPU, leading to inefficient resource utilization.
- Performance degradation: Accumulation of old releases can impact the performance of the cluster, as it may result in increased system load and slower response times.
- Complexity and management overhead: Having a large number of old releases can make it difficult to manage and maintain the cluster, increasing the complexity of troubleshooting and maintenance tasks.
- Compliance issues: Failure to clean up old releases may result in non-compliance with data retention policies, leading to potential legal or regulatory repercussions.
Overall, it is important to regularly delete old Helm releases to ensure the security, efficiency, and stability of the Kubernetes cluster.