
Best AEM Sidekick Solutions to Buy in July 2026
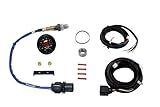
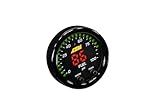
AEM 30-0300 X-Series Wideband UEGO AFR Sensor Controller Gauge
- MASSIVE 87% LARGER DISPLAY: ENHANCED VISIBILITY FOR QUICK READINGS.
- ADVANCED DATA LOGGING OUTPUTS: SUPPORTS 0-5V, RS232, AND CANBUS.
- FASTER RESPONSE FOR SAFER TUNING: OPTIMIZED PERFORMANCE WITH REAL-TIME FEEDBACK.


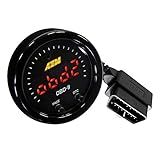
AEM 30-0311 X-Series OBDII Gauge
- EASILY READS DTCS FROM 2008+ VEHICLES VIA OBDII PORT!
- SLIM DESIGN ALLOWS VERSATILE MOUNTING ANYWHERE IN YOUR VEHICLE.
- AUTO DIMMING SENSOR ENSURES OPTIMAL DISPLAY BRIGHTNESS AT ALL TIMES.
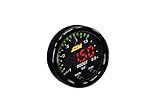
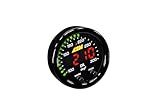
AEM 30-0306 X-Series Boost Pressure Gauge 52mm, Black
- HIGH ACCURACY FOR RELIABLE READINGS IN ANY DRIVING CONDITION.
- SLEEK DESIGN FITS SEAMLESSLY INTO YOUR VEHICLE'S DASHBOARD.
- EASY INSTALLATION AND USER-FRIENDLY INTERFACE FOR QUICK SETUP.
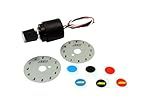
AEM 30-2056 12 Position Universal Trim Pot
- WEATHERPROOF DESIGN WITH FLYING LEADS FOR RELIABLE PERFORMANCE.
- COLOR-CODED 12-INCH WIRES SIMPLIFY INSTALLATION AND WIRING.
- EASY MOUNTING WITH 3/8 HOLE AND SECURE WITH 1/2 WRENCH.

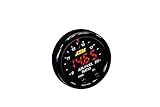
AEM 30-4110NS Digital Wideband UEGO Gauge without Sensor , Black , 6.025 inches
- COMPLETE KIT: GAUGE, HARDWARE, AND WELD-IN BUNG INCLUDED!
- VERSATILE DESIGN WITH INTERCHANGEABLE FACEPLATES AND BEZELS.
- RELIABLE RS232 SERIAL OUTPUT FOR EASY DATA TRACKING.
AEM 30-0301 X-Series Pressure Gauge, Black, 52mm
- HIGH-PRECISION READINGS FOR ACCURATE PERFORMANCE MONITORING.
- DURABLE DESIGN WITH EASY INSTALLATION FOR USER CONVENIENCE.
- SLEEK DISPLAY ENHANCES VEHICLE INTERIOR WHILE PROVIDING ESSENTIAL DATA.

AEM 52mm Wideband UEGO Air Fuel Ratio Sensor Controller Gauge w/White Face Kit

AEM 30-4406 -30-35 PSI Boost Gauge
- DURABLE HIGH-CARBON STEEL ENSURES LONG-LASTING PERFORMANCE.
- VERSATILE TOOL FOR CUTTING, STRIPPING, AND CRIMPING VARIOUS WIRES.
- ERGONOMIC PVC GRIPS PROVIDE COMFORT FOR EXTENDED USE.
AEM 30-0302 X-Series Temperature Gauge, Black
- HIGH-ACCURACY READINGS FOR PRECISE PERFORMANCE MONITORING.
- SLEEK DESIGN ENHANCES ANY DASHBOARD AESTHETIC.
- EASY INSTALLATION WITH COMPREHENSIVE INSTRUCTIONS INCLUDED.
Aem 30-0334 Afro Sensor Controller (X-Series Wideband Ugo Gauge With Obie Connectivity) 2.0625 x 0.825 inches
- LIGHTWEIGHT DESIGN FOR EASY INSTALLATION AT JUST 1.33 LBS.
- MADE IN THE USA FOR TRUSTED QUALITY AND RELIABILITY.
- COMPATIBLE WITH EFILIVE, HPTUNERS, AND DASHDAQ SOFTWARE.
In AEM (Adobe Experience Manager), a Sidekick is a panel that provides a set of tools and options for authors to edit and manage content within the AEM authoring interface.
To access the Sidekick in AEM, you need to be logged in as an author or administrator. Once logged in, you can typically find the Sidekick panel on the right-hand side of the authoring interface. If you do not see the Sidekick panel, you may need to enable it by clicking on the Sidekick icon usually located in the top toolbar of the interface.
In the Sidekick panel, you will find various tabs and components that allow you to perform tasks such as adding new components, editing content, previewing pages, and more. By using the Sidekick effectively, authors can easily create and manage content in AEM without needing to know complex coding or technical skills.
Overall, the Sidekick is an essential tool in AEM that helps authors streamline their content creation and editing processes.
How to navigate the sidekick in AEM?
To navigate the sidekick in AEM, follow these steps:
- Open your web browser and log into your AEM author instance.
- Once logged in, locate the sidekick on the right side of the page. It is a small toolbar that contains various tools and options for editing the page.
- To expand the sidekick, click on the small arrow icon located on the right side of the sidekick.
- To collapse the sidekick, click on the arrow icon again.
- To access the components available for editing on the page, click on the Components tab in the sidekick. This will display a list of components that can be added to the page.
- To add a component to the page, simply drag and drop the desired component from the Components tab onto the page.
- To edit an existing component on the page, click on the component to select it. This will display a toolbar with options for editing the component, such as moving, resizing, and deleting.
- To access the page properties, click on the Page Information tab in the sidekick. This will display the properties of the page, such as title, tags, and metadata.
- To preview the changes you have made to the page, click on the Preview tab in the sidekick. This will show you how the page will look to visitors once published.
- To save your changes, click on the Save icon in the sidekick. This will save your changes to the page.
By following these steps, you can easily navigate the sidekick in AEM and make edits to your web pages.
What types of components can be accessed through the sidekick in AEM?
In Adobe Experience Manager (AEM), the Sidekick allows users to access a variety of components, including:
- Text components: Users can add, edit, and format text content using the text component in the Sidekick.
- Image components: Users can upload, resize, and crop images using the image component in the Sidekick.
- Video components: Users can embed videos from various sources and customize settings using the video component in the Sidekick.
- Navigation components: Users can create and manage navigation menus, breadcrumbs, and other navigation elements using the navigation component in the Sidekick.
- Form components: Users can create and customize forms, fields, and buttons using the form component in the Sidekick.
- Social media components: Users can integrate social media feeds, share buttons, and other social media elements using the social media component in the Sidekick.
- Custom components: Users can create custom components and templates to suit their specific needs and requirements using the Sidekick.
How to create templates in the sidekick in AEM?
To create templates in Sidekick in AEM, follow these steps:
- Navigate to the AEM authoring environment and login using your credentials.
- Click on the "Websites" tab in the top navigation menu.
- From the dropdown menu, select "Templates" to open the Templates console.
- Click on the "+" icon to create a new template.
- In the Create Template dialog box, enter a name for your template and select a parent template (if applicable).
- Click on "Create" to create the template.
- Once the template is created, you can start adding components to it by dragging and dropping components from the Sidekick panel onto the template.
- Customize the layout and design of the template by rearranging and configuring the components as needed.
- Save your changes and activate the template to make it available for use in creating new pages.
- To use the template, navigate to the desired page in the AEM authoring environment, click on the "Edit" button, and select the template from the template dropdown menu in the Sidekick panel.
By following these steps, you can create templates in Sidekick in AEM and customize them to suit your specific requirements.
How to disable the sidekick in AEM?
To disable the sidekick in Adobe Experience Manager (AEM), you can follow these steps:
- Log in to your AEM instance as an administrator.
- Navigate to Tools -> Deployment -> Web Console.
- In the OSGi console, search for the package "com.day.cq.wcm.cq-wcm-commons."
- Disable the bundle by clicking the "Stop" button next to it.
- Refresh your AEM instance and the sidekick should now be disabled.
Please note that disabling the sidekick may affect the editing experience for content authors. If you need to re-enable the sidekick at any point, simply follow the same steps and click the "Start" button next to the "com.day.cq.wcm.cq-wcm-commons" bundle.
What are some potential enhancements for the sidekick in AEM?
- Improved integration with other Adobe products: Enhancing the sidekick's integration with other Adobe products, such as Adobe Creative Cloud or Adobe Target, could provide users with more seamless workflow and increased functionality.
- Customization options: Giving users the ability to customize the sidekick layout, icons, and features could make it more user-friendly and tailored to individual needs.
- Collaboration features: Adding collaboration features, such as the ability to leave comments or annotations on pages within the sidekick, could facilitate better communication and teamwork among users.
- Advanced editing tools: Integrating more advanced editing tools, such as code editing capabilities or advanced styling options, could empower users to create more complex and customized content within the sidekick.
- Mobile responsiveness: Improving the sidekick's responsiveness on mobile devices could make it easier for users to work on-the-go and streamline their workflow across different devices.
- AI-powered suggestions: Implementing AI-powered features, such as content recommendations or predictive analytics, could help users make more informed decisions and streamline their content creation process within the sidekick.
How to configure the sidekick in AEM?
To configure the sidekick in Adobe Experience Manager (AEM), follow these steps:
- Login to your AEM author instance and navigate to the page where you want to configure the sidekick.
- Click on the "Edit" button at the top of the page to enter edit mode.
- Once in edit mode, you will see the sidekick on the right-hand side of the page. Click on the "Configure" button at the top of the sidekick.
- In the configuration dialog, you can customize the sidekick by adding or removing tabs, adding or removing components from tabs, rearranging tabs and components, and setting default values for components.
- To add a new tab, click on the "Add" button in the configuration dialog. Enter a name for the tab and click "OK."
- To add a component to a tab, click on the tab name in the configuration dialog to expand it, then click on the "Add" button. Select the component you want to add from the list and click "OK."
- To rearrange tabs or components, click and drag them to the desired position in the configuration dialog.
- Once you have finished configuring the sidekick, click "OK" to save your changes.
- Click on the "Done" button at the top of the page to exit edit mode and view your newly configured sidekick.
By following these steps, you can easily configure the sidekick in AEM to better suit your content authoring needs.