Best Notification Management Solutions to Buy in July 2026

CREAVIVA Cube Pomodoro Timer - Flip to Start Countdown, Rechargeable Mini Productivity Timer for Study, Office, 11 Preset Times, Silent/Vibration, Time Management Tool for Kids & ADHD (White)
-
FLIP-TO-START: EFFORTLESS COUNTDOWN IN SECONDS, NO BUTTONS NEEDED!
-
11 PRESET TIMES: PERFECT FOR SHORT TASKS OR LONG STUDY SESSIONS!
-
ECO-FRIENDLY USB-C: RECHARGEABLE POWER FOR ENDLESS FOCUS SESSIONS!


VANPO Torque Screwdriver Digital 2.66-53.1 in-lbs/0.3-6 Nm, Adjustable Screwdriver Torque Wrench Set with Buzzer/LED Indicator Notification for Bike Repairing, Tools, Maintenance and Mounting
- PRECISION MEASUREMENT: ACCURATE TO ±2% WITH 4 VERSATILE MODES.
- DATA MEMORY: STORE 500 TORQUE VALUES FOR EASY REFERENCE ANYTIME.
- USER-FRIENDLY DESIGN: QUICK RELEASE & BEEP ALERTS ENSURE SAFE USE.
Rules & Tools for Leaders: From Developing Your Own Skills to Running Organizations of Any Size, Practical Advice for Leaders at All Levels
- AFFORDABLE PRICES FOR QUALITY READS ON A BUDGET!
- ECO-FRIENDLY CHOICE: GIVE BOOKS A SECOND LIFE!
- VERIFIED GOOD CONDITION ENSURES GREAT READING EXPERIENCE!

CREAVIVA Cube Pomodoro Timer - Flip to Start Countdown, Rechargeable Mini Productivity Timer for Study, Office, 11 Preset Times, Silent/Vibration, Time Management Tool for Kids & ADHD (Pink)
-
FLIP-TO-START TECH: EASY COUNTDOWN, JUST FLIP THE CUBE-NO BUTTONS!
-
ECO-FRIENDLY USB-C: RECHARGEABLE BATTERY LASTS LONGER-NO MORE DISPOSABLES.
-
POMODORO COMPANION: BOOST PRODUCTIVITY WITH PERFECT TIMING FOR WORK BREAKS!
CREAVIVA Cube Pomodoro Timer - Flip to Start Countdown, Rechargeable Mini Productivity Timer for Study, Office, 11 Preset Times, Silent/Vibration, Time Management Tool for Kids & ADHD (Yellow)
- EFFORTLESS OPERATION: FLIP THE TIMER FOR INSTANT COUNTDOWN-NO BUTTONS!
- OPTIMIZED TIMING: 11 PRESET INTERVALS FOR EVERY TASK AND FOCUS NEED.
- ECO-FRIENDLY: RECHARGEABLE VIA USB-C-NO MORE DISPOSABLE BATTERIES!
Yunbaoit Visual Timer with Protective Case, Rainbow Disk 60 Minute Countdown Timer for Kids and Adults, Silent Time Management Tool(Light Blue)
- VISUAL TIMER HELPS IMPROVE TIME MANAGEMENT FOR KIDS AND ADULTS!
- NO TICKING SOUND: PERFECT FOR QUIET SPACES AND SOUND-SENSITIVE USERS.
- VERSATILE USES: IDEAL FOR KITCHENS, CLASSROOMS, AND PRODUCTIVITY TASKS!
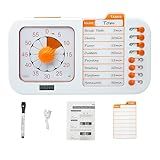
Task Timer, Timer for Kids, Students and Adults. with to-do List Card, Planning for Daily Chore, Schedules, School Classroom, Homework. Silent and Efficient Time Management Tool.
-
BOOST PRODUCTIVITY: ALL-IN-ONE TIMER & TO-DO LIST ENHANCES FOCUS!
-
USER-FRIENDLY: VISUAL TIMER HELPS KIDS GRASP TIME AND STAY ORGANIZED.
-
VERSATILE TOOL: PERFECT FOR HOME, CLASSROOM, AND ADHD MANAGEMENT!
To locally cancel a push notification in Swift, you can use the UNUserNotificationCenter class to manage and manipulate notifications. To cancel a specific notification, you need to first retrieve the notification's identifier and then use the removePendingNotificationRequests method to cancel it. This method takes an array of notification request identifiers as a parameter, so you need to create an array with the identifier of the notification you want to cancel. Once you have the identifier array, you can call the removePendingNotificationRequests method passing in the array to cancel the corresponding notification.
What is the Swift syntax for canceling a push notification?
In Swift, you can cancel a pending or delivered push notification using the UNUserNotificationCenter class. Here's an example of how you can cancel a push notification:
import UIKit import UserNotifications
// Get the notification center instance let notificationCenter = UNUserNotificationCenter.current()
// Specify the identifier of the notification you want to cancel let notificationIdentifier = "ExampleNotification"
// Cancel the notification with the given identifier notificationCenter.removePendingNotificationRequests(withIdentifiers: [notificationIdentifier]) notificationCenter.removeDeliveredNotifications(withIdentifiers: [notificationIdentifier])
This code snippet first gets the current UNUserNotificationCenter instance, then specifies the identifier of the notification you want to cancel. Finally, it removes the pending and delivered notifications with that identifier using the removePendingNotificationRequests and removeDeliveredNotifications methods, respectively.
How can I cancel a pending push notification in Swift?
To cancel a pending push notification in Swift, you can use the UNUserNotificationCenter class to manage and modify pending notifications. Here's an example of how you can cancel a pending notification:
import UIKit import UserNotifications
// Get the shared instance of the notification center let center = UNUserNotificationCenter.current()
// Identify the notification you want to cancel by its unique identifier let notificationIdentifier = "YourNotificationIdentifier"
// Use the removePendingNotificationRequests method to cancel the pending notification center.getPendingNotificationRequests { (requests) in for request in requests { if request.identifier == notificationIdentifier { center.removePendingNotificationRequests(withIdentifiers: [notificationIdentifier]) } } }
In this example, we first get the shared instance of the notification center. We then specify the unique identifier of the pending notification that we want to cancel. Finally, we iterate through the list of pending notification requests to find the one with the specified identifier and remove it using the removePendingNotificationRequests method.
By following this example, you can successfully cancel a pending push notification in Swift.
How to locally cancel a push notification in Swift?
To locally cancel a push notification in Swift, you can use the UNUserNotificationCenter class provided by the User Notifications framework. Here is an example code snippet that demonstrates how to cancel a specific push notification:
import UserNotifications
// Get the notification request identifier that you want to cancel let notificationIdentifier = "YourNotificationIdentifier"
// Get the current notification center let notificationCenter = UNUserNotificationCenter.current()
// Get all pending notification requests notificationCenter.getPendingNotificationRequests { (notificationRequests) in // Find the notification request with the specified identifier for request in notificationRequests { if request.identifier == notificationIdentifier { // Cancel the notification request notificationCenter.removePendingNotificationRequests(withIdentifiers: [notificationIdentifier]) break } } }
In this code snippet, we first specify the notification request identifier that we want to cancel. Then, we use the getPendingNotificationRequests method of the UNUserNotificationCenter class to retrieve all pending notification requests. We iterate through the notification requests to find the one with the specified identifier and then use the removePendingNotificationRequests method to cancel it.
Make sure to request authorization to manage notifications before trying to cancel them by adding the following code to your AppDelegate:
notificationCenter.requestAuthorization(options: [.alert, .badge, .sound]) { (granted, error) in if granted { // Handle notification authorization } }
What are the available APIs for canceling push notifications in Swift?
There is no specific API for canceling push notifications in Swift, as push notifications are typically managed by the operating system. However, you can use the following methods to handle notifications in your Swift code:
- UNUserNotificationCenter: This class in the UserNotifications framework allows you to manage all aspects of push notifications, including scheduling, presenting, and handling them. You can use this class to cancel pending notifications by identifying them using their identifier.
- UIApplication: The UIApplication class provides methods for interacting with the application's notifications, including canceling all scheduled notifications or specific notifications. You can use the UIApplication.shared.cancelAllLocalNotifications() method to cancel all pending notifications.
- Firebase Cloud Messaging (FCM) API: If you are using Firebase Cloud Messaging for push notifications, you can use the FirebaseMessaging framework to cancel specific push notifications. The Messaging.messaging().deleteFCMToken(forSenderID: completion:) method allows you to delete a specific FCM token, which effectively cancels notifications for that token.
Overall, the specific method for canceling push notifications will depend on how you are managing and sending notifications in your app.
How do I handle push notification dismissal in Swift?
In Swift, you can handle push notification dismissal using the UNUserNotificationCenterDelegate protocol. Here is an example of how you can handle push notification dismissal in Swift:
- First, make sure you request permission to show notifications and set the delegate for the user notification center in your AppDelegate:
import UIKit import UserNotifications
@UIApplicationMain class AppDelegate: UIResponder, UIApplicationDelegate, UNUserNotificationCenterDelegate {
func application(\_ application: UIApplication, didFinishLaunchingWithOptions launchOptions: \[UIApplication.LaunchOptionsKey: Any\]?) -> Bool {
    UNUserNotificationCenter.current().delegate = self
    UNUserNotificationCenter.current().requestAuthorization(options: \[.alert, .sound, .badge\]) { (granted, error) in
        if granted {
            print("Notification permission granted")
        } else {
            print("Notification permission denied")
        }
    }
    return true
}
}
- Implement the userNotificationCenter(_:willPresent:withCompletionHandler:) method of the UNUserNotificationCenterDelegate protocol to handle notifications that are received while the app is in the foreground:
func userNotificationCenter(_ center: UNUserNotificationCenter, willPresent notification: UNNotification, withCompletionHandler completionHandler: @escaping (UNNotificationPresentationOptions) -> Void) { // Handle the notification here completionHandler([.alert, .sound, .badge]) }
- Implement the userNotificationCenter(_:didReceive:withCompletionHandler:) method of the UNUserNotificationCenterDelegate protocol to handle the user's response to the notification:
func userNotificationCenter(_ center: UNUserNotificationCenter, didReceive response: UNNotificationResponse, withCompletionHandler completionHandler: @escaping () -> Void) { // Handle the dismissal of the notification here completionHandler() }
By implementing these methods in your AppDelegate class, you can handle push notification dismissal in Swift.
What are the potential pitfalls of canceling push notifications in Swift?
- Loss of engagement: Push notifications are a powerful tool for engaging users, reminding them of important information or encouraging them to return to your app. By canceling push notifications, you may lose the ability to effectively communicate with your users and may see a decline in user engagement.
- Decreased user retention: Push notifications can help to keep users interested in and engaged with your app, leading to higher retention rates. By disabling push notifications, you may see a decrease in user retention as users may forget about your app or lose interest over time.
- Missed opportunities: Push notifications can be a valuable marketing tool for promoting new features, products, or offers to your users. By canceling push notifications, you may miss out on opportunities to drive user acquisition, increase sales, or promote important updates.
- Negative user experience: While push notifications can be annoying if overused or irrelevant, they can also enhance the user experience by providing timely and valuable information. Disabling push notifications entirely may result in a less informative or engaging user experience, leading to decreased satisfaction with your app.
- Limited communication channels: Push notifications are one of the most direct and effective ways to communicate with your users. By canceling push notifications, you may limit your ability to reach and engage with your audience, particularly if you do not have alternative channels in place.