
Best Website Maintenance Tools to Buy in July 2026
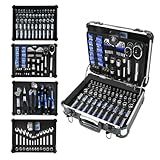
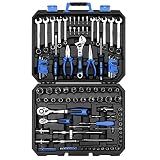
Prostormer Mechanic Tool Set, 240-Pieces Universal Household Auto Repair Tool Kit with Heavy Duty Aluminium Tool Box
-
DURABLE ALUMINUM CASE: SUPERIOR ORGANIZATION & PROTECTION FOR TOOLS.
-
HIGH-QUALITY STEEL TOOLS: CORROSION-RESISTANT FOR STRENGTH & LONGEVITY.
-
240-PIECE VERSATILITY: PERFECT FOR AUTOMOTIVE, HOUSEHOLD, AND MECHANICAL TASKS.


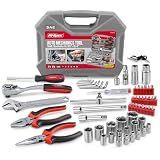
Hi-Spec Tools 67pc SAE Auto Mechanics Hand Tool Kit Set. Complete Car, Motorcycle, Engine & Garage Repairs with Sockets, Ratchet Wrench, Pliers & More
-
ALL-IN-ONE SOLUTION FOR CARS, BIKES, AND RVS-REPAIRS MADE EASY!
-
FAST SOCKET WORK WITH 3/8 RATCHETING WRENCH-SAVE TIME ON REPAIRS!
-
COMPACT STORAGE CASE ENSURES TOOLS ARE ALWAYS READY FOR ACTION.
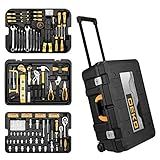
DEKOPRO 258 Piece Tool Kit with Rolling Tool Box Socket Wrench Hand Tool Set Mechanic Case Trolley Portable
- DURABLE FORGED STEEL TOOLS FOR PRECISION REPAIRS AND GIFTS
- EFFORTLESS PORTABILITY WITH SMOOTH-ROLLING CASE DESIGN
- COMPREHENSIVE 258 PCS SET FOR ALL YOUR HOME REPAIR NEEDS

DURATECH 269-Piece Socket Wrench and Home Repair Hand Tool Kit- Daily Use Mechanics Hand Tool Kit with Wide Open Mouth Tool Bag
-
RUST-RESISTANT CHROME FINISH: DURABLE TOOLS FOR OUTDOOR USE!
-
269-PIECE KIT: EVERYTHING YOU NEED FOR EFFICIENT HOME REPAIRS!
-
SAFETY-FIRST DESIGN: TOOLS MEET ANSI SPECS FOR SECURE USAGE!
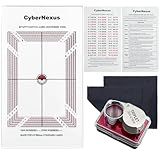
Card Grading Centering Tool for Pokemon, Trading Cards Measuring Tools, Come with Cleaning Cloth Kit & 30X Magnifying Implement for PSA's Latest Grading Standards/BGS Submissions
- PRECISION TOOL FOR TCG/MTG/DTCG COLLECTORS - ELEVATE YOUR GRADING ACCURACY!
- USER-FRIENDLY DESIGN WITH STEP-BY-STEP GUIDES - EASY TO USE FOR ALL LEVELS!
- DURABLE ACRYLIC & 30X LOUPE FOR ULTIMATE INSPECTION - TRUST IN LASTING QUALITY!
DEKOPRO 118 Piece Tool Kit Professional Auto Repair Tool Set Combination Package Socket Wrench with Most Useful Mechanics Tools
- COMPLETE KIT FOR PROFESSIONAL AUTO REPAIRS IN A COMPACT DESIGN.
- HIGH-QUALITY CR-V STEEL ENSURES DURABILITY AND CORROSION RESISTANCE.
- STURDY STORAGE CASE KEEPS TOOLS ORGANIZED AND PORTABLE.
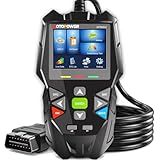
MOTOPOWER 4 in 1 Code Reader Car Diagnostic Scan Tool Oil Maintenance Reset, Battery Test, Performance Test with Lifetime Update
-
QUICK DIAGNOSTICS: GET PRECISE, INSTANT CAR DIAGNOSTICS-NO GUESSING!
-
DIY OIL RESET: EFFORTLESSLY RESET OIL LIFE MONITORS ON 2000+ VEHICLES.
-
REAL-TIME BATTERY TESTING: MONITOR 12V BATTERY HEALTH WITH LIVE DIAGNOSTICS.
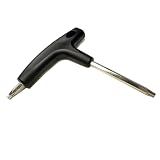
Symypy Golf Wrench Driver Tool TLC Multi-Function Taylormade M1/ M2/M3/M4/SLDR/RBZ COBRA F9 Golf Dual Wrench Club Tools T20 T25 Universal Weights Shaft Adapter(T20+T25+Black)
- VERSATILE DESIGN: UNIVERSAL TOOL FITS TAYLORMADE, COBRA, AND MORE!
- DURABLE MATERIALS: MADE OF HIGH-QUALITY STAINLESS STEEL FOR LONGEVITY.
- COMPACT & PORTABLE: EASY TO CARRY AT JUST 46G-TAKE IT ANYWHERE!
Maintaining a live website on production involves regularly monitoring the site for any issues, updating content, plugins, and themes, backing up files and databases regularly, ensuring security measures are in place, and handling any necessary bug fixes or updates in a timely manner. It is important to test any changes or updates on a staging environment before implementing them on the live site to prevent any potential issues. Regularly checking for broken links, optimizing site performance, and staying updated on industry trends and best practices are also essential for maintaining a successful live website on production.
What is the best practice for managing security updates on a live website?
The best practice for managing security updates on a live website includes the following steps:
- Regularly monitor security advisories: Stay informed about the latest security vulnerabilities and updates related to the technology stack of your website, including the operating system, web server, database, and CMS.
- Use a vulnerability scanner: Conduct regular scans of your website to identify any security vulnerabilities that may exist. This will help you proactively address potential issues before they are exploited by malicious actors.
- Implement a patch management process: Develop a process for timely installing security patches and updates for all components of your website. This should include testing updates in a staging environment before deploying them to the production website.
- Maintain backups: Regularly backup your website to ensure that you can quickly restore it in case of a security breach or update failure. Implement a backup schedule that aligns with the frequency of security updates.
- Implement a web application firewall (WAF): Use a WAF to protect your website from common security threats, such as SQL injection, XSS, and CSRF attacks. A WAF can help block malicious traffic and filter out potentially harmful requests.
- Limit access to the website: Restrict access to sensitive areas of your website and implement strong authentication mechanisms to prevent unauthorized access. Regularly review user permissions and access controls to ensure that only authorized users have access to critical functions.
- Monitor website activity: Use security monitoring tools to track activity on your website and detect any suspicious behavior or security incidents. Implement alerts and notifications to quickly respond to potential security threats.
- Stay informed: Continuously educate yourself and your team about the latest security trends and best practices. Participate in security training programs and conferences to stay current with emerging threats and mitigation techniques.
By following these best practices for managing security updates on a live website, you can help protect your website from potential security threats and minimize the risk of a security breach.
How to implement SSL on a live website for secure connections?
Implementing SSL on a live website for secure connections involves several steps. Here is a general outline of the process:
- Obtain an SSL certificate: Purchase an SSL certificate from a trusted Certificate Authority (CA). There are various types of SSL certificates available, such as single domain, wildcard, and multi-domain certificates. Choose the one that best fits your needs.
- Install the SSL certificate on your web server: Once you have obtained the SSL certificate, you need to install it on your web server. The exact steps for this will vary depending on the type of server you are using (e.g., Apache, Nginx, IIS). You may need to contact your web hosting provider for assistance with this step.
- Configure your server to use HTTPS: Update your server configuration to use HTTPS instead of HTTP for secure connections. This typically involves modifying your virtual host configuration file to specify the SSL certificate and other settings.
- Update internal links and resources: Update any internal links and resources on your website to use HTTPS instead of HTTP. This includes updating links in your HTML code, CSS files, JavaScript files, and any other resources that are loaded on your website.
- Set up 301 redirects: Set up 301 redirects to automatically redirect HTTP requests to HTTPS. This ensures that all traffic to your website is encrypted and secure.
- Test your SSL implementation: Use online tools such as SSL Labs to test your SSL implementation and ensure that your website is properly secured with SSL.
- Monitor SSL certificate expiration: Keep track of your SSL certificate expiration date and renew it before it expires to avoid any disruptions in secure connections on your website.
By following these steps, you can implement SSL on your live website and provide secure connections for your users.
What is the process for rolling back changes on a live website?
Rolling back changes on a live website can vary depending on the specific setup and processes in place, but generally, the process involves the following steps:
- Identify the issue: First, you need to identify the specific changes that caused the issue on the live website. This may involve reviewing recent code changes, updates, or modifications made to the website.
- Backup the website: Before making any changes, it is important to create a backup of the website to ensure that you can restore it to its previous state if necessary.
- Revert to a previous version: Depending on how your website is managed, you can revert to a previous version of the website by rolling back code changes, reverting updates, or restoring from a backup.
- Test the rollback: Once the changes have been reverted, it is important to test the website to ensure that the issue has been resolved and that the website is functioning correctly.
- Communicate with stakeholders: It is important to communicate with stakeholders, such as team members, clients, or users, about the changes that were made and the rollback process.
- Monitor the website: After rolling back changes, it is important to monitor the website to ensure that the issue has been fully resolved and that there are no further issues.
By following these steps, you can effectively roll back changes on a live website and restore it to its previous state.
How to check for broken links on a live website?
There are several ways to check for broken links on a live website:
- Use online tools: There are various online tools available that can help you check for broken links on your website. Some popular tools include Broken Link Checker, Online Broken Link Checker, and W3C Link Checker.
- Manually check: You can manually check for broken links by visiting each page of your website and clicking on each link to see if it leads to a valid page. This can be a time-consuming process, especially for larger websites.
- Use browser plugins: There are browser plugins available, such as Check My Links for Google Chrome, that can help you quickly identify broken links on a webpage.
- Use Google Search Console: Google Search Console can also help you identify broken links on your website. Go to the Index Coverage report in Google Search Console and look for any errors related to broken links.
- Monitor website analytics: Keep an eye on your website analytics to see if there is a sudden increase in the number of 404 errors, which may indicate broken links on your website.
By using one or a combination of these methods, you can effectively check for broken links on a live website and ensure a seamless user experience.
How to troubleshoot errors on a live website?
- Identify the error: The first step in troubleshooting errors on a live website is to identify the specific error that is occurring. Check the error message displayed on the website or in the server logs to get more information about the issue.
- Check server logs: Look at the server logs to see if there are any error messages or warnings that can provide clues about what is causing the problem.
- Check for recent changes: If the error started occurring after recent changes were made to the website (such as updates, code changes, or plugin installations), try reverting those changes to see if it resolves the issue.
- Test different browsers and devices: Some errors may only occur on specific browsers or devices. Test the website on different browsers and devices to see if the error is consistent across all platforms.
- Check for conflicts: If the website uses plugins or third-party scripts, there may be conflicts between different components causing the error. Temporarily disable plugins or scripts one by one to identify the source of the conflict.
- Check file permissions: Ensure that all files and directories on the server have the correct permissions set. Incorrect file permissions can cause errors on the website.
- Clear cache: Cached files on the server or browser may be causing the error. Clear the cache on the server and in the browser to see if that resolves the issue.
- Update software: Make sure that all software, including the website platform, plugins, and server software, are up to date. Outdated software can lead to compatibility issues and errors.
- Contact hosting provider: If the issue persists and you are unable to troubleshoot it on your own, contact your hosting provider for assistance. They may be able to provide additional insights or troubleshoot server-side issues.
- Monitor for recurring errors: Set up monitoring tools to track errors on the website and receive notifications when they occur. This will help you identify patterns and address recurring issues more efficiently.
How to update website content on production?
- Make a backup of your current website content before making any updates. This will ensure that you can revert back to the original content if needed.
- Access your website's content management system (CMS) or FTP server where the website files are stored.
- Make the necessary changes to the content by editing the HTML, CSS, or other files directly in the CMS or FTP server.
- Save the changes and preview them to ensure they look correct on the live website.
- Test the updated content on different devices and browsers to ensure compatibility.
- Once you are satisfied with the updates, publish the changes to make them live on the production website.
- Monitor the website for any issues or errors that may arise after the update and address them promptly.
- Inform your team or stakeholders about the updated content to keep them in the loop.
- Consider optimizing the updated content for SEO to improve visibility and rankings on search engines.
- Regularly review and update website content to keep it fresh and relevant to your audience.