
Best Hosting Services to Buy in July 2026

yoooliwicng funny aprons for men Adult Suit-Themed Apron - Elegant Design Perfect for Kitchen, Baking, Hosting Parties, Catering Services & Special Events
- UNIQUE TIE PRINT DESIGN ADDS FUN TO YOUR COOKING EXPERIENCE!
- WATERPROOF, OIL-RESISTANT, AND MACHINE-WASHABLE FOR EASY CARE.
- ADJUSTABLE FIT MAKES IT PERFECT FOR ALL ADULTS AND OCCASIONS!


yoooliwicng Funny aprons for men Adult Suit-Themed Apron - Elegant Design Perfect for Kitchen, Baking, Hosting Parties, Catering Services & Special Events
- UNIQUE TIE PRINT ADDS FUN AND STYLE TO YOUR COOKING ADVENTURES!
- WATERPROOF, OIL-RESISTANT MATERIAL KEEPS YOU CLEAN AND SAFE!
- ADJUSTABLE FIT FOR EVERYONE-PERFECT FOR ANY COOKING OCCASION!

Lenox 896685 Holiday Red Tartan Mugs, Set of 4, Christmas Dinnerware, Hosting, Service For 4, 3.5 x 3.25-Inch Diameter, 11 Fl Oz
- ELEGANT PORCELAIN WITH STUNNING 24K GOLD HANDLES.
- DISHWASHER SAFE FOR EASY CLEANUP-NO MICROWAVE USE!
- SET OF 4 STYLISH MUGS, PERFECT FOR ANY OCCASION!

Service Ideas WPB2BSNG Water and Cold Beverage Pitcher, No Ice Guard, Bell Shaped, 2 Liter (66.7 ounces), Dishwasher Safe, Brushed Stainless Steel
- DURABLE STAINLESS STEEL DESIGN ENSURES LONG-LASTING PERFORMANCE.
- ERGONOMIC HANDLE OFFERS COMFORTABLE, EFFORTLESS POURING.
- DISHWASHER SAFE FOR HASSLE-FREE CLEANING AND MAINTENANCE.

Service Ideas FCC06SS Flow Control Server, Vacuum Insulated, 0.6 Liter (20 Ounces), Stainless Steel/Black
-
ADJUSTABLE FLOW CONTROL: CUSTOMIZE YOUR COFFEE POUR EFFORTLESSLY!
-
SPILL-FREE DESIGN: PUSH BUTTON LID ENSURES MESS-FREE SERVING.
-
DURABLE INSULATION: KEEPS BEVERAGES HOT FOR UP TO 4 HOURS!
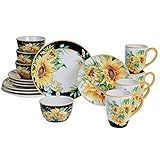
Sunflower Fields 16-Piece Ceramic Dinnerware Set – Great for Fall Gatherings, Daily Meals, Brunches, or Hosting – Service for 4 Includes Dinner Plates, Salad Plates, Bowls & Mugs
-
STUNNING 16-PIECE SET: ELEVATE MEALS WITH COORDINATED SUNFLOWER DESIGN.
-
DURABLE & ELEGANT: STRONG CERAMIC WITH SMOOTH GLAZE; CHIP-RESISTANT.
-
CONVENIENT & GIFTABLE: MICROWAVE/DISHWASHER SAFE; PERFECT FOR ANY OCCASION!
Apsic 50-Pack Disposable Aluminum Foil Pans Lids, 21"x13" Perfect For Cooking, Heating, Storing, And Preparing Food Service, Event Hosting, and Commercial Use
- CONVENIENT 50-PACK DESIGN FOR EFFORTLESS CLEANUP AND TIME-SAVING.
- PERFECT FOR LARGE MEALS OR BAKED GOODS, IDEAL FOR ON-THE-GO DINING.
- DURABLE, PREMIUM ALUMINUM OFFERS UNMATCHED STRENGTH FOR COOKING NEEDS.

Airbnb Co-Hosting Secrets: How to Start and Scale a Co-Hosting Business in 30 days

Lenox Dinnerware Set, Holiday Gingerbread Man Accent Plate, Service for 1, 8 Inch Porcelain Plate Perfect for Christmas Hosting, Dishwasher Safe, Christmas Decor, Gingerbread Man (Multicolor, 1 Piece)
- DURABLE 8 PORCELAIN: PERFECT FOR EVERYDAY USE!
- EFFORTLESS CLEANUP: DISHWASHER SAFE FOR YOUR CONVENIENCE!
- EXQUISITE DESIGN: ELEGANTLY IMPORTED FOR A REFINED TOUCH!
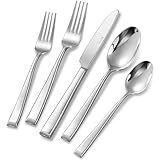
KEAWELL Premium Imperial 20-Piece Silverware Set, Service for 4 – Heavy Duty 18/10 Stainless Steel Flatware, Dishwasher Safe for Elegant Dining and Holiday Hosting (20, Silver)
-
THREE SIZE OPTIONS FOR TABLES: 20, 45, OR 65-PIECE SETS AVAILABLE!
-
ELEGANT, DURABLE FLATWARE WITH A MIRROR FINISH FOR REFINED TASTES.
-
DISHWASHER SAFE AND RUST-RESISTANT FOR EASY CARE AND LONGEVITY!
To run WooCommerce on SiteGround, follow these steps:
- Choose a hosting plan: Sign up for a hosting plan with SiteGround that best suits your needs. Their WordPress hosting plans are recommended for running WooCommerce.
- Install WordPress: After signing up, log in to your SiteGround account and go to the "My Accounts" tab. In the cPanel, find the "WordPress" icon under the "Autoinstallers" section and click on it. Follow the prompts to install WordPress on your SiteGround hosting.
- Install WooCommerce: Once WordPress is installed, log in to your WordPress dashboard by visiting yourdomain.com/wp-admin. Navigate to the "Plugins" section on the left-hand side and click on "Add New." Search for "WooCommerce," click on "Install Now," and activate the plugin.
- Set up WooCommerce: Once WooCommerce is installed and activated, the setup wizard will guide you through the initial configuration. It will prompt you to choose your store location, currency, payment options, and shipping methods.
- Configure settings: Customize your WooCommerce settings by going to the WooCommerce tab in your WordPress dashboard. Here, you can manage general settings, products, taxes, shipping, payments, and more. Adjust these settings according to your business requirements.
- Choose a theme: To enhance the appearance of your online store, consider installing a WooCommerce-compatible theme. Go to the "Appearance" section in your WordPress dashboard, click on "Themes," and select a suitable theme. Ensure that the theme you choose is compatible with WooCommerce for optimal performance.
- Add products: Start adding your products to WooCommerce. Go to the "Products" section in your WordPress dashboard and click on "Add New." Fill in the product details, including title, description, price, images, and inventory options. Repeat this step for each product you want to add.
- Customize your store: Personalize your online store by customizing its appearance, settings, and features. Use the various customization options available, such as adding widgets, creating menus, and modifying layout settings, to make your store unique.
- Test your store: Before making your online store live, thoroughly test its functionality. Ensure that the checkout process, payment methods, and product pages are working correctly. Test different scenarios to ensure a seamless customer experience.
- Launch your store: Once you are satisfied with your store's configuration and testing, it's time to make it live. Use your custom domain or the temporary SiteGround URL provided during the WordPress installation process to access your online store.
By following these steps, you can successfully run WooCommerce on your SiteGround hosting and start selling products online.
How to set up a WooCommerce store on SiteGround?
To set up a WooCommerce store on SiteGround, follow these steps:
- Sign up for a hosting plan: Go to SiteGround's website and sign up for a hosting plan that suits your needs. Make sure to select the appropriate plan that supports WooCommerce.
- Choose a domain: If you don't have a domain already, you can purchase one through SiteGround or use an existing domain.
- Install WordPress: SiteGround offers a seamless installation of WordPress. After signing up, you can use their SiteGround Wizard to install WordPress on your domain.
- Log in to your WordPress admin dashboard: Once WordPress is installed, you can access your admin dashboard by visiting www.yourdomain.com/wp-admin. Enter your username and password to log in.
- Install the WooCommerce plugin: In your WordPress dashboard, go to "Plugins" and click on "Add New." Search for "WooCommerce" and click on "Install Now." After installation, click on the "Activate" button.
- Configure your WooCommerce settings: WooCommerce will guide you through the initial setup process, including configuring currency, shipping options, payment gateways, and setting up your store pages.
- Customize your store: You can customize the appearance of your store by choosing a theme, adding a logo, modifying colors, and arranging widgets. Go to "Appearance" and click on "Customize" to access the customization options.
- Add products: To add products to your store, navigate to "Products" in your WordPress dashboard. Click on "Add Product," and enter the necessary details such as the product name, description, price, images, and other variations.
- Configure other settings: Explore the various settings available in WooCommerce to further customize your store. These include tax settings, shipping methods, payment gateway integration, order management, and more.
- Test your store: Before going live, make sure to thoroughly test your store by placing test orders, checking payment gateways, and reviewing the overall user experience.
Remember to regularly update your WooCommerce plugin and WordPress installation to benefit from the latest features and security enhancements. SiteGround also offers 24/7 support, so don't hesitate to reach out to them if you encounter any issues during the setup process.
How to handle shipping options in WooCommerce on SiteGround?
To handle shipping options in WooCommerce on SiteGround, follow these steps:
- Login to your WordPress admin dashboard.
- Navigate to "WooCommerce" in the left side menu and click on "Settings".
- In the "Settings" tab, click on the "Shipping" sub-tab.
- Here, you will find different sections to configure shipping options based on your requirements. a. Shipping Zones: By default, there should be a single zone named "Rest of the World". You can edit this zone or create new zones for specific regions/countries. b. Shipping Methods: Under each zone, you can configure different shipping methods. WooCommerce provides various methods like Flat Rate, Free Shipping, Local Pickup, and more. Click on a shipping method to set it up. c. Shipping Options: Within each shipping method, you can define various details such as the method title, tax status, cost calculations, and more. Configure the options according to your needs.
- Once you have set up the shipping options, click "Save changes" to save your settings.
NOTE: Make sure the WooCommerce plugin is installed and activated on your SiteGround hosting account. The process may vary slightly depending on your WooCommerce version and any additional shipping method plugins you have installed.
If you encounter any issues or need more advanced shipping options, you can consider installing additional shipping method plugins from the WooCommerce Extensions marketplace or consult the documentation provided by SiteGround and WooCommerce for further guidance.
How to manage customer orders on a WooCommerce store hosted on SiteGround?
To manage customer orders on a WooCommerce store hosted on SiteGround, you can follow these steps:
- Log in to your WooCommerce admin panel using your SiteGround credentials.
- Navigate to the "Orders" tab on the left-hand side of the screen.
- Here, you'll find a list of all the customer orders received on your store.
- You can use the search bar and filters to find specific orders based on order number, customer name, or product details.
- Click on an order to view its details, including customer information, order items, billing/shipping address, and payment status.
- From here, you can manage the order status by clicking on the dropdown menu next to "Order status." You can change it to "Processing", "Completed", "On-Hold", or other relevant options.
- To fulfill an order, click on the "Fulfill" button if it requires shipping. You can add tracking details here as well.
- If the customer requests a refund or return, click on the "Refund" button to issue the refund.
- For additional actions, such as printing invoices or packing slips, click on the "Actions" dropdown menu on the right-hand side of the WooCommerce order page.
- You can also add order notes for internal reference or communicate with the customer by using the "Order Notes" section.
- After completing any changes, make sure to click the "Save" or "Update" button to save your modifications.
By following these steps, you should be able to effectively manage and process customer orders on your WooCommerce store hosted on SiteGround.