
Best AI Development Kits to Buy in July 2026

MatataStudio AI Vision Kit for VinciBot with a 180° Flip Camera, Programmable Screen and Modular Structure Can Add 7 Visual Functions, for Beginners and Advanced Learners of AI from 8-12
- UNLOCK AI POTENTIAL WITH INTERACTIVE, HANDS-ON LEARNING EXPERIENCES.
- SEVEN VISUAL FUNCTIONS FOR ENGAGING STEM PROJECTS AND CREATIVITY.
- EASY CUSTOMIZATION: ONE-CLICK TRAINING FOR FACE AND COLOR RECOGNITION.


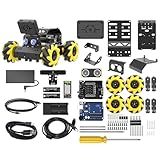
LewanSoul Robotic Kit for Arduino Robot Car AI Camera Vision Recognition Target Tracking Obstacle Avoidance, Programmable STEM Robot Gift for Ages 12 14 16+, Camera Robot Kit, miniAuto Standard Kit
-
ARDUINO COMPATIBLE: SEAMLESS INTEGRATION FOR EASY PROGRAMMING AND EXPANSION.
-
VISION TRACKING TECH: ADVANCED AI FEATURES FOR LINE FOLLOWING AND RECOGNITION.
-
360° MOBILITY: NAVIGATE COMPLEX SURFACES EFFORTLESSLY WITH MECANUM WHEELS.
AI ESP32-P4-WIFI6-DEV-KIT Development Board, Based On ESP32-P4 and ESP32-C6, Supports Wi-Fi 6 and Bluetooth 5 / BLE 5, Rich Human-Machine Interfaces, Supports AI Speech Interaction, with Speaker
-
HIGH-PERFORMANCE DUAL-CORE MCU FOR EFFICIENT EDGE COMPUTING.
-
SUPPORTS AI INTERACTION WITH PLATFORMS LIKE CHATGPT FOR ADVANCED APPS.
-
SECURE DATA HANDLING WITH ROBUST ENCRYPTION AND HARDWARE PROTECTION.

AI Engineering Starter Kit: The Practical Guide to Build, Train, and Deploy Real AI Applications with LLMs, MLOps, and Cutting-Edge Tools – Step-by-Step Projects for Aspiring AI Engineers.
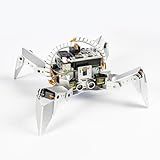
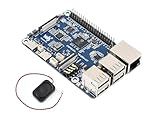
SunFounder PiCrawler AI Robot Kit for Raspberry Pi 5/4/3B+/3B/Zero 2W, ChatGPT-4o Enabled with Voice Command & Video Recognition, App Control, FPV, Camera, Python&Scratch (RPi NOT Included)
-
ENGAGE WITH AI: CHATGPT-4O FOR SMART INTERACTIONS & LEARNING SUPPORT.
-
REALISTIC MOVEMENTS: 12 SERVOS FOR LIFELIKE ACTIONS & PLAYFUL TRICKS.
-
LEARN & CREATE: VERSATILE PROGRAMMING SUPPORT IN PYTHON AND SCRATCH.
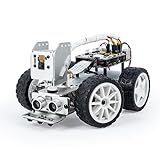
SunFounder Picar-X AI Video Robot Car Kit for Raspberry Pi 5/4/3B+/Zero 2w, LLMs ChatGPT-4o/Gemini/Grok, Voice&Video Recognition, Python, Scratch, Camera, Batterry (RPI NOT Included)
-
AI LEARNING MADE FUN: ENGAGE WITH VOICE, VISION, AND MULTI-LLMS.
-
CUSTOMIZABLE ROBOTICS: BUILD UNIQUE PROJECTS WITH ADAPTABLE DESIGNS.
-
ACCESSIBLE PROGRAMMING: LEARN VIA PYTHON OR SCRATCH FOR ALL SKILL LEVELS.
Ozobot Ari Entry Kit | Interactive Learning Robot with Touch Screen, ToF Sensor, Accelerometer, Gyroscope, and AI Integration | Hands-On STEM Education for Classrooms and Homeschool
- ENGAGE STUDENTS WITH A VIBRANT INTERACTIVE TOUCH SCREEN DISPLAY.
- EXPLORE PHYSICS CONCEPTS THROUGH DYNAMIC MOTION-BASED LEARNING.
- AI ADAPTS LEARNING PATHS FOR PERSONALIZED EDUCATIONAL EXPERIENCES.
To build a decoder using dynamic RNN in TensorFlow, you first need to define your RNN cell (such as LSTM or GRU) and create an instance of it. Next, you need to create an RNN layer using the tf.keras.layers.RNN function, passing the RNN cell instance as an argument.
Then, you will need to define the initial state of the RNN using the tf.zeros function, and pass it to the tf.keras.layers.RNN layer as the initial_state parameter.
After that, you can pass the output of the encoder (usually the last hidden state) to the decoder RNN layer. You can then use the tf.keras.layers.Dense layer to map the output of the RNN to the vocabulary size.
Finally, you can use the tf.nn.softmax function to get the probabilities of the next word in the sequence. You can sample from this distribution to get the next word, and pass it as input to the next timestep of the RNN until you reach the end of the sequence.
What is the role of the decoder in sequence-to-sequence models?
The decoder in sequence-to-sequence models is responsible for generating the target sequence based on the encoded input sequence. It takes the encoded information from the encoder and outputs one token at a time in a sequential manner until the end-of-sequence token is generated. The decoder uses the knowledge of the input sequence encoded by the encoder to make predictions about the target sequence, usually through an attention mechanism that allows it to focus on different parts of the input sequence when generating each output token. The decoder plays a crucial role in language translation, text summarization, and other sequence prediction tasks in natural language processing.
How to use the dynamic_rnn function in TensorFlow?
The dynamic_rnn function in TensorFlow is used to create dynamic recurrent neural networks. It takes in sequences of input data and outputs a sequence of output data based on the recurrent connections defined in the network.
Here is an example of how to use the dynamic_rnn function in TensorFlow:
- Define the input data and sequence lengths:
import tensorflow as tf
Define the input data
input_data = tf.placeholder(tf.float32, [None, seq_length, input_size])
Define the sequence lengths
seq_lengths = tf.placeholder(tf.int32, [None])
- Define the RNN cell:
# Create an RNN cell cell = tf.nn.rnn_cell.BasicRNNCell(hidden_size)
- Use the dynamic_rnn function to create the RNN:
# Create the dynamic RNN outputs, states = tf.nn.dynamic_rnn(cell, input_data, sequence_length=seq_lengths, dtype=tf.float32)
- Specify the loss function and optimizer for training:
# Define the loss function loss = ...
Define the optimizer
optimizer = tf.train.AdamOptimizer(learning_rate).minimize(loss)
- Train the RNN model:
# Start a TensorFlow session with tf.Session() as sess: sess.run(tf.global_variables_initializer())
# Train the RNN model
for i in range(num\_epochs):
    # Run the optimizer on the training data
    sess.run(optimizer, feed\_dict={input\_data: train\_data, seq\_lengths: train\_seq\_lengths})
This is a basic example of how to use the dynamic_rnn function in TensorFlow to create and train a dynamic recurrent neural network. You can customize the RNN cell, loss function, optimizer, and training process based on your specific use case and data.
What is the importance of initializing the decoder in TensorFlow?
Initializing the decoder in TensorFlow is important because it helps set the initial state of the decoder's weights and biases to suitable values before training the model. Proper initialization of the decoder can lead to faster and more stable training, better convergence, and higher model performance. It can help prevent issues such as vanishing or exploding gradients that may occur if the weights are initialized incorrectly. Initialization is a crucial step in the training process as it affects how the model learns and generalizes to new data.
What is dynamic RNN in TensorFlow?
Dynamic RNN in TensorFlow refers to the ability to construct recurrent neural networks (RNNs) with variable sequence lengths at runtime. This allows the RNN to process sequences of different lengths in a single batch, making it more flexible and efficient for handling tasks such as natural language processing or time series analysis.
In TensorFlow, dynamic RNN can be implemented using the tf.nn.dynamic_rnn function, which automatically handles sequences of different lengths by dynamically unrolling the RNN for each input sequence. This makes it easier to work with variable-length sequences and enables more efficient training and inference on RNN models.
How to optimize the hyperparameters of a decoder in TensorFlow?
Optimizing the hyperparameters of a decoder in TensorFlow involves tuning the various parameters to find the combination that results in the best performance for your specific task. Here are a few general steps you can follow to optimize the hyperparameters of a decoder in TensorFlow:
- Define the range of hyperparameters to tune: Identify the hyperparameters that can be optimized for the decoder, such as learning rate, batch size, number of layers, hidden units, dropout rate, etc.
- Use a grid search or random search technique: Grid search involves defining a grid of hyperparameters and evaluating the model performance for each combination. Random search, on the other hand, involves randomly sampling hyperparameter values from predefined ranges. Use either of these techniques to explore the hyperparameter space efficiently.
- Use cross-validation: Split your data into training and validation sets, and use cross-validation to evaluate the performance of different hyperparameter combinations. This will help you ensure that your model's performance is not influenced by randomness in the data split.
- Use a validation metric: Define a validation metric (e.g., accuracy, loss, etc.) to evaluate the performance of your model for each hyperparameter combination. Use this metric to compare the performance of different combinations and identify the best hyperparameters.
- Implement early stopping: To prevent overfitting, use early stopping to monitor the validation metric during training and stop training when the metric stops improving. This will help you avoid training the model for too long and potentially overfitting the data.
- Fine-tune the best hyperparameters: Once you have identified the best hyperparameters using the above steps, fine-tune them further by training the model with a smaller set of hyperparameters around the best values. This will help you achieve even better performance.
By following these steps and experimenting with different hyperparameter combinations, you can optimize the hyperparameters of a decoder in TensorFlow and improve the performance of your model.
How to create a custom decoder in Tensorflow?
To create a custom decoder in TensorFlow, you can follow these steps:
- Define your custom decoder function:
class CustomDecoder(tf.keras.layers.Layer): def __init__(self, num_classes): super(CustomDecoder, self).__init__() self.dense = tf.keras.layers.Dense(num_classes, activation='softmax')
def call(self, inputs):
    return self.dense(inputs)
- Create an instance of your custom decoder:
num_classes = 10 decoder = CustomDecoder(num_classes)
- Compile your model with the custom decoder:
model = tf.keras.models.Sequential([ tf.keras.layers.Dense(128, activation='relu', input_shape=(784,)), decoder ])
model.compile(optimizer='adam', loss='categorical_crossentropy', metrics=['accuracy'])
- Train your model:
model.fit(X_train, y_train, epochs=10, batch_size=32)
By following these steps, you can easily create and use a custom decoder in TensorFlow for your neural network models. Customize the decoder according to your specific use case and data requirements.