
Best Linux User Management Tools to Buy in July 2026

Linux Service Management Made Easy with systemd: Advanced techniques to effectively manage, control, and monitor Linux systems and services
- MASTER SYSTEMD FOR EFFICIENT LINUX SERVICE MANAGEMENT.
- GAIN ADVANCED TECHNIQUES TO OPTIMIZE SYSTEM PERFORMANCE.
- LEARN TO CONTROL AND MONITOR SERVICES WITH EASE.


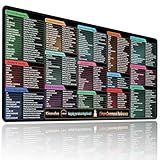
Kinevolve Linux Commands Mouse Pad,180+ Commands Desk Mat,Shortcuts to Kali/Ubuntu/OpenSUSE/Red Hat/Arch/Debian/Unix Programmer. XXL Cheat Sheet Mousepad 35.4" x 15.7"
- ESSENTIAL LINUX COMMANDS AT YOUR FINGERTIPS FOR SEAMLESS NAVIGATION.
- SPACIOUS XXL DESIGN ENSURES SMOOTH MOVEMENT FOR YOUR DEVICES.
- DURABLE, NON-SLIP, AND WATER-RESISTANT-BUILT TO LAST THROUGH DAILY USE.

Learning eBPF: Programming the Linux Kernel for Enhanced Observability, Networking, and Security

Linux Basics for Hackers: Getting Started with Networking, Scripting, and Security in Kali

Understanding the Linux Kernel, Third Edition
Linux Server Security: Tools & Best Practices for Bastion Hosts
- QUALITY ASSURANCE: THOROUGHLY VETTED FOR GOOD CONDITION AND READABILITY.
- ECO-FRIENDLY CHOICE: SAVE RESOURCES BY RECYCLING PRE-LOVED BOOKS.
- BUDGET-FRIENDLY: ENJOY SIGNIFICANT SAVINGS ON QUALITY LITERATURE!

Linux in Action

Kali Linux Hacking-Tools Für Dummies (Für Dummies) (German Edition)

The Official Linux Mint 22 Handbook: Your Essential Companion (2025 Edition) (Mastering Linux Mint 22: The Complete Guide Series)

Linux for Embedded and Real-time Applications
To create a user in Ubuntu Linux, you can follow these steps:
- Open the terminal by pressing Ctrl+Alt+T or searching for "Terminal" in the applications menu.
- Type the command sudo adduser username in the terminal. Replace "username" with the desired name for the new user.
- Press Enter and you will be prompted to enter a new password for the user. Type a strong password and press Enter. Please note that while typing the password, no characters will be visible on the screen for security reasons.
- Retype the password to confirm it and press Enter.
- You will then be asked to enter some additional user information such as full name, phone number, etc. You can provide this information if desired or simply press Enter to leave them blank.
- Finally, when prompted, type 'Y' or 'N' to indicate whether the information provided is correct.
- The user account will be created, and you can now log in as that user using the provided username and password.
Please note that the 'sudo' command is used in the above steps to ensure that administrative privileges are granted for creating the user.
How do you specify the maximum number of days before a password must be changed?
The maximum number of days before a password must be changed is usually set through the configuration of password policies in an operating system or an authentication system. The specific steps for specifying this setting can vary depending on the system being used. However, I'll provide instructions for two common platforms:
- Windows: Open the Local Security Policy editor by searching for "Local Security Policy" in the Start Menu. From the left-hand pane, navigate to Security Settings > Account Policies > Password Policy. On the right-hand side, look for the "Maximum password age" policy. Double-click on it. Enable the policy and specify the desired number of days before a password must be changed. Click "OK" to save the changes.
- Linux (specifically Ubuntu): Open a terminal window. Edit the password aging settings by executing the command: sudo nano /etc/login.defs Locate the line that starts with "PASS_MAX_DAYS" and modify the value after it to the desired number of days. Save the file and exit the editor. Changes should take effect immediately or after the next password change.
It's worth noting that these instructions can vary based on specific versions of operating systems or authentication systems. Always consult the documentation or help resources provided with your particular system to ensure the accurate configuration of password policies.
What are the default parameters for creating a user?
The default parameters for creating a user can vary depending on the system or software being used. However, some common default parameters for creating a user may include:
- Username: A unique name or identifier for the user.
- Password: A secure combination of characters for user authentication.
- User ID (UID): A system-generated numeric identifier for the user.
- Group ID (GID): A system-generated numeric identifier for the primary group of the user.
- Home directory: The default directory where the user's personal files are stored.
- Shell: The default command-line interpreter or shell for the user.
- Expiration date: An optional parameter specifying the date when the user's account will expire.
- User privileges: Default user privileges or permissions assigned to the user.
- User profile: Additional settings or preferences specific to the user.
- Email address: The user's email address, if applicable.
Note that default parameters can be customized or modified based on the specific requirements of the system or organization.
How do you add a user to multiple secondary groups upon creation?
To add a user to multiple secondary groups upon creation, you can use the command-line tools available in most operating systems like Linux.
Here is an example of how you can achieve this using the useradd command:
- Open a terminal or command prompt.
- Type the following command:
sudo useradd -G group1,group2,group3 username
Replace "group1, group2, group3" with the names of the secondary groups you want to add the user to, and "username" with the desired username.
- Press Enter to execute the command. You might be prompted to enter your password, as you are using the sudo command to run the useradd command with administrative privileges.
Once this command is executed, the user will be created and added to the specified secondary groups. You can verify this by checking the /etc/group file or using the groups command followed by the username:
groups username
Make sure to replace "username" with the actual username you used while creating the user.
Note: The specific procedure might vary slightly depending on your operating system or distribution. Additionally, some operating systems have specific tools or utilities to add users (e.g., usermod) that provide similar functionality for adding users to multiple secondary groups.
How can you add a description to a newly created user?
To add a description to a newly created user, you can follow these steps:
- Identify the method or platform you used to create the user. This could include a website, application, or system.
- Log in to the admin or management interface of the method or platform used to create the user.
- Find the section or area that manages user details. This could be labeled as "User Management," "User Settings," "User Profile," or similar.
- Locate the newly created user in the user list or search for their username or email address.
- Click on the username or user details to access the specific user's profile.
- Look for an option to edit or update the user's information.
- Within the user profile, you should find an input field or text box labeled "Description," "Bio," "About Me," or similar.
- Enter the desired description or information about the user in this field.
- Save or submit the changes to apply the description to the user's profile.
The exact steps may vary depending on the method or platform used, so you may need to consult the documentation or support resources specific to the system you are working with.
How can you force a new user to change their password upon first login?
To force a new user to change their password upon first login, you can follow these steps:
- Set up an initial password: Generate a temporary, random password for the user. This initial password should be strong and complex.
- Mark the account as "password reset required": Flag the user's account with a specific attribute or flag such as "PasswordResetRequired" to indicate that the user must change their password on their first login.
- Notify the user: Inform the user that they need to change their password upon initial login. This notification can be sent via email, SMS, or another communication method.
- Provide clear instructions: In the notification, include explicit instructions on how the user can reset their password. Explain the password requirements, any system constraints, and any specific steps they need to follow.
- Redirect the user to a password reset page: When the user attempts to log in for the first time with the initial password, redirect them to a page specifically designed for password reset.
- Verify the password reset: Validate the new password the user chooses to ensure it meets the required criteria and is adequately secure. This step will help maintain the security of the system.
- Update the user's account: Once the user successfully resets their password, remove the "PasswordResetRequired" flag or attribute from their account to allow normal login without the need for a password change.
By enforcing a password change upon the first login, you can enhance the security of user accounts and ensure that users generate their unique and strong passwords.