Best IP Restriction Tools to Buy in July 2026

WFLNHB Purge High Boost Purge Valve Kits Set AD-IP 801266/065612 Replacement for K022105
- DIRECT FIT FOR KENWORTH/PETERBILT ENSURES EASY INSTALLATION.
- DURABLE MATERIALS GUARANTEE LONG-LASTING PERFORMANCE.
- VERIFY PART NUMBER FOR SEAMLESS COMPATIBILITY AND SATISFACTION.


Englander Replacement Control Board Heat Sensor for 10-CDV 10-CPM 25-EP 25-EPI 25-IP 25-PAF 25-PDV 25-PDVC 25-PFS 25-PI 25-PUF PU-CBHS
- RESTORE STOVE FUNCTIONALITY WITH EASY SENSOR REPLACEMENT!
- COMPATIBLE WITH MULTIPLE MODELS: FITS 1998+ PU-CB BOARDS!
- ENSURE OPTIMAL PERFORMANCE: REPLACE BAD HEAT SENSORS PROMPTLY!

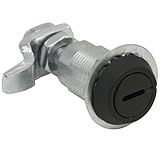
Southco E3-15-25 Series Vise Action Powder Coated Zinc Alloy Tool Operated Compression Latch with Tubular Key Head, Non-Locking, 1"-1.62"/2.07"-2.69" Grip Range, Black
- QUICK, SECURE CLOSURE IDEAL FOR HIGH-VIBRATION ENVIRONMENTS.
- SMOOTH VISE ACTION ENSURES TIGHT ALIGNMENT WITH HALF-TURN MOTION.
- CONSISTENT PULL-UP SEALS OUT NOISE AND MOISTURE EFFECTIVELY.
Awoco Heavy Duty Commercial Door Micro Switch with Parallel Roller Plunger for Sliding Doors/Windows for Air Curtains, 250V 20A IP 65 Limit Switch Type NO and Type NC (TZ-6002-20A)
- WATER-PROOF DESIGN ENSURES DURABILITY FOR SLIDING DOORS/WINDOWS.
- EASY INSTALLATION WITH BUILT-IN CABLE FIXATOR AND VARIOUS ACTUATORS.
- VERSATILE WITH BOTH NORMALLY OPEN AND NORMALLY CLOSED OPTIONS AVAILABLE.
MENGQI-CONTROL 4 Doors Complete TCP/IP PIN Code RFID Card/Fob Access Control Systems with North American Standard Electric Strike for Latch Doors Keypad Reader 110V Power Supply APP Remote Open Door
-
ANSI STRIKE LOCK FOR SECURE ACCESS IN NORTH AMERICAN SETTINGS.
-
SUPPORTS 20,000 USERS WITH QUICK CARD ACCESS & REMOTE MANAGEMENT.
-
FAIL SECURE MODE ENSURES SAFETY DURING POWER OUTAGES; ADJUSTABLE SETTINGS.
Southco E3-19-25 Series Vise Action Powder Coated Zinc Alloy Tool Operated Compression Latch with Slotted Recess Head,Black
- QUICK, SECURE CLOSURE IDEAL FOR VIBRATION-SENSITIVE APPLICATIONS.
- SMOOTH VISE ACTION DESIGN ENSURES TIGHT, EASY OPERATION.
- RELIABLE SEALING MEETS NEMA 4 AND IP-65 STANDARDS.
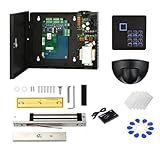
MENGQI-CONTROL TCP/IP Single Door Security Access Control System with 600lbs Electric Magnetic Lock Exit Motion Sensor 110V-240V Power Supply Box FRID Keypad Reader
- CONTROL ACCESS WITH CARD/PIN; LOG 20,000 USERS & 100,000 ENTRIES.
- SMART APP FOR REMOTE UNLOCKING; AUTO OPEN/CLOSE AT SET TIMES.
- EASY DIY SETUP WITH DETAILED GUIDES; SUPPORTS ALL WINDOWS SYSTEMS.
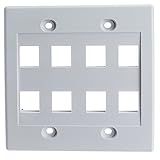
Keystone Wall Plate 8 Port, White (Cat5e, Cat6, Coax (Video), Aux (Cat6 for Data, IP Phone, POTS or Other), Dual Gang, CableWholesale
- CLEAN, PROFESSIONAL INSTALLATIONS WITH SHOCK-RESISTANT ABS BODY.
- EFFORTLESS SETUP FOR NETWORKING AND PHONE LINES-MINIMUM TOOLS NEEDED.
- VERSATILE USE FOR NETWORKING, HOME THEATER, AND OFFICE SETUPS.
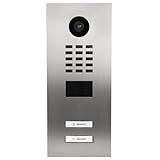
DoorBird IP Video Door Station Flush-mounted, Brushed Stainless Steel Call buttons Multi Tenants - Access Control- POE Capable (Stainless Steel/2 Call Buttons)
-
CONTROL 2 ELECTRIC DOORS/GATES-IDEAL FOR MULTI-TENANT LIVING!
-
WEATHERPROOF IP66 RATED; STYLISH STAINLESS STEEL FINISH INCLUDED.
-
SMART HOME COMPATIBLE WITH MAJOR PLATFORMS & CONNECT TO SMART LOCKS!
To restrict specific IP addresses in XAMPP, you can edit the configuration files to allow or deny access based on IP address. You will need to open the httpd.conf file located in the Apache folder of your XAMPP installation.
Within the httpd.conf file, you can use the "Allow" and "Deny" directives to specify which IP addresses are allowed or denied access to your server. You can also use the "Require" directive in combination with the "Require ip" parameter to specify specific IP addresses that are allowed access.
After making your changes to the httpd.conf file, be sure to save the changes and restart the Apache server for the changes to take effect. This will restrict access to your XAMPP server based on the specified IP addresses.
How to create a deny rule for specific IPs in XAMPP?
To create a deny rule for specific IPs in XAMPP, you can follow these steps:
- Open the Apache configuration file httpd.conf located in the conf folder of your XAMPP installation directory.
- Find the section where you want to add the deny rule, such as within a or block.
- Add the following lines to deny access to specific IPs:
Order deny,allow Deny from 192.168.1.1 Deny from 10.0.0.0/8
Replace the IP addresses with the specific IPs you want to deny access to.
- Save the changes to the httpd.conf file and restart the Apache server in the XAMPP Control Panel.
After following these steps, the specific IP addresses you specified in the deny rule will be blocked from accessing your XAMPP server.
How to configure XAMPP to display a custom message for blocked IP addresses?
To configure XAMPP to display a custom message for blocked IP addresses, you can follow these steps:
- Open the XAMPP control panel and stop the Apache server.
- Navigate to the Apache configuration directory. This is typically located at "C:\xampp\apache\conf" on Windows or "/etc/httpd/conf/" on Unix-like systems.
- Find the "httpd.conf" file in the configuration directory and open it with a text editor.
- Search for the following lines in the "httpd.conf" file:
# Deny access to the entirety of your server's filesystem. You must
explicitly permit access to web content directories in other
blocks below.
- Add the following lines below the above lines to define the custom error message for blocked IP addresses:
<Directory "/"> AllowOverride none Require all granted ErrorDocument 403 /custom_message.html
- Save the changes to the "httpd.conf" file and close the text editor.
- Create a new HTML file called "custom_message.html" in the XAMPP htdocs directory (e.g., "C:\xampp\htdocs" on Windows or "/opt/lampp/htdocs/" on Unix-like systems).
- Add your custom message to the "custom_message.html" file. For example:
Access to this site is blocked
Your IP address has been blocked from accessing this site. Please contact the administrator for more information.
- Start the Apache server from the XAMPP control panel.
- Test the configuration by accessing the XAMPP server from a blocked IP address. You should see the custom message displayed instead of the default 403 Forbidden error page.
By following these steps, you can configure XAMPP to display a custom message for blocked IP addresses in the event of access denial.
What are some common methods for restricting specific IP addresses in XAMPP?
- Access Controls in httpd.conf: You can specify a list of allowed or denied IP addresses in the httpd.conf file. This can be done using the "Allow" and "Deny" directives.
- .htaccess file: You can create a .htaccess file in the directory you want to restrict access to and specify the IP addresses you want to allow or deny access to.
- XAMPP Security Configuration Tool: XAMPP comes with a security configuration tool that allows you to configure access controls, including restricting specific IP addresses.
- Firewall: You can use a firewall such as Windows Firewall or a third-party firewall software to block specific IP addresses from accessing your XAMPP server.
- Mod_Security: You can also use Mod_Security to configure rules for restricting access to specific IP addresses in XAMPP. This is a web application firewall that can be configured to block or allow access based on various criteria, including IP address.
What are the steps to restrict specific IP addresses to XAMPP?
- Start by accessing the XAMPP configuration file, httpd-xampp.conf, located in the "apache\conf\extra" directory of your XAMPP installation.
- Open the httpd-xampp.conf file using a text editor, such as Notepad or Sublime Text.
- Locate the section of the file that begins with ":(?:xampp|security|licenses|phpmyadmin|webalizer|server-status|server-info))">". This section contains the directives that control access to various parts of the XAMPP server.
- To restrict access to specific IP addresses, you can add a new "Require" directive within the section. For example, to restrict access to IP address 192.168.1.100, you can add the following line:
Require ip 192.168.1.100
- Save the changes to the httpd-xampp.conf file and restart the Apache server in XAMPP.
- Test the restriction by trying to access the XAMPP server from the specified IP address. You should receive a 403 Forbidden error if the restriction is working correctly.
By following these steps, you can restrict specific IP addresses from accessing your XAMPP server.