
Best Communication Tools on Bitbucket to Buy in July 2026
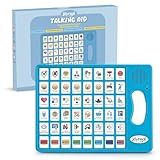
Joyreal AAC Device for Autism, Non Verbal Communication Tools for Speech Therapy & Stroke Rehab. Speech Communication Tablet, Autism Talking Aids with 8 Programmable Buttons & Adjustable Volume
-
37 USER-FRIENDLY BUTTONS FOR EASY DAILY COMMUNICATION.
-
SWITCH VOICES & RECORD CUSTOM MESSAGES FOR PERSONAL TOUCH.
-
ADJUSTABLE VOLUME FOR EFFECTIVE COMMUNICATION IN ANY SETTING.


Joyreal AAC Device for Autism, Non Verbal Communication Tools for Speech Therapy & Stroke Rehab. Autism Talking Aids with 6 Programmable Buttons & Adjustable Volume, Autism Toys for Kids and Adults
-
24 TALKING BUTTONS ENABLE QUICK, CLEAR COMMUNICATION FOR DAILY NEEDS.
-
PERSONALIZE WITH 6 PROGRAMMABLE BUTTONS FOR TAILORED VOICE INSTRUCTIONS.
-
ADJUSTABLE VOLUME ENSURES EFFECTIVE USE IN BUSY OR QUIET ENVIRONMENTS.
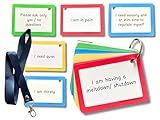
Communication Cards for ADHD and Autism, Special Needs Communication Aid for Non Verbal Adults and Children, Speech Delay Flash Cards
- ENHANCE COMMUNICATION FOR ADHD AND AUTISM WITH DOUBLE-SIDED CARDS.
- COLOR-CODED FOR CLEAR UNDERSTANDING OF NEEDS AND EMOTIONS.
- DURABLE, PORTABLE DESIGN WITH LANYARD FOR ON-THE-GO USE.

Plastic Communication Cards, 60 Basic Communication, Special Needs, Autism, Toddler, Hospital Cards, Non Verbal Speech Therapy, Senior
- 30 DOUBLE-SIDED CARDS FOR CLEAR, NON-VERBAL COMMUNICATION.
- COMPACT 75X75MM SIZE, PERFECT FOR ON-THE-GO INTERACTIONS.
- IDEAL FOR SPECIAL NEEDS, AUTISM, AND LANGUAGE DEVELOPMENT SUPPORT.
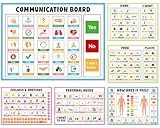
6Pcs Communication Board for Non Verbal Adults Picture Symbol Communication Cards Speech Therapy Tools for Autism Toddlers Kids Aphasia Stroke Patients Hospital Care Home Use Talking Placemats
- 6 DIVERSE THEMES HELP NON-VERBAL INDIVIDUALS EXPRESS NEEDS EASILY.
- DURABLE, WIPEABLE CARDS ENSURE LONG-LASTING USE AND EASY CLEANUP.
- VERSATILE FOR THERAPY, HOME, OR CARE FACILITIES-SUPPORTS ALL USERS.
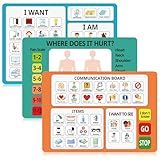
Fuyoooo 3 Pcs Communication Boards for Non Verbal Adults 11.81 x 8.27 Inches Colorful Picture Symbol Communication Cards Speech Therapy Tools for Autism Aphasia Stroke Patients Hospital Care Home Use
-
VERSATILE TRIO: THREE BOARDS FOR CONVENIENCE AND ACCESSIBILITY.
-
TAILORED DESIGNS: DIVERSE SYMBOLS ENHANCE COMMUNICATION EFFECTIVENESS.
-
PORTABLE SIZE: COMPACT BOARDS ENSURE COMMUNICATION ON-THE-GO.

AAC Device for Autism, Joyreal Non Verbal Communication Tools for Speech Therapy & Stroke Rehab. Autism Talking Aids with 6 Programmable Buttons & Adjustable Volume, Autism Toys for Kids and Adults
- 23 PRE-INSTALLED BUTTONS FOR ESSENTIAL COMMUNICATION NEEDS
- CUSTOMIZABLE MALE/FEMALE VOICES & 6 PERSONALIZED RECORDING OPTIONS
- ADJUSTABLE VOLUME & LIGHTWEIGHT DESIGN FOR ON-THE-GO USE
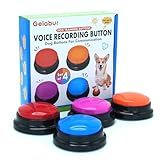
Gelabur Set of 4 Dog Buttons for Communication, Voice Recordable Buttons for Classroom, Dog Training Talking Buttons Starter Set, Pet Easy Speaking Buttons Tools
- TEACH DOGS TO COMMUNICATE NEEDS WITH CUSTOMIZABLE BUTTONS.
- ENGAGE STUDENTS WITH INTERACTIVE VOICE RECORDING BUTTONS.
- DURABLE, PET-SAFE DESIGN PERFECT FOR DOGS AND CLASSROOM USE.
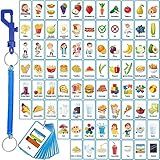
Equsion 81 Pcs Autism Communication Cards Nonverbal Communication Board Autism Flashcards with Retractable Plastic Spring Cord Keychain Special Needs Speech Delay Materials (Blue)
-
COMPREHENSIVE SET: 81 CARDS COVER ALL COMMUNICATION NEEDS EFFORTLESSLY.
-
ENGAGING DESIGN: VIVID PATTERNS AND WORDS CAPTURE ATTENTION EFFECTIVELY.
-
DURABLE & WATERPROOF: QUALITY MATERIALS ENSURE LONGEVITY AND RESISTANCE.
To reply to a user on Bitbucket, you can navigate to the comment section of the specific file or pull request where the user has left a comment. Type your reply in the text box provided below the user's comment and then click the "Reply" button to submit your response. You can also use the "@" symbol followed by the user's username to directly mention them in your reply. This will notify the user that you have responded to their comment.
How can I ensure my responses to users on Bitbucket are helpful and concise?
- Understand the issue or question: Before responding to a user on Bitbucket, make sure you fully understand their issue or question. Read through their message carefully and ask for clarification if necessary.
- Provide clear and direct answers: When responding to a user, make sure your answers are clear and to the point. Avoid using technical jargon or lengthy explanations unless necessary.
- Offer solutions or suggestions: If possible, provide the user with a solution to their issue or a suggestion on how to solve it. Give them step-by-step instructions if needed.
- Be respectful and polite: Treat all users on Bitbucket with respect and courtesy, even if they are having difficulty understanding an issue. Remember to thank them for reaching out and seeking help.
- Follow up if needed: After providing an initial response, follow up with the user to ensure that their issue has been resolved or to offer further assistance if required.
- Use formatting and bullet points: To make your responses easily readable, use formatting tools such as bullet points, numbered lists, and headings. This can help users quickly digest the information you are providing.
- Provide links to relevant resources: If there are any documentation or resources that can help the user further understand the issue, provide links to them in your response.
- Encourage feedback: Encourage users to provide feedback on your response and ask if they need any further assistance. This can help improve the quality of your responses in the future.
What steps should I take to follow up on user inquiries and feedback on Bitbucket?
- Start by acknowledging the user's inquiry or feedback promptly. Let them know that you have received it and that you appreciate their input.
- Evaluate the inquiry or feedback and determine the appropriate action to take. This may involve investigating the issue further, providing more information, or making necessary updates or changes.
- Provide a detailed response to the user, addressing their concerns or questions. Be clear, concise, and helpful in your communication.
- If necessary, follow up with further information or updates on the progress of resolving the issue or implementing the feedback.
- Encourage further communication and feedback from the user, to ensure that their needs are being met and that any issues are addressed satisfactorily.
- Keep track of all user inquiries and feedback, and use this information to continually improve and enhance the user experience on Bitbucket.
- Follow up with the user after any changes or updates have been made, to ensure that they are satisfied with the resolution and to gather further feedback.
How do I handle negative feedback from users on Bitbucket?
Handling negative feedback from users on Bitbucket can be a challenging but important task to maintain a positive relationship with your users. Here are some steps you can take to effectively handle negative feedback:
- Stay calm and professional: It's natural to feel defensive or upset when receiving negative feedback, but it's important to remain professional and polite in your responses.
- Acknowledge the feedback: Let the user know that you have received their feedback and appreciate their input. Show empathy and understanding towards their concerns.
- Investigate the issue: Take the time to carefully review the feedback and try to understand the root cause of the issue. This may involve looking into the reported problem, analyzing the code or system configuration, or gathering more information from the user.
- Respond promptly: Address the negative feedback in a timely manner to show that you are committed to resolving the issue. Provide updates on your progress and communicate any necessary steps to address the problem.
- Offer solutions: Propose practical solutions to the problem and explain how you plan to address it. Be transparent about the steps you are taking to improve the user experience.
- Follow up: After implementing the solutions, follow up with the user to ensure that the issue has been resolved satisfactorily. Ask for feedback on the changes and make any further adjustments if needed.
- Learn from the feedback: Use negative feedback as an opportunity to learn and grow. Identify recurring themes or issues in the feedback and consider how you can prevent similar problems in the future.
By following these steps, you can effectively handle negative feedback from users on Bitbucket and demonstrate your commitment to customer satisfaction.