
Best Programming Tools to Buy in July 2026
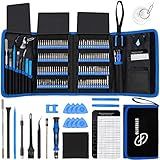
STREBITO Electronics Precision Screwdriver Sets 142-Piece with 120 Bits Magnetic Repair Tool Kit for iPhone, MacBook, Computer, Laptop, PC, Tablet, PS4, Xbox, Nintendo, Game Console
- COMPLETE SET: 120 BITS & 22 ACCESSORIES FOR ANY DIY REPAIR PROJECT.
- ERGONOMIC DESIGN: COMFORTABLE GRIP WITH MAGNETIC HOLDER FOR PRECISION USE.
- PORTABLE STORAGE: ORGANIZED IN A TEAR-PROOF BAG FOR EASY TRANSPORT AND ACCESS.


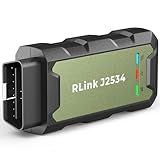
TOPDON RLink J2534 Pass-Thru Programmer, OEM Reprogramming and Diagnostic Tool, Enhanced J2534 VCI, Supports J2534/D-PDU/CAN-FD/DoIP, Compatible with 17+ Vehicle Brands, No OE Software Provided
- ALL-IN-ONE DIAGNOSTICS: TACKLE COMPLEX REPAIRS WITH FULL-SYSTEM DIAGNOSTICS.
- WIDE VEHICLE COMPATIBILITY: SUPPORTS 17+ BRANDS FOR VERSATILE REPAIR SOLUTIONS.
- LIFETIME FREE UPDATES: STAY CURRENT WITH SEAMLESS SOFTWARE UPDATES FOREVER.

Autel Scanner MaxiIM KM100 (E) Programming Tool, 2025 Same as KM100 KM100X Programmer, Lite Ver. of IM508 IM608 2 Pro, Lifetime Updates, Built-in APB112, OBD Learning on 99% Cars, Auto VIN & Auto Scan
- ⚡ LIGHTNING-FAST DIAGNOSTICS: GET RESULTS IN JUST 60 SECONDS!
- 💰 SAVE $259 WITH BUILT-IN APB112 FEATURES INCLUDED!
- 🛠️ 700+ BRANDS COVERED; UPGRADE YOUR TOOLKIT FOR LIFELONG USE!
Tcl/Tk Pocket Reference: Programming Tools

VXDAS 2IN1 TPMS Relearn Tool Super GL50448 for GM and Ford with Model Switch Button,Tire Pressure Sensor Monitor Rest Activation for Buick/Cadillac/Chevrolet/GMC/Lincoln/Mazda 2024 Edition(Green)
-
CONVENIENT 2-IN-1 DESIGN FOR GM AND FORD VEHICLES.
-
COMPATIBLE WITH 315/433MHZ TPMS; IDEAL FOR MOST CARS.
-
COST-EFFECTIVE SOLUTION; SAVE $50-$100 ON TIRE LIGHT RESETS!

TPMS19 TPMS Reset Tool Sensor Relearn Reset Tool for Ford Lincoln and Mazda Tire Pressure Monitor System Sensor Programming Training Activation Tool TPMS Trigger Tool Tire Sensors Reset Tool
- CUSTOMIZED FOR FORD & MAZDA - PERFECT FIT FOR YOUR VEHICLE'S NEEDS.
- EASY ONE-BUTTON ACTIVATION - FAST, HASSLE-FREE TIRE PRESSURE SETUP.
- COMPACT DESIGN - CONVENIENT AND PORTABLE FOR ON-THE-GO USE.

Autel Scanner MaxiCOM MK808S: 2025 Bidirectional Tool as MK808BT Pro MX808S M808Z, Work as MaxiCheck MX900 MK900BT, 28+ Service, Active Test, All System Diagnose, Injector Coding, FCA Autoauth OS 11
-
BI-DIRECTIONAL CONTROL FOR ACTIVE TESTING ACROSS ALL SYSTEMS!
-
28+ RESET SERVICES FOR 150+ CAR MAKES-VERSATILE & RELIABLE!
-
AUTOVIN & AUTOSCAN: 10X FASTER DIAGNOSTICS, SAVE TIME & MONEY!

Chevy TPMS Relearn Tool with Battery GM TPMS Relearn Tool Chevy TPMS Reset Tool TPMS Programming Tool for GM Chevrolet Cadillac Buick GMC Tire Pressure Sensor Reset Tool EL 50448
- INSTANT USE WITH INCLUDED 9V BATTERY-NO DELAYS OR EXTRA COSTS!
- SUPPORTS 100+ GM VEHICLES FOR VERSATILE, RELIABLE FUNCTIONALITY.
- ONE-BUTTON DESIGN ENSURES EASY, DIY TPMS ACTIVATION FOR EVERYONE!

FOXWELL T2000 Pro TPMS Programming Tool, 2025 TPMS Relearn Tool, Activate/Relearn TPMS Sensors (315/433MHz), TPMS Reset & Diagnostics, Tire Sensor Programmer Only Program T10 Sensors
-
USE CODE 'T2000PRO' FOR 20% OFF YOUR PURCHASE TODAY!
-
ACTIVATE AND RELEARN ALL OEM TPMS SENSORS WITH EASE!
-
ENJOY FREE LIFETIME WIFI UPDATES FOR ENHANCED VEHICLE COVERAGE!
To construct a class defined in another file with g++, you first need to include the header file containing the class definition in your source file using the #include directive. This will allow the compiler to recognize the class and its member functions.
Next, you need to compile both the source file and the file containing the class definition using g++. You can do this by running the g++ command in the terminal and providing the names of the source files as arguments.
If the class is defined in a separate source file, you will also need to create an object file for it using the g++ command. This can be done by compiling the source file containing the class definition without linking it, using the -c flag.
Once you have compiled both the source files and the object files, you can link them together using g++ to create an executable file. This can be done by providing the names of the object files as arguments to the g++ command.
Finally, you can run the executable file in the terminal to execute the program that uses the class defined in the separate file.
How to implement virtual functions in C++?
To implement virtual functions in C++, follow these steps:
- Declare a base class with at least one virtual function. For example:
class Base { public: virtual void virtualFunction() { std::cout << "Base class virtual function" << std::endl; } };
- Create a derived class that inherits from the base class and overrides the virtual function. For example:
class Derived : public Base { public: void virtualFunction() override { std::cout << "Derived class virtual function" << std::endl; } };
- Create an object of the derived class and call the virtual function. The function that is called will be determined at runtime based on the actual type of the object. For example:
int main() { Base* base = new Derived(); base->virtualFunction(); // Output: "Derived class virtual function"
delete base;
return 0;
}
What is the purpose of classes in C++?
The purpose of classes in C++ is to provide a way to model real-world entities or abstract concepts by encapsulating data (attributes or properties) and functions (methods or operations) into a single unit. Classes allow for data abstraction, data hiding, and modularity, making it easier to manage and manipulate complex systems or structures. They also facilitate code reusability and promote the principles of object-oriented programming, such as inheritance, polymorphism, and encapsulation.
How to organize code into header and source files in C++?
Organizing code into header and source files in C++ can help make your code more modular, organized, and easier to manage. Here are some steps to follow when organizing your code into header and source files:
- Identify the different parts of your program: Before splitting your code into header and source files, take some time to identify the different components of your program and determine which parts can be separated into their own files.
- Create header files: Header files typically contain declarations of classes, functions, variables, and constants. Create a separate header file for each class or module in your program. Make sure to include include guards at the top of each header file to prevent duplicate inclusion.
- Create source files: Source files typically contain the implementation of the classes and functions declared in the header files. Create a corresponding source file for each header file, and include the corresponding header file at the top of the source file.
- Separate interface and implementation: When organizing your code into header and source files, it's important to separate the interface (declaration) from the implementation (definition). This means that the header file should contain only declarations, while the source file should contain the actual implementation of the declared entities.
- Include header files in source files: In your source files, include the necessary header files at the top of the file using the #include directive. This allows the compiler to access the declarations of classes, functions, and variables defined in the header files.
- Use namespaces: To avoid naming conflicts and improve code readability, consider using namespaces in your header and source files to group related classes, functions, and variables together.
- Organize header and source files in a logical directory structure: Consider organizing your header and source files into directories based on their functionality or purpose. This can make it easier to navigate and manage your codebase.
By following these steps, you can effectively organize your code into header and source files in C++, making it easier to understand, maintain, and expand your codebase.
How to use polymorphism in C++ classes?
In C++, polymorphism can be achieved using virtual functions and pointers or references to base class objects.
Here's an example to demonstrate how to use polymorphism in C++ classes:
#include
class Shape { public: virtual void draw() { std::cout << "Drawing a shape" << std::endl; } };
class Circle : public Shape { public: void draw() override { std::cout << "Drawing a circle" << std::endl; } };
class Square : public Shape { public: void draw() override { std::cout << "Drawing a square" << std::endl; } };
int main() { Shape* shape1 = new Circle(); Shape* shape2 = new Square();
shape1->draw(); // Output: Drawing a circle
shape2->draw(); // Output: Drawing a square

delete shape1;
delete shape2;

return 0;
}
In this example, we have a base class Shape with a virtual function draw(). We have two derived classes Circle and Square that override the draw() function.
In the main() function, we create pointers to objects of type Shape that point to instances of Circle and Square. When we call the draw() function on these pointers, the appropriate version of the function is called based on the actual type of the object pointed to.
This is an example of runtime polymorphism in C++, where the exact function to be called is determined at runtime based on the type of the object.
How to create a separate file for a class in C++?
To create a separate file for a class in C++, you can follow these steps:
- Create a header file (.h or .hpp) for your class: This file will contain the class declaration, including the class name, member variables, and member functions. For example, you can create a header file called "MyClass.h" and define your class in it.
- Define the class methods in a separate source file (.cpp): Create a source file (e.g., "MyClass.cpp") where you define the implementation of your class methods. Include the header file at the beginning of the source file to provide access to the class declaration.
- Include the header file in your main program: In the main program or any other file where you want to use the class, include the header file using the #include directive. This will allow you to create objects of the class and call its methods.
By following these steps, you can create a separate file for a class in C++ and organize your code more effectively. This approach also makes it easier to maintain and update your class implementation separately from other parts of your program.
What is a class in C++ programming?
A class in C++ programming is a user-defined data type that contains data members (variables) and member functions (methods) that operate on those data members. It serves as a blueprint for creating objects, which are instances of the class. Classes are used to encapsulate data and behavior into a single unit, allowing for better organization, modularity, and reusability in code.