
Best Chart.js Resources to Buy in July 2026

The Official Guide to Mermaid.js: Create complex diagrams and beautiful flowcharts easily using text and code


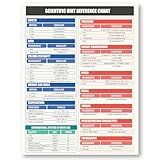
Scientific & Metric Units Conversion Magnet Chart Guide | for Educational & Professional Precision | 8.5” x 11” Size | Waterproof Vinyl & Easy-to-Read | American to Metric Equivalent Measurements
-
UNLOCK ACCURATE MEASUREMENTS WITH EASY-TO-READ CONVERSION CHARTS!
-
PERFECT FOR STUDENTS WITH INSTANT ACCESS TO KEY CONVERSION METRICS!
-
COMPACT 8.5 X 11 SIZE FOR EASY USE IN CLASSROOMS AND WORKSHOPS!
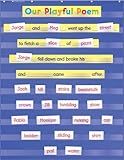
Standard Pocket Chart
- DURABLE NYLON DESIGN ENSURES LONG-LASTING CLASSROOM USE.
- VERSATILE POCKETS IDEAL FOR MATH, VOCABULARY, AND VISUALS.
- ENHANCES INTERACTIVE LEARNING FOR STUDENTS AND TEACHERS ALIKE.
Host Defense The Mushroom Cultivator: A Practical Guide to Growing Mushrooms at Home by Paul Stamets and J.S. Chilton - Book About Mycology & Growing Mushrooms At-Home - Mushroom Growing Guide
- MASTER 15 MUSHROOM TYPES WITH EXPERT TIPS FROM PAUL STAMETS' GUIDE.
- LEARN MUSHROOM GENETICS & LIFECYCLE FOR OPTIMAL GROWING SUCCESS.
- CERTIFIED ORGANIC MYCELIUM ENSURES QUALITY, SAFETY, AND SUSTAINABILITY.
Visual Basic Cheat Sheet, Syntax Table & Chart, Complete Reference Guide by Examples: Visual Basic Language Syntax Book, Cover all VB Syntaxes, Quick Study Workbook (Cheat Sheet Series)

The Pediatrician's Guide to Feeding Babies and Toddlers: Practical Answers To Your Questions on Nutrition, Starting Solids, Allergies, Picky Eating, and More (For Parents, By Parents)
React: The Comprehensive Guide to Mastering React.js with Hands-on Examples, Expert Tips, and Everything You Need to Build Dynamic, Scalable User Interfaces (Rheinwerk Computing)
R Cheat Sheet, Syntax Table & Chart, Complete Reference Guide by Examples: R Language Syntax Book, Cover all Basic R Syntaxes, Quick Study Workbook (Cheat Sheet Series)
To pass data in Laravel with Chart.js, you need to first retrieve the data you want to display in your chart from your database or any other source. Once you have the data, you can pass it to your blade view by using the compact() function in your controller.
In your blade view, you can then access the data using the JavaScript framework Chart.js to create and customize your chart. You can pass the data to Chart.js by encoding it using json_encode() in your view file.
Once you have passed the data to Chart.js, you can use its functions and options to create different types of charts such as bar charts, line charts, pie charts, etc. Customize the appearance and behavior of your chart by tweaking the various options provided by Chart.js.
By following these steps, you can effectively pass data in Laravel with Chart.js and create dynamic and interactive charts for your web application.
How to set up Chart.js options for customization in Laravel?
To set up Chart.js options for customization in Laravel, you can follow these steps:
- First, install Chart.js in your Laravel project by running the following command in your terminal:
npm install chart.js --save
- Next, create a new Chart.js chart in your Laravel project. You can create a new Chart.js chart in your view file using the following code snippet:
- Now, you can define the options for customizing your Chart.js chart. You can set up options such as title, legend, tooltips, and more by creating an options object and passing it to the Chart.js constructor. Here's an example of customizing options for your Chart.js chart:
var ctx = document.getElementById('myChart').getContext('2d'); var myChart = new Chart(ctx, { type: 'bar', data: { labels: ['Red', 'Blue', 'Yellow', 'Green', 'Purple', 'Orange'], datasets: [{ label: '# of Votes', data: [12, 19, 3, 5, 2, 3], backgroundColor: [ 'rgba(255, 99, 132, 0.2)', 'rgba(54, 162, 235, 0.2)', 'rgba(255, 206, 86, 0.2)', 'rgba(75, 192, 192, 0.2)', 'rgba(153, 102, 255, 0.2)', 'rgba(255, 159, 64, 0.2)' ], borderColor: [ 'rgba(255, 99, 132, 1)', 'rgba(54, 162, 235, 1)', 'rgba(255, 206, 86, 1)', 'rgba(75, 192, 192, 1)', 'rgba(153, 102, 255, 1)', 'rgba(255, 159, 64, 1)' ], borderWidth: 1 }] }, options: { scales: { y: { beginAtZero: true } } } });
- You can further customize your Chart.js chart by adding more options such as title, legend, tooltips, animation, and more. Consult the Chart.js documentation for more customization options: https://www.chartjs.org/docs/latest/configuration/
By following these steps, you can set up Chart.js options for customization in your Laravel project.
What is the best way to integrate Chart.js into Laravel?
The best way to integrate Chart.js into Laravel is to first install Chart.js using npm or include it via a CDN in your Laravel project. Once you have Chart.js installed, you can use it to create interactive and dynamic charts in your Laravel application.
To integrate Chart.js into your Laravel application, you can create a helper function or a blade component to generate the chart data and display it on your views. You can pass data to the chart using JSON, or fetch data using Ajax requests from your Laravel backend.
Another option is to use a Laravel charting package like "ConsoleTVs/Charts" that provides a simple API for creating and displaying charts in your Laravel application. This package simplifies the process of integrating Chart.js into Laravel and provides additional features and customization options.
Overall, the best way to integrate Chart.js into Laravel depends on your specific requirements and preferences. You can choose the method that best fits your project needs and makes it easy to create and display charts in your Laravel application.
What is the function of the view file in displaying Chart.js data in Laravel?
In Laravel, the view file is responsible for rendering the content of a web page, including displaying data from Chart.js. The view file typically contains HTML code, along with PHP code for accessing and displaying data from the controller. When using Chart.js in Laravel, the view file will include the necessary JavaScript code to create and display the chart using the data passed from the controller. The view file acts as the final step in the data flow process, presenting the chart to the user in a visually appealing and interactive manner.
What is the process of updating live data in Chart.js in Laravel?
To update live data in Chart.js in Laravel, you can follow these steps:
- Set up a route in your Laravel application to handle the live data updates. This route should return the updated data in JSON format.
- Create a JavaScript function that makes an AJAX request to the route you set up in step 1. This function should fetch the updated data and update the chart with the new values.
- Call the JavaScript function that you created in step 2 at regular intervals using setInterval or another method of your choice to continuously update the live data in the chart.
By following these steps, you can update live data in Chart.js in your Laravel application.