
Best Tools to Buy for Accurate IP Tracking in NGINX in July 2026
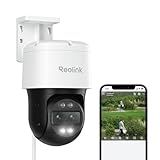
REOLINK PTZ Security Camera System 4K, IP PoE 360 Camera with Dual-Lens, Auto 6X Hybrid Zoomed Tracking, 355 Pan & 90 Tilt, Outdoor Surveillance, AI Detection, TrackMix PoE
- DUAL VIEW EXCELLENCE: CAPTURE DETAILS AND PANORAMAS ON ONE SCREEN.
- SMART TRACKING & ZOOM: AUTO-TRACKING WITH FLEXIBLE ZOOM OPTIONS INCLUDED.
- INSTANT ALERTS FOR SAFETY: GET NOTIFIED OF SUSPICIOUS ACTIVITY IMMEDIATELY.


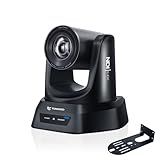
TONGVEO 4K NDI PTZ Camera AI Auto-Tracking 20X Optical Zoom HDMI IP Live Streaming SDI USB3.0 PoE LAN Supports for Church Worship Event Video Conference YouTube OBS vMix Zoom Teams and More
-
STUNNING 4K CLARITY: ELEVATE STREAMS WITH 4K/30FPS RESOLUTION.
-
SEAMLESS NDI INTEGRATION: EFFORTLESS LIVE STREAMS WITH POPULAR SOFTWARE.
-
INTELLIGENT AI TRACKING: KEEP SUBJECTS PERFECTLY FRAMED, EVEN IN MOTION.
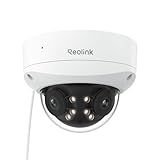
REOLINK 4K 8MP 180° Dual-Lens PoE IP Camera, IK10 Vandal-Proof, Person/Vehicle/Animal Detection, Spotlight Color Night Vision, 2 Way Talk, IP67 Weatherproof, No PT Supported, Duo 2V PoE
-
CAPTURE EVERY DETAIL WITH 8MP DUAL-LENS 180° VIEW!
-
SMART AI ALERTS FOR ENHANCED SECURITY IN REAL-TIME!
-
VANDAL-PROOF & VERSATILE: BUILT TO LAST IN ANY ENVIRONMENT!
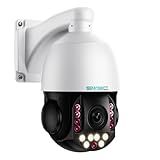
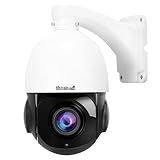
SV3C 36X Zoom PTZ POE Camera Outdoor, Auto Tracking 4K ONVIF IP Wired Camera, Person Vehicle Motion Detection, Floodlight Color Night Vision, Two Way Audio, Camhipro, Preset, BlueIris, 24/7 Recording
- 4K CLARITY & NIGHT VISION: CAPTURE DETAILS DAY & NIGHT WITH 135FT VISIBILITY.
- RELIABLE POE & ONVIF COMPLIANCE: HASSLE-FREE SETUP WITH VERSATILE COMPATIBILITY.
- 360° COVERAGE & SMART ALERTS: TRACK MOTION; MINIMIZE FALSE ALARMS WITH PRECISION.

Amcrest 1080P WiFi Camera Indoor, Nanny Cam, Dog Camera, Sound & Baby Monitor, Human & Pet Detection, Motion-Tracking, 2.4Ghz Only, Pan/Tilt Wireless IP Camera, Night Vision, Smart Home ASH21-B
- 1080P HD STREAMING: CAPTURE CLEAR, LIVE 1080P VIDEO VIA APP CONTROL.
- AI HUMAN DETECTION: ENJOY ADVANCED, CLOUD-FREE MONITORING WITH ALERTS.
- NIGHT VISION UP TO 33FT: RELIABLE VISIBILITY IN TOTAL DARKNESS FOR SAFETY.

NOYAFA NF-8506 Network Cable Tester with RJ45 Crimp Tool, CAT5 CAT6 Network Tester, IP Scan, PoE Ping Test, Network Rate Test, Port Flashing, RJ45 RJ11 Ethernet Cable Tester with Crimper Stripper
- COMPREHENSIVE TESTING: ALL-IN-ONE TESTER FOR CABLES, NETWORKS, AND POE.
- USER-FRIENDLY: HANDHELD DESIGN WITH INTUITIVE LED INDICATORS FOR EASY USE.
- DURABLE TOOL: HEAVY-DUTY CRIMPING TOOL FOR LONG-LASTING PERFORMANCE IN FIELDWORK.

Tapo 2K Indoor/Outdoor Dual Lens Pan/Tilt Wired Security Camera - 125° Wide-Angle View + 6mm Zoom, Motion Track, Person/Vehicle Detection, Subscription-Free Local Storage or Optional Cloud, C246D
- DUAL 2K LENS FOR COMPREHENSIVE COVERAGE AND DETAIL
- AI DETECTION OFFERS RELEVANT ALERTS WITHOUT SUBSCRIPTION FEES
- EASY INSTALLATION WITH IP65 RATING FOR INDOOR/OUTDOOR USE
JideTech 200X Hybrid Zoom 4K 8MP Outdoor PTZ IP PoE Security Camera, Auto Tracking Dome Surveillance Camera, Human/Vehicle Detection, 492ft IR Night Vision, Two-Way Talk, IP66,RTMP,Blue Iris for ONvif
-
200X HYBRID ZOOM: UNMATCHED 4K CLARITY AT 20FPS FOR DETAIL-RICH SECURITY.
-
SMART AI TRACKING: AUTO-DETECTS AND FOLLOWS HUMANS/VEHICLES IN REAL-TIME.
-
IP66 WATERPROOF: RELIABLE PERFORMANCE IN ANY WEATHER FOR ULTIMATE PEACE OF MIND.
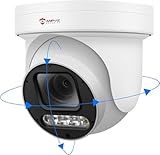
Anpviz 6MP PoE PTZ Camera Outdoor, 5X Optical Zoom 2.7~13.5mm Lens, Pan Tilt Zoom IP Security Camera with Human Vehicle Detection, Spotlight&Sound Alarm, SD Card Slot, IP66, NDAA Compliant (U Series)
- SMOOTH 6MP HD VIDEO & EASY POE INSTALLATION FOR STABILITY
- VERSATILE PAN-TILT-ZOOM & IP66 FOR INDOOR/OUTDOOR COVERAGE
- SMART ALERTS & NIGHT VISION FOR ENHANCED HOME SECURITY
To get the real client IP directly from NGINX, you can use the ngx_http_realip_module module. This module allows NGINX to replace the client IP address in the request headers with the address sent in the X-Forwarded-For or X-Real-IP headers.
Follow these steps to configure NGINX to obtain the real client IP:
- Open the NGINX configuration file typically located at /etc/nginx/nginx.conf or /etc/nginx/conf.d/default.conf.
- Inside the http block, add the following line to load the ngx_http_realip_module module: load_module /usr/lib/nginx/modules/ngx_http_realip_module.so;
- Within the http block, add the following lines to set the real_ip_header variable to the appropriate header value: set_real_ip_from 10.0.0.0/8; real_ip_header X-Forwarded-For; Replace 10.0.0.0/8 with the appropriate CIDR notation for your trusted proxy IP address or subnet range.
- Below the previous lines, add the following line to restore the original client IP address: real_ip_recursive on;
- Save the configuration file and exit the text editor.
- Test the NGINX configuration for syntax errors: nginx -t
- If the test is successful, reload NGINX to apply the changes: systemctl reload nginx
Once NGINX is configured, it will use the value from the X-Forwarded-For or X-Real-IP header as the client IP address instead of the default value obtained by NGINX. This allows you to accurately trace the client IP in your NGINX logs or use it for any other purposes within your NGINX configuration.
How to configure NGINX to obtain the client IP address?
To configure NGINX to obtain the client IP address, you can follow these steps:
- Open your NGINX configuration file. Depending on the operating system and NGINX installation method, the file could be located at /etc/nginx/nginx.conf or /etc/nginx/conf.d/default.conf or /etc/nginx/sites-available/default.
- Inside the main http block, add or modify the http or server block to include the following line: set_real_ip_from 0.0.0.0/0; # Set the IP range from which NGINX should trust proxy requests real_ip_header X-Forwarded-For; # The header that contains the real IP address Alternatively, if you're behind a load balancer or reverse proxy, you can use the X-Real-IP header instead of X-Forwarded-For: real_ip_header X-Real-IP;
- Save the configuration file and exit the editor.
- Test the configuration syntax for any errors by running the command: nginx -t
- If there are no syntax errors, reload the NGINX configuration to apply the changes by running the command: nginx -s reload
After configuring NGINX to obtain the client IP address, you can access it in your application or web server logs using the REMOTE_ADDR environment variable.
How to check if NGINX is running on a server?
You can use the following command to check if NGINX is running on a server:
sudo systemctl status nginx
This command will display the status of the NGINX service. If NGINX is running, you will see output similar to:
● nginx.service - The NGINX HTTP Server Loaded: loaded (/lib/systemd/system/nginx.service; enabled; vendor preset: enabled) Active: active (running) since Tue 2021-04-13 10:00:00 PDT; 1h ago Docs: http://nginx.org/en/docs/ Main PID: 12345 (nginx) Tasks: 2 (limit: 4915) Memory: 4.0M CPU: 1.000s CGroup: /system.slice/nginx.service ├─12345 nginx: master process /usr/sbin/nginx -g daemon on; master_process on; └─12346 nginx: worker process
If NGINX is not running, you will see output indicating that the service is inactive or not found.
Note: The exact command may vary depending on the operating system and how NGINX is installed on the server.
What is an NGINX rewrite rule?
An NGINX rewrite rule is a configuration setting that allows rewriting or modifying URL paths or query strings sent by clients before processing the request. It enables the server to redirect or serve content from different locations based on certain conditions defined by regular expressions. NGINX rewrite rules are commonly used for URL redirection, modifying query strings, masking internal file paths, and implementing SEO-friendly URLs.
How to block specific IP addresses using NGINX?
To block specific IP addresses using NGINX, you can follow these steps:
- Open the NGINX configuration file. This file is typically located in the /etc/nginx/ directory and is named nginx.conf.
- Inside the http block, add a new server block to define the configurations for blocking the IP addresses: http { ... server { ... } }
- Inside the server block, add a new location block to specify the path or URL where you want to block the IP addresses: http { ... server { ... location /block/path { ... } } }
- Inside the location block, use the deny directive to specify the IP addresses you want to block: http { ... server { ... location /block/path { deny 192.168.1.1; deny 10.0.0.0/24; ... } } } You can use either the IP address or IP range format (CIDR notation) to specify the IP addresses you want to block.
- Save the configuration file and exit the text editor.
- Test the NGINX configuration to ensure it is valid: $ nginx -t
- If the configuration test is successful, reload or restart NGINX for the changes to take effect: $ systemctl reload nginx or $ service nginx restart
With these steps, NGINX will deny access to the specified IP addresses for the specified path or URL. If any requests come from these IP addresses, NGINX will return a forbidden (403) error.