Best All-In-One Printers for Wireless Printing to Buy in July 2026
Brother Work Smart 1360 Wireless Color Inkjet All-in-One Printer with Automatic Duplex Printing and 1.8” Color Display | Includes Refresh Subscription Trial(1) (MFC-J1360DW) (Uses LC501 Series Inks)
- ALL-IN-ONE FUNCTIONALITY: PRINT, COPY, AND SCAN FOR HOME EFFICIENCY.
- EASY CLOUD ACCESS: PRINT AND SCAN FROM POPULAR CLOUD APPS SEAMLESSLY.
- FAST PRINTING SPEEDS: SAVE TIME WITH UP TO 16 PPM BLACK & 9 PPM COLOR.


Canon PIXMA TR4720 All-in-One Wireless Printer, Home Use with Auto Document Feeder, Mobile Printing and Built-in Fax, Black
-
ENJOY FAST 4-IN-1 CAPABILITIES: PRINT, COPY, SCAN, AND FAX EASILY.
-
SMART INK MANAGEMENT: ALEXA ALERTS YOU WHEN RUNNING LOW ON SUPPLIES.
-
ENERGY-EFFICIENT DESIGN: ONLY 7W POWER CONSUMPTION; ECO-FRIENDLY CHOICE!

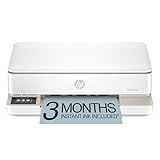
HP OfficeJet Pro 8125e Wireless All-in-One Color Inkjet Printer, Print, scan, Copy, ADF, Duplex Printing Best-for-Home Office, 3 Month Instant Ink Trial Included, AI-Enabled (405T6A)
-
FAST PRINTING: UP TO 20 PPM BLACK AND 10 PPM COLOR FOR EFFICIENCY.
-
HP AI FORMATTING ENSURES PRECISE WEB PAGE PRINTS WITH NO WASTE.
-
WIRELESS CONNECTIVITY LETS YOU PRINT EASILY FROM ANY DEVICE.
Epson EcoTank ET-2800 Wireless Color All-in-One Cartridge-Free Supertank Printer with Scan and Copy – The Ideal Basic Home Printer - Black, Medium
- CARTRIDGE-FREE CONVENIENCE: SAVE TIME AND MONEY WITH ECOTANK PRINTING.
- MASSIVE INK SAVINGS: CUT REPLACEMENT COSTS BY UP TO 90% VS. CARTRIDGES.
- ECO-FRIENDLY CHOICE: REDUCE LANDFILL WASTE WITH CARTRIDGE-FREE DESIGN.
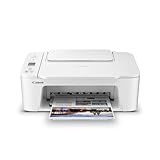
Canon PIXMA TS3720 Wireless All-in-One Printer (6671C022)
-
ALL-IN-ONE: PRINT, COPY, AND SCAN FOR ULTIMATE CONVENIENCE.
-
FAST PRINTING: ENJOY QUICK PRINTS AT 7.7IPM BLACK, 4IPM COLOR.
-
MOBILE PRINTING: EASILY PRINT FROM SMARTPHONES WITH CANON PRINT APP.
HP Envy 6155e Wireless All-in-One Color Inkjet Printer, Portobello, Print, scan, copy, Duplex printing Best-for-home, 3 month Instant Ink trial included, AI-enabled (714L5A)
-
FAST, QUALITY PRINTS: ENJOY 7 PPM COLOR AND 10 PPM BLACK FOR EVERYDAY TASKS.
-
HP AI PRECISION: PRINT EMAILS/WEB PAGES FLAWLESSLY-NO WASTED PAPER.
-
SMART CONNECTIVITY: RELIABLE DUAL-BAND WI-FI ENSURES HASSLE-FREE PRINTING.
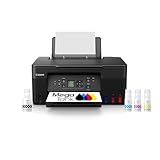
Canon MegaTank G3270 All-in-One Wireless Inkjet Printer. for Home Use, Print, Scan and Copy
- WIRELESS PRINT/COPY/SCAN FOR ULTIMATE CONVENIENCE!
- UP TO 2 YEARS OF INK INCLUDED FOR MASSIVE SAVINGS!
- PRINT 6,000 B&W & 7,700 COLOR PAGES FROM ONE INK SET!
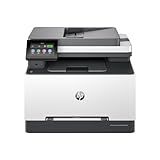
HP Color Laserjet Pro MFP 3301sdw Wireless All-in-One Color Laser Printer, Scanner, Copier, Best-for-Office (499Q3F)
-
FAST PRINTING SPEEDS: UP TO 26 PPM FOR EFFICIENT DOCUMENT HANDLING.
-
VIVID COLOR QUALITY: NEXT-GEN TERRAJET TONER FOR VIBRANT, PROFESSIONAL PRINTS.
-
VERSATILE FEATURES: AUTO 2-SIDED PRINTING & 250-SHEET INPUT FOR PRODUCTIVITY.
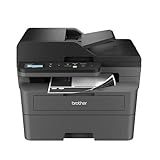
Brother DCP-L2640DW Wireless Compact Monochrome Multi-Function Laser Printer with Copy and Scan, Duplex, Mobile, Black & White | Includes Refresh Subscription Trial(1), Works with Alexa
-
COMPACT 3-IN-1 DESIGN FOR SMALL BUSINESS EFFICIENCY AND PRODUCTIVITY.
-
FAST PRINTING (36 PPM) & SCANNING (23.6 IPM) SAVES VALUABLE TIME.
-
MOBILE APP FOR SEAMLESS MANAGEMENT AND EASY TONER SUBSCRIPTIONS.
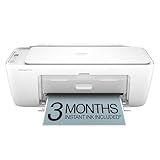
HP DeskJet 2827e Wireless All-in-One Color Inkjet Printer, Scanner, Copier, Best-for-Home, 3 Month Instant Ink Trial Included, AI-Enabled (6W7F5A)
- WIRELESS PRINTING: EFFORTLESS CONNECTIONS WITH RELIABLE WI-FI TECH.
- INSTANT INK SUBSCRIPTION: NEVER RUN OUT-GET INK DELIVERED TO YOUR DOOR!
- COMPACT & ECO-FRIENDLY: DESIGNED TO FIT ANY SPACE, MADE WITH 60% RECYCLED MATERIAL.
To set up an all-in-one printer for wireless printing, start by unboxing the printer and placing it near a power source and within range of your wireless router. Plug the printer into a power outlet and turn it on. Follow the printer's on-screen instructions to select language, country, and time settings, and install any included ink cartridges and paper. Consult the printer's manual to initiate the wireless setup. This usually involves accessing the printer's control panel to find the wireless settings menu. Use this menu to search for and select your Wi-Fi network, then enter your Wi-Fi password when prompted. If your printer supports Wi-Fi Protected Setup (WPS) and your router does too, you can press the WPS button on both devices to establish a connection quickly. Once connected to the network, you may need to install the printer software on your computer or mobile device. Visit the manufacturer's website to download the latest drivers and software compatible with your device's operating system. Install the software and follow the installation prompts to add the printer to your networked devices, ensuring that you select the wireless option when choosing the connection type. After the software installation is complete, print a test page to confirm that your setup is successful and that your printer is communicating wirelessly with your devices.
What is a print queue and how to manage it?
A print queue is a lineup of print jobs that are intended to be processed by a printer. When users send documents to a printer, they are often placed in a queue where they wait their turn to be printed. This system is especially useful in environments where multiple users and devices share a single printer, ensuring an organized and efficient print process.
Managing a print queue effectively involves several tasks to ensure that documents are printed in a timely and orderly manner. Here are some strategies and steps for managing a print queue:
- Accessing the Print Queue: On Windows: Go to "Devices and Printers" in the Control Panel, right-click on the printer you are using, and choose "See what’s printing." On macOS: Go to "System Preferences," select "Printers & Scanners," choose your printer, and click on "Open Print Queue."
- Monitoring the Queue: Regularly check the print queue window to see the status of all documents. This will help identify any blockages or errors that might need resolution.
- Prioritizing Jobs: Some environments may allow for reordering jobs in the queue. You can move jobs up or down if certain documents need to be printed sooner.
- Pausing & Resuming: Many print queue interfaces allow you to pause and resume print jobs or the entire queue if necessary, which is useful for prioritizing tasks or addressing printer issues.
- Canceling Print Jobs: If a print job is no longer needed or causing issues, it can be canceled by selecting it in the queue and choosing the cancel option.
- Checking Printer Status: Ensure that the printer is online, has enough paper, and is not jammed or out of ink/toner.
- Troubleshooting Errors: If jobs are stuck in the queue, troubleshoot common issues such as connectivity problems, printer errors, or driver issues.
- Updating Printer Drivers: Outdated printer drivers can cause printing problems. Ensure that the printer drivers are up to date.
- Restarting Printer and Computer: As a troubleshooting step, sometimes restarting the printer and the computer can resolve stuck jobs or communication issues.
- Network Printing Considerations: If the printer is shared on a network, ensure network connections are stable and all users are properly authenticated to use the printer.
By effectively managing the print queue, you can minimize downtime and enhance productivity in any setting that relies on printing functions.
How to configure an all-in-one printer on a home network?
Configuring an all-in-one printer on a home network involves several steps, including setup, driver installation, and network configuration. Here’s a detailed guide that should help you through the process:
Step 1: Unbox and Prepare the Printer
- Unpack the Printer: Remove the printer from the box along with any packaging materials.
- Install Ink/Toner Cartridges: Follow the manufacturer's instructions to install the cartridges.
- Load Paper: Place a stack of plain paper into the appropriate tray.
Step 2: Connect the Printer to Power
- Power Connection: Plug the printer into a power outlet and turn it on.
- Initial Setup: Follow any on-screen instructions or setup wizards on the printer's control panel. This might include setting the language, date, and time.
Step 3: Connect the Printer to the Network
There are generally two methods to connect your printer to the network: wirelessly or via a wired Ethernet connection.
Option A: Wireless Connection
- Wi-Fi Setup: Access the printer's control panel. Navigate to the Wireless Setup Wizard or a similar option under the network settings. Select your home Wi-Fi network from the list and enter the Wi-Fi password.
- WPS Method (if supported by your router): Press the WPS button on your router. Within 2 minutes, press the WPS button on your printer (or follow WPS instructions in the printer menu).
Option B: Wired Connection
- Ethernet Cable: Connect an Ethernet cable from the printer to an available port on your router. The printer should automatically obtain an IP address from the router.
Step 4: Install Printer Drivers and Software
- Install Drivers: Go to the printer manufacturer's website and download the latest drivers for your printer model. Run the installer and follow the on-screen instructions. Choose the networked printer option when prompted.
- Use Provided Installation CD: Alternatively, use the CD that came with the printer to install drivers.
Step 5: Add the Printer to Your Computer
Windows
- Settings: Open Settings > Devices > Printers & Scanners. Click Add a printer or scanner and select your printer from the list.
- Control Panel (alternative method): Go to Control Panel > Devices and Printers > Add a printer. Follow the wizard to add your printer.
macOS
- System Preferences: Open System Preferences > Printers & Scanners. Click the + button to add your printer. Select your printer from the list and click Add.
Step 6: Test the Printer
- Print a Test Page: Use your computer or the printer's control panel to print a test page and check the quality.
- Scan and Copy Functions (if applicable): Test the scanning and copying capabilities to ensure all functions are operational.
Troubleshooting
- Cannot Find Printer: Ensure the printer is on the same network as your computer, and check for any firewalls or antivirus software that might block printer detection.
- Connection Issues: Restart both the printer and the router to refresh network settings.
- Driver Issues: Confirm you have the correct driver and software for your operating system and printer model.
By following these steps, your all-in-one printer should be successfully configured on your home network, allowing you to print, scan, and copy wirelessly.
How do you install printer drivers for wireless printing?
Installing printer drivers for wireless printing typically involves a few steps. Here's a general guide to help you through the process:
- Check Printer Compatibility: Ensure that your printer supports wireless printing and is compatible with your computer’s operating system.
- Connect Printer to Wi-Fi: Turn on the printer and ensure it’s within range of your Wi-Fi network. Use the printer's control panel to navigate to the network settings. Select your Wi-Fi network from the list and enter the password if required. The printer should connect, often indicated by a Wi-Fi or connection status light on the printer.
- Download Printer Drivers: Visit the printer manufacturer’s website. Navigate to the ‘Support’ or ‘Downloads’ section. Search for your printer model and download the latest drivers compatible with your operating system.
- Install the Printer Drivers: Run the downloaded installer file. Follow on-screen instructions, which usually include selecting the connection type (wireless), and approving license agreements. The installer might ask you to temporarily connect your printer to the computer using a USB cable during the process to complete the setup, especially for first-time installations.
- Add Printer to Your Computer: Windows: Go to Settings > Devices > Printers & scanners. Select Add a printer or scanner, and wait for your printer to appear in the list. Select your printer and click Add device. macOS: Open System Preferences > Printers & Scanners. Click the + button to add a printer. Select your printer from the list and follow any additional on-screen instructions.
- Test the Installation: Print a test page to ensure that the printer and computer are communicating correctly.
- Additional Software: If your printer has additional software or utilities available, consider installing them to enhance functionality, like scanning or maintenance tasks.
If you encounter any issues during installation, refer to the printer’s manual or manufacturer’s website for troubleshooting tips specific to your model.
How to set up wireless printing on a mobile device?
Setting up wireless printing on a mobile device can be a convenient way to print documents, photos, and more without having to transfer them to a computer. Here's a general guide to help you set up wireless printing on your mobile device:
Step 1: Ensure Printer Compatibility
- Check for Wireless Capability: Ensure your printer is Wi-Fi enabled. Check the printer’s manual or specifications.
- Update Firmware: If needed, update your printer's firmware to support mobile printing.
Step 2: Connect Printer to Wi-Fi Network
- Using Printer’s Control Panel: Access the settings menu on your printer and select the option to connect to a Wi-Fi network. Follow the prompts to enter your Wi-Fi network name (SSID) and password.
Step 3: Install Printer on Your Mobile Device
- Using Built-In Options or Manufacturer’s App: iOS Devices: Uses AirPrint. Ensure your printer supports AirPrint. Connect your iOS device to the same Wi-Fi network. Android Devices: Uses Google Cloud Print (though it was discontinued) or manufacturer apps.
- Download Manufacturer’s App: Go to the App Store or Google Play Store. Search for the printer manufacturer’s official app (e.g., HP Smart, Canon PRINT, Epson iPrint). Download and install the app.
- Set Up the Printer in the App: Open the manufacturer’s app and follow the instructions to locate and add your printer. Make sure your mobile device is connected to the same Wi-Fi network as the printer.
Step 4: Printing from Your Mobile Device
- Using the Print Feature: Open the document, email, or photo you want to print. Tap the “Share” or "Menu" icon (e.g., three dots or lines). Select “Print” from the available options. Choose your printer from the list. Adjust print settings if necessary (e.g., number of copies, page range, color). Tap “Print”.
- Using Manufacturer’s App: Open the app and select the type of document or media you wish to print. Follow the app’s instructions to find and select your document, then print.
Troubleshooting Tips
- Check Connections: Ensure both your printer and mobile device are connected to the same Wi-Fi network.
- Restart Devices: Try restarting your printer and mobile device if you experience connectivity issues.
- Update Apps/Firmware: Ensure you have the latest app version and printer firmware for compatibility.
- Consult Manufacturer Support: If issues persist, refer to the printer's user manual or contact the manufacturer’s customer service for support.
By following these steps, you should be able to set up and use wireless printing on your mobile device.